background image

Charging and servicing the battery 

  Charge the battery fully as soon as possible after each round of golf, even if there is 

still enough charge left in the battery for further use. Always begin a round of golf 
with a fully charged battery. 

  The battery should be stored flat in a warm place. Once the battery is charged,  

disconnect it from the power supply. 

Important:

 Always ensure the battery  

is charged before storing it. 

  If the battery has not been used for a long period of time, for example over winter, 

connect the battery to the power supply and charge it again. If it is not used for  
more than 3 months, recharge it during this period.

  Only use the charger supplied with the trolley.

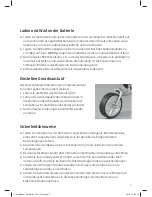
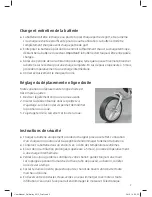
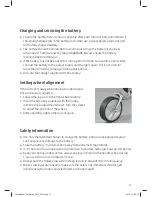
Setting wheel alignment

If the cart veers away when driving straight ahead, 
this can be easily adjusted:
1.  Loosen the lug nut on the front wheel slightly.
2.  Insert the Allen key supplied with the trolley  

into the small adjustment screws. Turn the screws  
to adjust the position of the wheel.

3.  After adjusting, tighten the lug nut again.

13

Safety information

  Use only the intended charger to charge the battery. Using an unapproved charger  

can cause severe damage to the battery. 

  Store the battery in a dry location away from extreme temperatures.

  If it is not used for a longer period (more than 3 months), recharge it during this period.

  Keep your trolley under control: always keep your hand on the handle when driving  

so you can stop or avoid objects in time.

  Always park the trolley crosswise in steep terrain to prevent it from rolling away.

  When crossing water hazards, make sure the axle is not immersed. If water gets  

into the axle, the motor and electronics can be damaged.

User Manual_Golftrolley 2015_Print.indd   13

24.12.14   08:53

Содержание Fairway Buddy TS

Страница 1: ...Fairway Buddy TS Bedienungsanleitung Manuel d utilisation User manual User Manual_Golftrolley 2015_Print indd 1 24 12 14 08 53...

Страница 2: ...User Manual_Golftrolley 2015_Print indd 2 24 12 14 08 53...

Страница 3: ...tbarer Caddyrahmen mit Steuergriff und Bedienungseinheit Scorecardhalter mit Schrauben und Inbusschl ssel Schirmhalter Getr nkehalter Lithium Ionen Akku 10 Ah Batterie Ladeger t Ersatzdichtungen Schl...

Страница 4: ...terung oben in der gew nschten Position einrasten und fixieren Batterie auf Vorrichtung befestigen 2 B nder mit Klettverschluss und Kabel einstecken Abb 4 Scorecardhalter an Caddyrahmen festschrauben...

Страница 5: ...ren Sie den mitgelieferten Inbusschl ssel in die kleinen Justierschrauben Durch Drehen der Schrauben wird die Position des Rades ver ndert 3 Nach erfolgter Justierung die Radmutter wieder anziehen 5 S...

Страница 6: ...wieder einschalten Knopf A 1 Sek dr cken Spezielle Funktion 2 10 Sek Distanztimer Bei Stillstand Knopf B 3 Sek dr cken bis die LED Anzeige schnell blinkt dann loslassen Trolley f hrt w hrend 10 Sek in...

Страница 7: ...bulaires Cadre pliable avec poign e de commande et unit de commande Support de carte de score avec vis et cl Allen Support de parapluie Support de boissons Batterie lithium ion 10 Ah Chargeur Joints d...

Страница 8: ...sac enclencher dans la position souhait e et fixer Fixer la batterie sur son support 2 sangles avec attaches de type Velcro et connecter les c bles ill 4 Support de carte de score se fixe si souhait...

Страница 9: ...a roue avant 2 Ins rer la cl Allen fournie dans les petites vis d ajustage La rotation des vis permet de modifier la position de la roue 3 L ajustage termin resserrer l crou de la roue 9 Instructions...

Страница 10: ...frein parking appuyer 1 seconde sur le bouton A Fonction sp ciale 2 distance d loignement 10 secondes chariot immobile appuyer 3 secondes sur le bouton B jusqu au clignotement rapide de la LED et rel...

Страница 11: ...th double tube motor Collapsible caddy frame with control handle and panel Scorecard holder with screws and Allen key Umbrella holder Beverage holder Lithium ion 10 Ah battery Charger Replacement seal...

Страница 12: ...st click into desired position and secure Attach the battery to the trolley using the 2 Velcro straps and plug in the cable Fig 4 Scorecard holder screw on to the caddy frame if desired tighten the sc...

Страница 13: ...ad this can be easily adjusted 1 Loosen the lug nut on the front wheel slightly 2 Insert the Allen key supplied with the trolley into the small adjustment screws Turn the screws to adjust the position...

Страница 14: ...e parking brake press button A for 1 second Special function 2 10 second distance timer While the trolley is stationary press button B for 3 seconds until the LED display flashes rapidly and then rele...

Страница 15: ...User Manual_Golftrolley 2015_Print indd 15 24 12 14 08 53...

Страница 16: ...00 Thalwil T 41 43 37799 02 F 41 43 37799 05 info golfomania ch www golfomania ch G ltig ab Valable d s le Valid from 1 1 2015 nderungen vorbehalten Sous r serve de modifications Subject to change Use...

Отзывы: