background image


                         GOLDMUND EIDOS 36U – Universal Player - 

20


8    SETTINGS  


The  Setup  Menu  of  the  Eidos  36U  player  presents  many  setup  and  configuration 
options. For most users, the default configuration will be sufficient and will not require 
any changes to the settings. However if you need to configure the player to perfectly 
match  your  home  theater  settings  and  viewing  preferences,  please  refer  to  the 
following sections for details about each configuration option. 


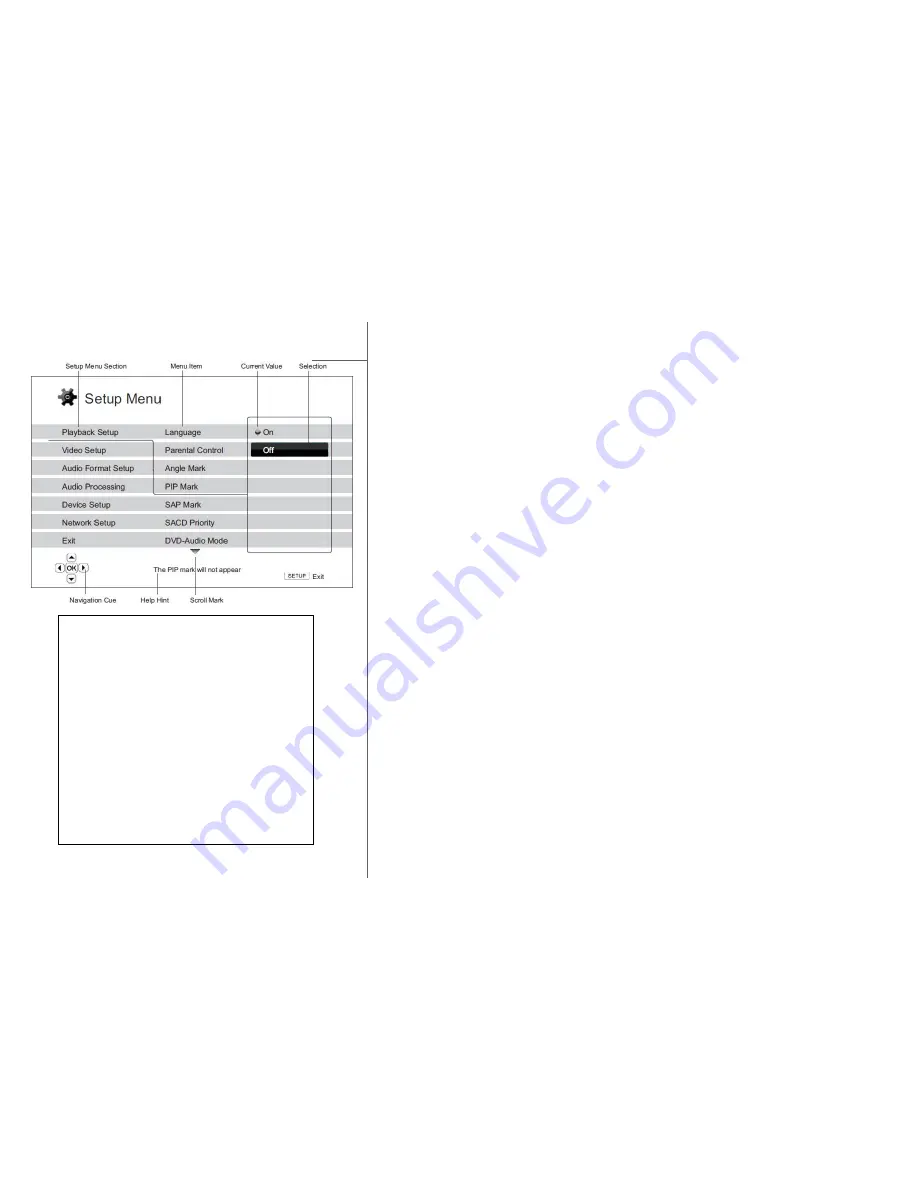
Using the Setup Menu System 
 

In many places of this guide, the player’s Setup Menu needs to be adjusted to match 
your specific audio/video configuration. When performing menu adjustments, we will 
use the following terminology to indicate the location of the desired function: 
 

Setup Menu Section > Menu Item > Selection 


Setup  Menu  Section  is  the  uppermost  Setup  Menu  level.  There  are  six  (6)  Setup 
Menu  sections  listed  in  the  left  column  of  the  Setup  Menu  screen.  They  are: 
Playback Setup, Video Setup, Audio Format Setup, Audio Processing, Device Setup, 
and Network Setup. Menu Item is the parameter to be adjusted which appears in the 
center column of the Setup Menu. Once you enter a Setup Menu Section, the list of 
Menu  Items  and  their  current  value  are  displayed  in  a  box.  Selection  is  the  actual 
numeric  or  descriptive  element  that  represents  the  change  being  made  to  the 
selected parameter. It is the item located to the right of its corresponding Menu Item. 
A Scroll Icon appears at the top or bottom of the menu when there are more Menu 
Items or Selections than what can fit in a screen. You may use the UP and DOWN 
ARROW buttons to scroll the display in order to access additional items. 
The diagram on the left should give a good description of the various elements and 
their context. In this screen we could, for example, instruct you to set the PIP Mark 
parameter  to  Off  in  the  Playback  Setup  section.  To  indicate  where  we  were,  you 
would see the following: Playback Setup > PIP Mark > Off. 
 

NOTE 
 

It  is  possible  that  some  setup  items  are 
grayed-out  and  inaccessible.  This  can  be 
caused  by  disc  still  being  played  back  or 
interlocking  with  mutually  exclusive  setup 
items. Please stop playback or eject the disc 
before trying to change these setup items. If 
you  still  cannot  access  the  setup  item, 
please  check  for  configuration  conflicts  and 
consistency. For example, if “Video Setup > 
1080p24  Output”  is  set  to  “Off”,  the  “DVD 
24p  Conversion”  menu  item  will  be  grayed-
out.  Setting  “1080p24  Output”  to  “On”  will 
enable the “DVD 24p Conversion” setting. 


Содержание EIDOS 36U+

Страница 1: ...USER MANUAL GOLDMUND EIDOS 36U Universal Player...

Страница 2: ...on of sound and image At Goldmund we strive to lead in the creation development and manufacture of the industry s most advanced technologies including audio and video systems home networking and music...

Страница 3: ...OMPATIBILITY 5 2 UNPACKING 6 3 POWER SUPPLY VOLTAGE SELECTION 7 4 CHOICE OF PLAYER LOCATION 7 5 POWER CONNECTION 8 6 BACK PANEL CABLE CONNECTIONS 8 7 BASIC OPERATIONS 11 8 SETTINGS 20 9 CLEANING 32 10...

Страница 4: ...ul installation and use can provide the satisfaction you are expecting The installation instructions must be carried out in full and the mentioned precautions taken to get the expected result and to a...

Страница 5: ...ges or Picture in Picture functions to be used Discs supporting BD Live BD ROM version 2 Profile 2 that provides interactive features when the player is connected to the Internet High quality movie an...

Страница 6: ...obtain the best quality out of your system we recommend using one of the Goldmund acoustic processors Mimesis 32 or Mimesis 16HD 2 UNPACKING You will find in the Eidos 36U Box The universal player it...

Страница 7: ...r 60 Hz mains 4 CHOICE OF PLAYER LOCATION Thanks to the specific quality of the Goldmund Mechanical Grounding and the Goldmund Magnetic Damping construction the choice of the player location is not cr...

Страница 8: ...Unplug the power cord if you are not going to use the player for an extended period of time Hold the power plug when unplugging Do not pull on the cord 6 BACK PANEL CABLE CONNECTIONS 6 1 VIDEO CONNEC...

Страница 9: ...u of the Eidos 36U Setup Audio Format Setup HDMI Audio LPCM PCM connection Connecting to a Receiver Amplifier in PCM or Digital 7 1 5 1 multichannel Goldmund recommends that the greatest care is taken...

Страница 10: ...r If the A V receiver or amplifier only has 5 1ch audio input the REAR L Surround Back Left and REAR R Surround Back Right terminals do not need to be connected Goldmund recommends using a Goldmund In...

Страница 11: ...8 To turn off the player press the POWER button NOTE During DVD and some Blu ray Disc playback pressing the STOP button for the first time brings the player to a pre stop mode You can resume playback...

Страница 12: ...press of the FWD button switches the playback speed in the following sequence 2 Press the REV button on the remote control and the player starts fast reverse playback Each press of the REV button swit...

Страница 13: ...ase use the following steps 1 Press the PAUSE button on the remote control to pause the playback first 2 Press the FWD button to select a forward slow playback speed Each press of the FWD button switc...

Страница 14: ...avigate the menu using the ARROW buttons and then press the ENTER button to make the selection 4 Some menus make use of the COLOR buttons You can select menu functions by pressing the corresponding CO...

Страница 15: ...panel will remain in the selected format The following display formats are available DVD and Blu ray Disc CD and SACD Note In addition to the playback time the on screen display may also contain the...

Страница 16: ...tput The TV screen displays a mute icon The front panel MUTE indicator will also light up 2 Press the MUTE button again to resume audio output Audio Language Track Selection 1 To select the audio lang...

Страница 17: ...utton until the subtitle is turned off Angle Selection 1 When playing a DVD or Blu ray Disc an angle mark will be displayed on the screen when the player detects scenes recorded with multiple angles T...

Страница 18: ...ndary video Picture in Picture or PIP and secondary audio This feature is often called BONUSVIEW When such a disc is played a Picture in Picture mark PIP Mark and a Secondary Audio Program mark SAP Ma...

Страница 19: ...ng standard disc based formats such as Blu ray Disc DVD CD and SACD the Goldmund Eidos 36U Universal player can play media files You can enjoy digital music movies and photos stored on an optical disc...

Страница 20: ...ion the list of Menu Items and their current value are displayed in a box Selection is the actual numeric or descriptive element that represents the change being made to the selected parameter It is t...

Страница 21: ...it indicates that there are more menu items that can be accessed by scrolling with the UP DOWN ARROW buttons For example in the Playback Setup section you may use the UP DOWN ARROW buttons to select...

Страница 22: ...of the selected language is available on the disc the audio track will be played back Subtitle Language To choose the preferred subtitle language for DVD If a subtitle of the selected language is avai...

Страница 23: ...action from normal movie watching SACD Priority To select which audio layer to play for SACD Super Audio CD The options are Multi Channel Play the multi channel surround audio layer Stereo Play the 2...

Страница 24: ...onent Use component video as the primary video output port This setting will ensure that the component output will always be available and displays proper video signals With this configuration the vid...

Страница 25: ...system conversion is performed PAL encoded contents are converted to NTSC output Blu ray Discs encoded with 24Hz frame rate are converted to 60Hz frame rate if neither 1080p24 Output nor Source Direc...

Страница 26: ...ate will be output as 1080p 24Hz without regard to whether the TV can support the 1080p24 signal or not This is useful if the TV can actually support 1080p24 but does not properly state its capability...

Страница 27: ...have a burn in issue Energy Saver Video output will be turned off after 3 minutes of inactivity Many projectors and LCD TVs will go into a standby or sleep mode and turn off their projection lamp or...

Страница 28: ...o fields into a video frame Use this setting if you are certain the disc is made from footage originally shot with a video camera and not with a film camera 2 2 Even This mode should be used when you...

Страница 29: ...ff No Chroma filtering is applied Use this setting if the disc does not have Chroma errors Color Space To select the color space for the HDMI output The available options are Auto Recommended The play...

Страница 30: ...oother color transitions and better gradients The available options are 30 Bits Use the 30 bit per pixel Deep Color mode 36 Bits Use the 36 bit per pixel Deep Color mode Off default Do not use Deep Co...

Страница 31: ...lect region A for Blu ray Press DIMMER DIMMER DIMMER MUTE 2 to select region B for Blu ray Press DIMMER DIMMER DIMMER MUTE 3 to select region C for Blu ray Now turn OFF the player and turn it back ON...

Страница 32: ...E The Goldmund Eidos 36U player does not require any specific maintenance WARNING Always turn the power off before cleaning your player There are no user serviceable parts inside the Eidos 36U Unautho...

Страница 33: ...oaxial Optical HDMI Audio Stereo up to 7 1ch high resolution PCM up to 5 1ch DSD bitstream or LPCM conversion of Dolby Digital Dolby Digital Plus Dolby TrueHD DTS DTS HD High Resolution Audio and DTS...

Страница 34: ...60Hz AC Power Consumption 35W 0 5W Standby SIZE AND WEIGHT 440 W x 370 H x 130 D mm 12 kg WARRANTY 3 years parts and labor Information and product specifications contained in this manual are subject...

Страница 35: ...TE The remote control supports one of three remote codes The default is Code 1 To check the selection code open the battery compartment cover of the remote control and then use a ball point pen to fli...

Отзывы: