background image

GOLDEN EMBERS GAS SYSTEM INSTRUCTIONS:   

CLASS 1 - Fully Automatic - AC11 Series 

 
Golden Embers Gas Burner Systems are supplied as a pre-assembled kit and must only be connected to the gas main by 

a fully licensed gas fitter. All that is required to connect the kit is that it be positioned so that the top of the burner head 

is immediately (at least 15mm) below the underside of the oven floor, points directly up the centre of the burner tube 

hole and the burner bracket is properly secured to the frame or under floor plate of the oven base. The control box is a 

self contained unit and should be placed where convenient, providing the distance from the burner and temperature 

probe is such that the leads are all able to reach. The unit has been designed in cooperation with former AGA personnel 

to ensure compliance with AGA requirements as shipped and has been consistently 2

nd

 tier approved as shipped.* 

 It is the purchaser’s Responsibility to arrange or order Tier 2 or type B testing  and approvals. 

To commission the system

: 1) connect and purge a ¾” gas supply to the ball valve on the side of the burner system. 2) 

Plug in the 240v (or 110v)  mains power lead into the power socket. – It is important to not that the system requires 

correct polarity and proper earth connection to function correctly.   3) Ensure that there are no leaks and light the 

system. (Initially it may take a while for the gas to clear the air from the lines - so you may need to try several times)  
*

Golden Embers terms of supply excludes all testing or compliance procedures unless specifically designated / ordered


Once you get ignition of the pilot the pilot and main burner can be adjusted for optimum operation.


Adjusting the pilot

: The pilot used in these systems is pre-set to the correct levels for the appropriate gas type specified 

at the time of ordering.  The Pilot injector module is predrilled and cannot be adjusted. If the pilot flame is not correctly 

sized then the gas supply pressure needs to be checked and rectified. 


Adjusting the air mix for the main burner

: adjust the air mix for the main burner by screwing the adjusting ring up or 

down. There is a locking nut below this adjusting ring that should be used to lock the ring in the optimum position.  The 

flame should be strong, clear and quiet. The flame in the oven should be as blue as possible. A yellow flame means that 

there is too little air, an orange flame means that there is too much air. A roaring flame means that there is too much air. 

A discoloured flame can also be a sign that there is debris in the burner tube or burner head. 


Adjusting flame size

: If the flame size is too large or too small the gas flow can be adjusted by adjusting the regulator 

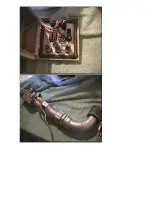
screw. The regulator screw is located under the large cover screw at the top of the control valve (see diagram 2) 

screwing it down will increase gas throughput while screwing it up will decrease gas throughput. Once you have 

adjusted it to the desired size you must securely replace the cover screw, which is sealed with an O-Ring. 

If the regulator is screwed down fully (fully open) and there is still inadequate flame, it means that the supply pressure 

is too low. Check that the supply line is not obstructed or damaged. If there is no obstruction then it will be necessary to 

remove the injector nozzle and increase the jet size by drilling out the injector hole. Do this in small increments (about 

.2mm) so as not to excessively enlarge the injector. Ideally you should drill it out until the flame is larger than desired 

and then reduce the flame by unscrewing the regulator screw. The injector as shipped is set for a gas consumption rate 
of around 50Mj/Hr  during constant operation, which is normal for dual fuel systems. 
 

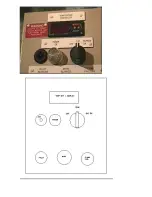
Procedures for operating: 


The first switch (black rotary switch on the side of the unit) is the master switch and will switch off the gas system and 

the temperature display module. Switch this switch on. The power on light will illuminate. The temperature display 

module will run a self test diagnostic for a few seconds and will then display the temperature in the oven. If you are not 

using gas and merely want to monitor the oven temperature, then this is the mode of operation to select. 


The second switch (the front panel rotary switch) is the gas system power switch. This switch will only operate once the 

temperature and master control switch is on. To activate the gas burner system, switch this switch on.   


Once the gas system is switched on, the safety circuitry will test the system for about 15 seconds. If the test is clear then 

the ignition system will start sparking at the pilot (short sharp crackling should be heard) and ignite the pilot flame. The 

Pilot On Lamp will illuminate once operating .If the pilot flame does not ignite properly within 20 seconds, the safety 

circuitry will lock the system and the flame failure lamp will glow. The system will not start again until the master 

switch is turned off and then on again.  Once the reset lock out has been cleared the safety check, purge and ignition 

cycle will start again. 


When the temperature is below the preset temperature on the temperature controller the main burner will ignite and the 

main burner indicator light will be illuminated. 


Never place wood or other debris near or over the burner tube opening. Keep the fire at least 200mm away.  

Do NOT use the burner to light your firewood. Flame from the burner will assist in lighting wood at a distance. 


To switch off the system

 either switch of the gas circuitry first or disable the entire system by switching off the system 

master switch, or, to maintain temperature display but disable the gas system only, switch of the gas circuitry. 


To adjust the temperature:

 Press the set switch once, the 

set

 light will flash, now adjust the temperature up or down 

by using the up and down arrow keys. Once the desired temperature is set release the arrow keys and wait 15seconds. 

The light will stop flashing and the new setting will take effect.  

Содержание Wood Fired Ovens

Страница 1: ...ructions as supplied with any upgrade or option 2 Product specific instructions as supplied with the particular primary product 3 Quick reference operating guides supplied with the principal product 4 Component operating and instruction texts as may have been supplied 5 The Cooking with Fire Book and finally 6 any third party or additional texts PRE INSTALLATION CHECK LIST To ensure installation a...

Страница 2: ... standard 900mm doorways please carefully read and follow the instructions supplied separately with the turning frame Either use the forklift to move the appliance to its set down position or place a pallet trolley under the frame and move the unit into position At all times ensure that the appliance is only lifted enough to be clear of the floor excess height will result in the appliance being un...

Страница 3: ...uadrant should be fixed to the outside of this skin If gas is being used then the damper blade must either be 5mm smaller in diameter or have a notch cut off each side so as to never allow the duct to be sealed The outer duct must end about an inch or so lower than the inner duct and should be covered by a skirt cowl or weather spinning which does not seal it Alternatively you can use a wood burni...

Страница 4: ... six monthly and all bends should be fitted with inspection hatches The exact interval between cleaning for each specific system should be determined under advice of a professional flue cleaner or chimney sweep and will depend on many factors specific to the actual site and operating conditions and practices IMPORTANT REFER AT ALL TIMES TO THE CODE APPLICABLE TO THE AUSTRALIAN STANDARDS FOR SOLID ...

Страница 5: ...ticularly if not properly dried and cured Each species of wood has its own characteristics which will set it apart from other woods and to determine its suitability for certain uses Wood is made up of a number of substances Cellulose constitutes about 50 percent of the wood by weight Lignin makes up about 23 to 33 percent of softwoods but only about 16 to 25 percent of hardwoods The lignin binds t...

Страница 6: ...od passes across the entire oven from front to back The fire should take up as little floor area as possible Some operators use a simple metal or brick form to hold the fire in place It is very important to always have a good strong flame so as to ensure the cooking chamber temperature is properly maintained and the top of the pizzas are toasted This will prevent the bases from burning before the ...

Страница 7: ...ricks which make up the floor of the oven are level and replace any damaged cracked or warped bricks immediately CLEANING THE WOOD FIRE OVEN One of the benefits of using a Golden Embers wood fired oven is the minimal effort required to keep it clean The best method of keeping the oven floor clean is as follows 1 Once you have baked your last pizza of the day spread the remaining coals evenly over ...

Страница 8: ...multaneously in the Golden Embers pizza oven As the oven heat is concentrated in he vicinity of the fire you should use the supplied pizza paddle to rotate the bases and ensure even baking Alternatively you can fit the optional separator or fire guard which effectively separates the fire from the cooking area eliminating direct infra red exposure to the pizzas and thus minimising or even eliminati...

Страница 9: ...rease gas throughput Once you have adjusted it to the desired size you must securely replace the cover screw which is sealed with an O Ring If the regulator is screwed down fully fully open and there is still inadequate flame it means that the supply pressure is too low Check that the supply line is not obstructed or damaged If there is no obstruction then it will be necessary to remove the inject...

Страница 10: ...he operating manual If it is necessary to have the flue too open to maintain draw then the air supply make up air and extraction in the kitchen is not balanced and needs attention IMPORTANT WARNINGS AND DO S AND DON TS Remember that all types of flammable gas can be extremely volatile and dangerous and that in the interest of your own and public safety it is imperative that the system only be oper...

Страница 11: ... core 240V 10amp flex power lead with 10 amp plug Systems Control N A 240V crimped female spade connectors insulated Systems Control N A Number of Main Burners Type Single NG Brown 40mm Long Pattern Inspirator Maximum Gas Rate per Burner 100MJ Injector Nozzle Size as shipped 2mm Combustion Rate at that size 60 MJ hr Number of Pilot Burners Type Brahma Wind Proof Torch Burner Pilot 5MJ Hr Volume of...

Страница 12: ...ioning then turn of gas ball valve and call your supplier Igniter sparks repeatedly no pilot flame lights and reset light comes on Try again there may be air in the line if still unsuccessful then check that ball valve is open and that the gas supply is functioning If all checked then check that spark is going to pilot head not to ground somewhere else If still not functioning check cables to BM v...

Страница 13: ...although fine cracking in the vicinity of the burner jet is often inevitable in any event Although not essential it is always recommended that at least 1 piece of timber be kept burning in the oven even if it is merely a glowing log in the corner This enhances flavours gives greater visual appeal and will assist in ensuring that the oven floor is maintained at a constant temperature relative to th...

Страница 14: ...GOLDEN EMBERS AC11 CLASS 1 GAS WOOD FIRE GAS TRAIN SCHEMATIC AND LEGEND ...

Страница 15: ...5MJ Hr for gas only at maximum and during intermittent operation only Each cooking chamber is guaranteed not to crack during normal use The dome insulating and decorative skin is multi layered being 90mm High Alumina High density High Purity Low cement Continuous pour Refractory Castable 25mm High density Zirconia Blanket 160Kg m3 25mm High Density Ceramic Blanket 130 Kg m3 25mm Fibretex 350 or Fi...

Страница 16: ...ion flame electrode control 240 or 110 volt AC AGA Approval Number 5391 Class 2Cb Brand Name BRAHMA Category Burner Controls Flame Safeguards Flame Detectors UV Burner Control with Integral Ignition HTX CP3135 1 Set point Range 0 450oC Alarm output Accurate to 1 J type thermocouple 0 450oC Brand Name CAMPINI Category Thermostats Temperature Indicators Thermometer Thermostat Programmable ...

Страница 17: ......

Страница 18: ......

Отзывы: