© 2018 Gold Medal Products Co.
Part No. 110172
Instruction Manual
10700 Medallion Drive, Cincinnati, Ohio 45241-4807 USA
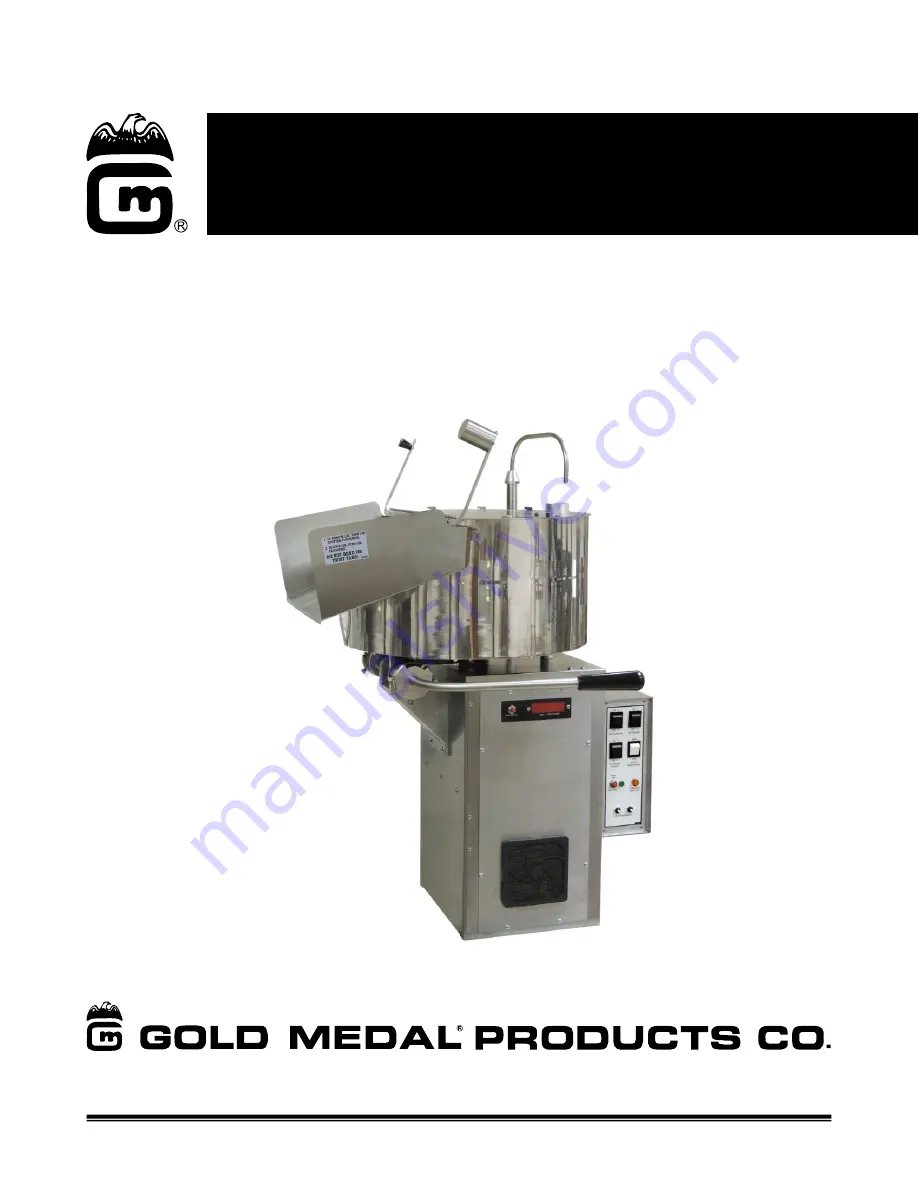
36, 48, & 60 oz. Cornados
Export Model Series 2149, 2258, and 2297
(100, 110, and 101, 111)
48 oz. Unit Shown
Страница 1: ... Gold Medal Products Co Part No 110172 Instruction Manual 10700 Medallion Drive Cincinnati Ohio 45241 4807 USA 36 48 60 oz Cornados Export Model Series 2149 2258 and 2297 100 110 and 101 111 48 oz Unit Shown ...
Страница 2: ...he Packing Cord on Kettle Hub 22 Kettle and Drive Shaft Alignment 23 Electronic Temperature Control Export 24 Operation 24 Control Description 24 Probe LED Indicator Light Thermocouple Error Condition 25 Kettle Circuit Breaker 26 ORDERING SPARE PARTS 27 Model Variations Voltage Specific Parts 27 Unit Exterior Front View Filter 28 Unit Exterior Rear View Oil Line 29 Unit Exterior Kettle Mount Parts...
Страница 3: ... void the warranty and may cause a dangerous condition This appliance is not intended to be operated by means of an external timer or separate remote control system NEVER make alterations to this equipment Read the Installation Operating and Maintenance Instructions thoroughly before installing servicing or operating this equipment 014_020416 WARNING To avoid burns DO NOT touch the kettle or any h...
Страница 4: ...physical sensory or mental capabilities or lack of experience and knowledge unless they have been given supervision or instruction concerning use of the appliance by a person responsible for their safety Note Improvements are always being made to Gold Medal s equipment This information may not be the latest available for your purposes It is critical that you call Gold Medal s Technical Service Dep...
Страница 5: ...ing this equipment To order copies of the operator s manual go to gmpopcorn com or write to Gold Medal Products Co 10700 Medallion Drive Cincinnati OH 45241 USA 1 800 543 0862 Model Description This manual covers 2149 36 oz 2258 48 oz and 2297 60 oz Series tall pedestal Cornado units motor is located in pedestal See below for series specific RH LH and Pass Thru Handle descriptions Model Series 100...
Страница 6: ...le surface See counter mounting requirements and hole locations below Mounting Instructions 8 minimum clearance required between kettle and any combustible surface Pedestal Interior 4 Mounting Locations Secure Pedestal to table or counter Counter Mounting Requirements 2 Dia X 1 8 Thick Fender Washer 3 4 Minimum for Wood or Wood Plastic Products 5 16 18 Grade 5 Bolt 5 16 18 Grade 5 Nut 3 16 Minimum...
Страница 7: ...re supply 230 V 2 Hot 1 Neutral 1 Ground All electrical components in this machine are 230 V motors heat elements lights etc and therefore require Hot to Neutral connection NOT Hot to Hot A certified electrician must supply and install the wall receptacle for this unit reference the Receptacle Wiring Diagram for Export Units DANGER Machine must be properly grounded to prevent electrical shock to p...
Страница 8: ...cal components Before You Plug In Machine 1 Make sure all machine switches are OFF before plugging equipment into receptacle 2 Make sure wall outlet can accept the grounded plugs where applicable on the power supply cord 3 The wall outlet must have the proper polarity If in doubt have a competent electrician inspect the outlet and correct if necessary 4 DO NOT use a grounded to un grounded recepta...
Страница 9: ...witch light does not come on when activated then the Kettle Circuit Breaker may be tripped Reference the Kettle Does Not Heat section in the Troubleshooting section of this manual KETTLE MOTOR SWITCH Two position ON OFF lighted rocker switch supplies power to the kettle agitator motor The Kettle Motor Switch MUST be ON at all times when there is popcorn popped or un popped in the kettle HIGH LOW K...
Страница 10: ...ster Switch ON the night before it is expected to be used Bucket Pump Model Oil System Master Switch ON activates the 30 watt heating element on the bucket pump to keep the coconut oil liquid RED OIL DISPENSE PUSH BUTTON PB SWITCH GREEN OIL LIGHT Red Push Button Switch dispenses a predetermined amount of oil into the kettle when pressed The Oil System Master Switch must be ON for the Oil Dispense ...
Страница 11: ... Push Button Switch for 5 seconds the display count will start to blink to warn the user the count is about to be reset to zero Continue to hold the push button 3 more seconds and the count will reset to zero Note Display is selectable to show either F or C Temperatures unit is preset at installation replacement display must be set by qualified service personnel only ...
Страница 12: ...down Oil Dispense Switch and turn Oil System Master Switch ON continue to hold Oil Switch for 5 seconds until the indicator light OIL Light or LOAD DUMP Light on popper starts to blink ON OFF then release switch unit now in program mode 5 Hold a measuring cup under the oil delivery tube in popper PUSH and RELEASE the Oil Dispense Switch to START oil flow 6 When correct amount of oil has been dispe...
Страница 13: ...the oil is liquid As a check dispense oil into a measuring cup first then use that oil for the first popping cycle 1 Turn all switches ON set popping temperature option if equipped to Salt High mode 2 Kettle is ready to pop about 5 8 minutes when the yellow Load Dump Light and Audible Signal beeper if enabled turn ON 3 Lift kettle lid and pour in pre measured popcorn and Flavacol close lid 4 Press...
Страница 14: ...easured popcorn and Flavacol close lid 4 Press the Red Oil Dispense PB Switch to add oil if equipped or add oil manually before closing lid light and beeper will turn OFF in approx 20 seconds 5 Add pre measured amount of Glaze Pop or Sugar when using sugar we recommend using Compound S to help keep kettle clean close lid 6 When the light and beeper come on again gently dump the kettle Note The sig...
Страница 15: ...d Allow kettle to cool at least 1 hour before attempting to clean DO NOT use ice or water to cool down a hot kettle Severe kettle damage will result 1 When cool wipe outside of kettle with a clean soft cloth DO NOT use oven cleaners or abrasive materials as they will damage the kettle 2 Every night mix Gold Medal s Heat n Kleen solution Item No 2095 2 tablespoons per gallon of water It is not nece...
Страница 16: ...ess grease from unit 4 Wipe stainless steel parts with a clean cloth and cleaner designed for stainless steel such as Gold Medal Watchdog Stainless Cleaner Item No 2088 DO NOT use oven cleaners or abrasive materials as they will damage parts of machine Sanitizing the Tubing and Pump Reference the Oil Dispense Unit manual for oil system cleaning instructions To Remove Install Kettle Lid if needed T...
Страница 17: ...f packing cage is removed then the packing cord should be replaced see Replacing the Packing Cord on Kettle Hub in the Maintenance section of this manual Step 4 Reinstall agitator assembly Step 1 Turn unit OFF and allow it to cool completely before attempting to remove agitator shaft On the bottom side of the kettle hold the Agitator Shaft firmly with Channel Lock pliers NOTE The shaft has a left ...
Страница 18: ...rip during transit if reset then trips again the unit must be inspected repaired before going any further reference the Kettle Circuit Breaker in the Maintenance section B Kettle Heat Switch B Have a qualified service person check the voltage to and from the Kettle Heat switch and if the switch is defective replace it C Temperature Control Board C A defective thermocouple lead will cause the kettl...
Страница 19: ...n D Inferior Corn D Inferior quality corn would result in longer popping cycles Use only top quality hybrid popcorn from reputable suppliers Even then if you let your corn pick up moisture or dry out your popping cycles will be slow Kettle Agitator Shaft not Rotating A Kettle Motor Switch A If the kettle agitator shaft is not rotating DO NOT pop corn Check to make sure the Kettle Motor Switch is O...
Страница 20: ... DANGER Improper installation adjustment alteration service or maintenance can cause property damage injury or death Any alterations to this equipment will void the warranty and may cause a dangerous condition This appliance is not intended to be operated by means of an external timer or separate remote control system NEVER make alterations to this equipment Read the Installation Operating and Mai...
Страница 21: ...cool completely before attempting to remove agitator shaft On the bottom side of the kettle hold the Agitator Shaft firmly with Channel Lock pliers NOTE The shaft has a left handed thread Steps to Remove the Agitator Assembly and Lubricate Shaft Tap bar in a CLOCKWISE direction Step 2 To loosen the Agitator Assembly tap the agitator s welded bar with a rubber mallet in a CLOCKWISE direction and un...
Страница 22: ... bottom and wind up in a CLOCKWISE direction Steps to Replace Packing Cord Step 1 Remove agitator assembly see Removing Agitator Assembly section then remove the packing cage and the old packing cord For older models which have an oil seal remove the oil seal from inside the agitator hub and replace with the Cornado Packing Kit Item No 69305 as described here Kettle Hub Packing Cord will ride on t...
Страница 23: ... one another and that the two shafts do not bind when the kettle is dumped Step 3 Once properly aligned re tighten the two hex bolts on the adjusting plate Step 1 To adjust the lower agitator shaft loosen the two hex bolts for the adjusting plate It may be necessary to use a socket wrench on the hex nuts located inside the pedestal Loosen 2 Hex Bolts Adjusting Plate Lower Agitator Shaft Lower Agit...
Страница 24: ...ed high limit There are no mechanical thermostats in this kettle There are 4 factory settings on the control see descriptions below If needed adjustments may be made to the Kettle Dump and Audible Signal to Dump The remaining settings are factory set for the unit DO NOT adjust 1 Control Set Point Temperature This is factory set DO NOT adjust 2 The Overshoot circuit is tuned for the kettle at the f...
Страница 25: ... thermocouple error conditions Reversed Probe Indicates the thermocouple probe has been connected in reverse The yellow leads must go to the positive terminals If the kettle heats for a short time and then stops and the red Probe LED light is ON then one or both Thermocouple is wired in reverse Check TC A and TC B make sure the yellow leads go to the positive terminals Open Probe Indicates the the...
Страница 26: ...er is tripped For hanging kettle machines On Standard Poppers the Kettle Circuit Breaker is located under the dome An additional cover must be removed to reset the circuit breaker On PopClean Poppers the side dome panel must be removed to access the circuit breaker located on the vertical controls panel in the dome interior reference images below For pedestal mounted kettle machines the front cove...
Страница 27: ...chine nameplate data plate with your order 5 Address all parts orders to Parts Department Gold Medal Products Co 10700 Medallion Drive Cincinnati Ohio 45241 4807 or place orders by phone or online Phone 800 543 0862 513 769 7676 Fax 800 542 1496 513 769 8500 E mail info gmpopcorn com Web Page gmpopcorn com Model Variations Voltage Specific Parts Kettle Model Part Description and Part Number PN 111...
Страница 28: ...X 3 8 PHIL PAN M S 39000 3 GLIDE SCREW 8 32X3 8 PAN HD PH 74141 4 8 32 X 3 4 PHIL FLAT M S 47125 5 FILTER AND GUARD ASSY includes Guard Filter and Cover 63707 6 FILTERS BAG OF 5 69917 See Control Box section See Kettle Assembly section See Unit Exterior Kettle Mount section For Labels see Safety Label Section 4 5 6 3 2 1 See Pedestal Interior Electrical section 2258 00 100 General image shown for ...
Страница 29: ...8 BUSHING SNAP 1 125 IN 82221 82221 9 TOP LID 17899 17899 10 8 32 X 1 2 PHIL PAN M S 47141 47141 11 JUNCTION BOX BOTTOM 111536 111536 12 JUNCTION BOX TOP 111535 111535 13 BOTTOM JUNCTION BOX LID 17672 17672 14 8 32X3 8 FL HD PH MS 20065 20065 15 STRAIN RELIEF T B 3302 89045 89045 16 16W FOIL HEAT ELEMENT 17898EX 17898EX 17 8 32 X 3 8 PAN HD PH M S 12389 12389 18 8 32 SERRATED FLANGE NUT 61151 6115...
Страница 30: ...kdown 5 6 7 10 4 8 9 15 16 14 2 3 1 18 19 20 17 21 8 24 22 23 NOTE Concave side of Large Spacer fits up against bracket weld on Dump Bar Shaft 12 11 13 See Unit Exterior Oil Line section 2258 00 100 2297XE RH Dump Lever RH Dump Handle shown for parts reference see next page for Pass Thru Handle General images shown for parts reference only ...
Страница 31: ...110 13 1 4 20X3 4 LG HEX HD BOLT 13164 13164 13164 13164 14 SPRING RETAINER ROD 82551 82551 82551 82551 15 SET COLLAR 1 2ID X 7 8OD 47326 47326 47326 47326 16 SET SCREW 1 4 20 X 3 16 1 req d per collar 47751 47751 47751 47751 17 COLLAR 74661 74661 74661 74661 18 5 16 18 X 1 25 SQ HD CP 40785 40785 40785 40785 19 TORSION SPRING 74660 74660 74660 74660 20 SPACER 74658 74658 74658 74658 21 SPACER LAR...
Страница 32: ...oz Kettle shown for general parts reference only Kettle Bottom Junction Box View 21 22 23 20 24 5 1 2 3 4 3 6 7 2149XES 69550EX Kettle images 9 11 12 13 Agitator Drive Assembly includes Agitator Packing Kit Thrust Washer and Shaft 8 10 14 To Remove Kettle Lid Lift TAB slightly rotate lid assembly to disengage raised hooks then lift lid off Reverse steps to install lid 28 27 25 26 29 3 29 1 2 ...
Страница 33: ...ORNADO AGIT 69302 69302 69302 69302 69302 69302 12 PACKING CORD 7 IN 69304 7 69304 7 69304 7 69304 7 69304 7 69304 7 13 THRUST WASHER 67852 67852 67852 67852 67852 67852 14 AGITATOR SHAFT 83287 83287 83287 83287 83287 83287 15 KETTLE BASE PLATE 83258 83264 83302 83258 83264 83302 16 ACORN NUT 1 4 20 49068 49068 49068 49068 49068 49068 17 FLAT WASHER 1 4 STAINLESS 87261 87261 87261 87261 87261 8726...
Страница 34: ... RND TOP SQ NUT 69156 11 HEX NUT 1 4 20 74133 12 NUT RETAINER 50190 13 1 4 20 X 1 75 SET SCREW 76444 14 HEAT ELEMENT 1350W 82386 15 TUBULAR ELEMENT 1800W 48650EX 16 TUBULAR ELEMENT 1250W 48801EX 17 RETAINING NUT fastens lead to kettle bottom 41434 11 12 9 10 Hand tighten snug then tighten one full turn DO NOT use a torque wrench Form a tab UP on flat of nut to retain nut position Element Bracket H...
Страница 35: ... RND TOP SQ NUT 69156 11 HEX NUT 1 4 20 74133 12 NUT RETAINER 50190 13 1 4 20 X 1 75 SET SCREW 76444 14 HEAT ELEMENT 2700W 82598 15 TUBULAR ELEMENT 1500W 48800EX 16 TUBULAR ELEMENT 1050W 48651EX 17 RETAINING NUT fastens lead to kettle bottom 41434 11 12 9 10 Hand tighten snug then tighten one full turn DO NOT use a torque wrench Form a tab UP on flat of nut to retain nut position Element Bracket H...
Страница 36: ...X 1 25 SET SCREW 69140 12 1 4 20 RND TOP SQ NUT 69156 13 HEX NUT 1 4 20 74133 14 NUT RETAINER 50190 15 1 4 20 X 1 75 SET SCREW 76444 16 TUBULAR ELEMENT 2300W 68052EX 17 TUBULAR ELEMENT 1850W 68051EX 18 500W HEAT ELEMENT 68106EX 19 TUBULAR ELEMENT 1050W 48651EX 20 RETAINING NUT fastens lead to kettle bottom 41434 60 oz Element View 69550EX Clamping Views Form a tab UP on flat of nut to retain nut p...
Страница 37: ...30 11 WASHER 1 4 INTERNAL TOOTH 12383 12383 12 FLAT WASHER 1 4 STAINLESS 87261 87261 13 1 4 20 SERRATED LOCK NUT 46311 46311 14 KETTLE DRIVE MOTOR includes motor spacers 82413R 82413R 15 BAFFLE 111909 111909 16 8 32 X 3 8 PAN HD PH M S 12389 12389 17 8 32 SERRATED FLANGE NUT 61151 61151 18 POWER SUPPLY CORD ASSEMBLY 82943 82943 19 STRAIN RELIEF T B 3304 82227 82227 20 WIRE HARNESS OIL PUMP 41499 4...
Страница 38: ...r Removed General images shown for parts reference only 2258 00 100 20 21 22 18 12 13 19 25 26 23 24 12 13 9 14 15 16 17 10 11 3 Jumper set to Fahrenheit Jumper set to Celsius 2 4 3 5 6 7 8 1 Temp Cycle Count Board displays either Fahrenheit F or Celsius C depending on jumper placement qualified service personnel set jumper placement when board is installed 27 28 12 13 12 13 ...
Страница 39: ...E CONNECTOR W FLANGES 111627 10 3 48X1 2 SS SLOTTED SCREW 111804 11 3 48 SS HEX NUT 111805 12 8 32 X 3 8 PAN HD PH M S 12389 13 8 32 SERRATED FLANGE NUT 61151 14 TRANSFORMER 12 24 VOLT 39459 15 5 POSITION WIRE CONNECTOR 55245 16 3 POSITION WIRE CONNECTOR 55244 17 2 POSITION WIRE CONNECTOR 55621 18 CAPACITOR 5 MFD 82217 19 CAPACITOR STRAP 48301 20 CIRCUIT BREAKER COVER 55253 21 CB WARNING LABEL 552...
Страница 40: ...orn com Control Box Control Panel Parts Breakdown 15 Control Box Interior View Control Panel Exterior View 12 13 14 9 10 11 2 4 6 3 1 5 7 8 7 2 5 8 16 3 6 2258 00 100 12 General images shown for parts reference only General image shown reference Electronic Control section for control board view ...
Страница 41: ...LIGHT AMBER 55039EX 55039EX 8 CIRCUIT BREAKER 10A 48659 48659 9 4IN DIN RAIL 111532 111532 10 RELAY DPDT 89086 89086 11 RELAY SOCKET 2 POLE 89085 89085 12 6 32 X 1 2 PHIL PAN M S 42237 42237 13 6 32 GRIP NUT ZINC PLATED 47517 47517 14 SCREW 8 32X3 8 PAN HD PH 74141 74141 15 TEMPERATURE CONTROL 41001 41001 16 LABEL CORNADO CONTROLS 111526 111526 Safety Labels Item Part Description Part Number All M...
Страница 42: ...escription Part Number 36 oz 48 oz 60 oz 1 36OZ CORN CUP ASSEMBLY 67905 36 48OZ CORN CUP ASSEMBLY 17757 48 60OZ CORN CUP ASSEMBLY 17757 60 2 FLAVACOL CONT WELDMENT 41752 41752 41752 3 PERF JET SCOOP REGULAR RH 2072 2072 2072 4 MEASURE 2 TBS 29 6cc Flavacol measure 47681 5 MEASURE 1 4 CUP Flavacol measure 47169 47169 1 5 2 3 4 ...
Страница 43: ...36 48 60 oz Export Model Series 2149 2258 and 2297 Cornados 100 110 and 101 111 Page 43 gmpopcorn com Wiring Diagram For wiring information please reference the Wiring Diagram shipped with the popper ...
Страница 44: ...OR LIABILITIES ON OUR PART INCLUDING THE IMPLIED WARRANTY OF MERCHANTABILITY THERE ARE NO WARRANTIES WHICH EXTEND BEYOND THE DESCRIPTION ON THE FACE HEREOF In no event shall Gold Medal Products Co be liable for special incidental or consequential damages No claim under this warranty will be honored if the equipment covered has been misused neglected damaged in transit or has been tampered with or ...