Gmini GM1604 Скачать руководство пользователя страница 25

EN 
IMPORTANT 

- KEEP THIS MANUAL FOR PERTINENT FUTURE REFERENCE. 

WARNING:  BEFORE USE, REMOVE AND DISCARD ALL PLASTIC BAGS AND PARTS OF 
PRODUCT PACKAGING OR AT LEAST KEEP THEM OUT OF REACH OF CHILDREN! 

WARNING:

Never leave a child unattended!
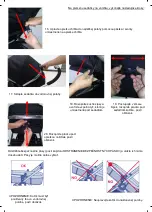
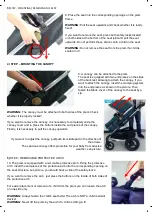
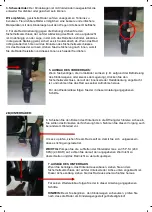
Before use, make sure that all locking elements are clicked into place.
When assembling or disassembling the product, always make sure that the child is at a safe distance 
to avoid a possible injury!
Do not let a child play with this product! 
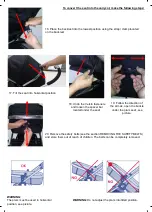
Before using the pram with a carrycot, baby seat or car seat, always check whether the fastening 
systems are properly secured!

WARNING: 

This product is not suitable for jogging or roller skating.

This pram is suitable for children from birth to three years of age, with a maximum weight of up to 15 
kg!
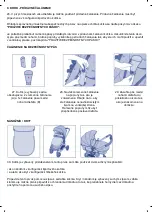
For children from birth to about 6 months of age, the pram must be used in the carrycot configuration.
In the case of use as a deep pram: the product is suitable for a child who cannot sit up unaided, roll 
over and cannot raise himself/herself on hands and knees. The maximum weight of a child in the 
deep pram is 9 kg.

WARNING: 

As soon as your child can sit up unaided, use a harness.

ATTENTION: 

Keep in mind the danger imminent near open fires or heat sources such as electric or 

gas heating, etc. Never leave the carrycot near these heat sources.

ATTENTION: 

If you buy a mattress separately, always check whether it is suitable for the given

product. Do not use a mattress higher than 10 mm.
Whenever placing a child into the pram or taking a child out of it, the brakes must be secured! 
Do not overload the basket! The maximum allowed weight is 2 kg! 
Any bag or thing hanging on the handle and/or on the backrest and/or on the sides of the pram may 
endanger the pram stability! 
Do not carry more than one child at a time! 
Do not use accessories, spare parts or components which are not supplied or approved by the 
manufacturer! 
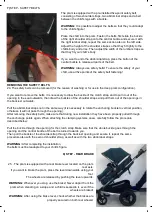
After removing the safety belts, make sure that they have been properly pulled through the anchorage 
points again. The belt length must be readjusted. To make sure that the belts are fixed properly, seat 
a child into the pram, fasten the seat belts and pull their ends strongly! 
This pram does not replace a cradle or cot. If the child needs a rest, lay him/her into a carrycot, cradle 
or cot! 
Before assembling the product, check whether there has been any damage to its components during 
transport. If so, the product must not be used and must be kept out of reach of children! 
Do not use the product if any of its parts is missing, partially torn or damaged! 
Assembly of the product must be carried out exclusively by an adult! 
This product must be used exclusively by an adult! 
Do not allow anyone to use the product without being previously made acquainted with this manual! 
When adjusting the pram seat, make sure that the moving parts of the pram cannot come into contact 
with the child’s body! 
Never depart from the pram when standing on a slope and a child is seated in it, even if the wheels 
are braked! 
Do not use the pram on stairs and escalators: you could lose control of it more easily.
Pay special attention if you want to roll on a pavement or a stair or descend from them!
Whenever you stop, brake the pram! 
Never lift the product by the handle if a child is seated in it! 
Do not allow a child to stand on the basket: it may break down and injure the child, and the pram may 
topple over! 

Содержание GM1604

Страница 1: ...v ko k Gmini LORD EN MANUAL Gmini LORD Stroller DE BEDIENUNGSANLEITUNG Kinder Sportwagen Gmini LORD Vyrobeno v n Dovozce a distributor pro R SK Piccollo s r o Pernerova 35 Praha 8 www piccollo cz I ww...

Страница 2: ...p s se ujist te zda byly znovu spr vn prota eny kotevn mi body D lka p s mus b t znovu upravena Abyste se ujistili zda jsou p sy spr vn p ipevn ny posa te d t do ko rku p sy zapn te a siln zat hn te...

Страница 3: ...p lou osobou I T N Ko rek a korba nemaj sn mateln potah L tkov potah ist te vlhkou houbou a neutr ln m m dlem sti z um l hmoty pravideln ist te vlhk m had kem Pokud se kovov sti dostanou do styku s vo...

Страница 4: ...cvaknut pojistky POZN MKA Pokud V m ko rek nejde po zm knut pojistky otev t zatla te m rn na konstrukci ko rku sm rem dolu a pot kon opakujte POJISTKA Jednou rukou zat hn te za pojistku sm rem nahoru...

Страница 5: ...et cvaknut pojistky Prove te tento kon i u druh ho zadn ho kole ka Pro kontrolu za kolo m rn zat hn te abyste se ujistili e je spr vn upevn no D LE IT Pneumatiky zadn ch kol nafukujte max na 35 P S I...

Страница 6: ...p ipevn na na obou stran ch ko rku Zkontrolujte zda je spr vn zablokov na Pokud chcete boudu odstranit je t eba pln rozepnout zip potahu boudy a stisknout tla tka uvnit koncovek boudy Nakonec je t eb...

Страница 7: ...ed tka v konfiguraci sportovn ko r postupujte dle n e popsan ch kon 13 Postupujte ve sm ru ipek zapn te p ezku pod sed tkem ko rku viz Obr zek Pro spr vn zapnut je zapot eb pou t ob ruce 14 Zapn te p...

Страница 8: ...pod op rkou no i ek viz Obr zek Pro p em nu seda ky v korbi ku prove te n sleduj c kroky 16 Upravte op rku zad do nejni polohy pomoc p sku svorky um st n na op rce zad UPOZORN N Ko rek mus b t pou v n...

Страница 9: ...odstra ujte korbi ku z ko rku pokud v n d t le 21 PRAVY OP RKY NOHOU Op rku nohou je mo no upravit do 4 r zn ch poloh sou asn m stla en m tla tek um st n ch po obou boc ch polohov n sed tka Zafixov n...

Страница 10: ...CH P S 24 Bezpe nostn p sy lze odstranit z d vodu pran nebo pro pou it v konfiguraci hlubok ho ko rku Pokud chcete p sy odstranit je t eba prot hnout sponu mezino n ho p su a vyt hnout ji otvorem v s...

Страница 11: ...vybaven sadou obsahuj c 2 x ramenn polstrov n A a 1x polstrov n p su mezi nohama d t te B 28 Navl kn te ramenn polstrov n na popruhy tak jak je zn zorn no na Obr zku Dbejte na to abyste polstrov n ne...

Страница 12: ...e lep jej nejprve zabrzdit Pot zm kn te pojistku um st nou na rukojeti ko rku druhou rukou p it hn te pojistku um st nou na lev stran konstrukce sm rem k sob a sou asn tla te na rukoje sm rem do konst...

Страница 13: ...oz v bl zkosti otvoren ch oh ov alebo zdrojov tepla ako je elektrick alebo plynov k renie at Nikdy nenech vajte korbi ku ko ka v bl zkosti t chto zdrojov tepla POZOR Ak zak pite matrac oddelene v dy s...

Страница 14: ...e obmedzili riziko u krtenia ned vajte die a u na hranie predmety na n rkach ani ich nenech vajte v jeho bl zkosti Ak nech te ko k st dlho na slnku po kajte k m nevychladne sk r ne do neho znova usad...

Страница 15: ...kou Ak sa kovov asti dostan do styku s vodou osu te ich aby ste zabr nili ich hrdzaveniu Nepou vajte tekut piesok ani riedidl Pri isten sa ria te pokynmi uveden mi na t tkoch v robkov alej s uveden sy...

Страница 16: ...poistky POZN MKA Ak sa V m ko k ned po stla en poistky roztvori zatla te mierne na kon trukciu ko ka smerom dolu a potom kon opakujte POISTKA Jednou rukou zatiahnite za poistku smerom hore a druhou r...

Страница 17: ...ie poistky Urobte tento kon aj pre druh zadn koleso Pre kontrolu mierne zatiahnite za koleso aby ste sa uistili e je spr vne upevnen D LE IT Pneumatiky zadn ch kolies nafukujte max na 35 P S I 240 kPa...

Страница 18: ...oboch stran ch ko ka Skontrolujte i je spr vne zablokovan Pokia chcete strie ku odstr ni je potrebn plne rozopn zips po ahu strie ky a stla i tla idl vn tri koncoviek strie ky Nakoniec je potrebn vyti...

Страница 19: ...ur cii portov ko k postupujte pod a ni ie pop san ch konov 13 Postupujte v smere pok zapnite pracku pod seda kou ko ka pozri obr zok Na spr vne zapnutie je potrebn pou i obe ruky 14 Zapnite pracku pod...

Страница 20: ...no i iek pozri obr zok Na premenu seda ky na vani ku vykonajte nasleduj ce kroky 16 Upravte opierku chrbta do najni ej polohy pomocou p sika svorky umiestnen na opierke chrbta UPOZORNENIE Ko k mus by...

Страница 21: ...jte vani ku z ko ka ak v nej die a le 21 PRAVY OPIERKY N H Opierku n h je mo n upravi do 4 r znych pol h s asn m stla en m tla idiel umiestnen ch po oboch bokoch polohovania seda ky Zafixovanie opierk...

Страница 22: ...H P SOV 24 Bezpe nostn p sy mo no odstr ni z d vodu prania alebo pou itia v konfigur cii hlbok ho ko ka Ak chcete p sy odstr ni je potrebn pretiahnu sponu medzino n ho p su a vytiahnu ju otvorom v sed...

Страница 23: ...o k je vybaven sadou obsahuj cou 2 x ramenn al nenie A a 1x al nenie p su medzi nohami die a a B 28 Navle te ramenn al nenie na popruhy tak ako je zn zornen Dbajte na to aby ste al nenie nenavliekli z...

Страница 24: ...Potom stla te poistku umiestnen na rukov ti ko ka druhou rukou pritiahnite poistku umiestnen na avej strane kon trukcie smerom k sebe a s asne tla te na rukov smerom do kon trukcie a dole Pokia je ko...

Страница 25: ...mum allowed weight is 2 kg Any bag or thing hanging on the handle and or on the backrest and or on the sides of the pram may endanger the pram stability Do not carry more than one child at a time Do n...

Страница 26: ...Important note The images shown in this manual are for illustrative purposes only and may differ from your purchased model RECOMMENDED CLEANING AND MAINTENANCE This product requires regular maintenanc...

Страница 27: ...ck NOTE If you cannot open the pram after pressing the safety lock push the pram frame slightly downwards and then repeat the action SAFETY LOCK Pull the safety lock upwards with one hand and open the...

Страница 28: ...hear a click of the safety lock Perform this action also with the second rear wheel For the purpose of checking pull the wheel gently to make sure that it is properly fixed IMPORTANT Inflate the rear...

Страница 29: ...whether it is properly locked If you want to remove the canopy it is necessary to completely unzip the canopy cover and to press the buttons inside the end pieces of the canopy Finally it is necessary...

Страница 30: ...in the child s pushchair configuration follow the operations described below 13 Proceed in the direction of the arrows fasten the buckle under the pram seat see picture Correct fastening requires the...

Страница 31: ...ove the safety belts see the section REMOVING THE SAFETY BELTS and store them out of reach of children The belts can be completely removed To convert the seat into the carrycot make the following step...

Страница 32: ...e carrycot if a child is lying in it 21 ADJUSTING THE FOOTREST The footrest can be adjusted into 4 different positions by simultaneously pressing the buttons located on both sides of the seat position...

Страница 33: ...e shoulder straps and pull them out of the openings in the backrest outwards Pull the abdominal straps out in the same way it is necessary to rotate the anchoring buckle to vertical position otherwise...

Страница 34: ...d with a set containing 2x shoulder padding A and 1x padding of the strap between the child s legs B 28 Put the shoulder padding on the straps as shown in the picture Be careful not to put the padding...

Страница 35: ...e it first Then press the safety lock located on the pram handle pull the safety lock located on the left side of the structure with the other hand towards you and at the same time press the handle to...

Страница 36: ...die Bremsen sichergestellt sein berlasten Sie den Korb nicht Das erlaubte Maximalgewicht ist 2 kg Jedwede Tasche oder ein Gegenstand auf den Schiebegriffen und oder auf der R ckenlehne und oder auf d...

Страница 37: ...Salzwasser es w rde seine Verrostung verursachen Benutzen Sie den Kinderwagen nicht am Strand Falls Sie den Kinderwagen nicht gebrauchen bewahren Sie ihn au er Reichweite der Kinder AUFSTELLUNG DER T...

Страница 38: ...ll bewegen auf die Verunreinigung durch den Staub und Sand Somit schr nken Sie die Reibung ein die die richtige Funktionsf higkeit des Kinderwagens gef hrden k nnte Den Kinderwagen bewahren Sie auf ei...

Страница 39: ...NWEIS Wenn der Kinderwagen nach dem Dr cken des Sicherheitsverschlusses nicht zu entfalten ist dr cken Sie sanft auf das Kinderwagengestell hinunter und wiederholen Sie nachher den Vorgang SICHERHEITS...

Страница 40: ...Nehmen Sie diesen Vorgang auch bei anderem Hinterrad vor Um es zu pr fen ziehen Sie am Rad sanft an damit Sie sich vergewissern dass es richtig eingerastet ist WICHTIG Pumpen Sie die Luftreifen der H...

Страница 41: ...ck muss auf beiden Seiten des Kinderwagens eingerastet sein Pr fen Sie ob es richtig verriegelt ist Zum Abnehmen des Verdecks ist der Rei verschluss am Stoffbezug vollst ndig zu ffnen und die Kn pfe i...

Страница 42: ...der Sitzeinheit in dem Modell des Sport Kinderwagens setzen Sie nach dem unten beschriebenen Vorgang fort 13 Setzen Sie in Pfeilrichtung fort schlie en Sie die Schnalle unter der Sitzeinheit siehe das...

Страница 43: ...ld Zum Verstellen der Sitzeinheit auf die Babyschale f hren Sie folgende Schritte durch 16 Verstellen Sie die R ckenlehne mittels des G rtels der Klemme angebracht auf der R ckenlehne in die niedrigst...

Страница 44: ...nd drinnen liegt 21 EINSTELLEN DER FUSSST TZE Die Fu st tze ist durch das gleichzeitige Dr cken der Kn pfe angebracht auf beiden Seiten der Verstellung der Sitzeinheit in 4 verschiedene Positionen ein...

Страница 45: ...notwendig die Schnalle des Gurtes zwischen den Beinen durchzuziehen und sie durch die ffnung in der Sitzeinheit nach au en zu ziehen nachher ziehen Sie die Schnallen der Schultergurte durch und ziehe...

Страница 46: ...lsterung A und 1x Polsterung f r den Gurt zwischen den Beinen des Kindes B enth lt 28 Ziehen Sie die Schulterpolsterung auf die Gurte wie es auf dem Bild dargestellt ist Beachten Sie dass Sie die Pols...

Страница 47: ...verschluss angebracht am Griff des Kinderwagens mit der anderen Hand ziehen Sie den Sicherheitsverschluss angebracht auf der linken Seite des Gestells zu Ihnen an und gleichzeitig dr cken Sie auf den...

Страница 48: ...v ko k Gmini LORD EN MANUAL Gmini LORD Stroller DE BEDIENUNGSANLEITUNG Kinder Sportwagen Gmini LORD Vyrobeno v n Dovozce a distributor pro R SK Piccollo s r o Pernerova 35 Praha 8 www piccollo cz I ww...

Отзывы: