Global Industrial 133720 Скачать руководство пользователя страница 6

Disc 

Housing 

Assembly

M8 Bolt

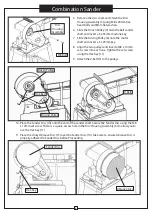
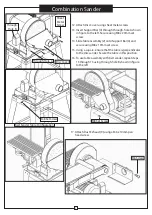
10. Place the Sander Disc (10) onto the end of the sander shaft. Secure the Sander Disc using the M8

x 10mm set screw. There is a square access hole in the Disc Housing Assembly (3) to allow you to

use the Hex Key (11).

11. Place the sticky Abrasive Disc (13) over the Sander Disc (10). Take care to ensure Abrasive Disc is

properly adhered to Sander Disc before Proceeding.

V-Belt

Driven Pulley

Hex Key

Driving Pulley

5. Remove the disc cover and attach the Disc

Housing Assembly (3) using M8 x 20mm hex

head bolts and 8mm flat washers.

6. Slide the Driven Pulley (7) onto the belt sander

shaft and insert a 5 x 55mm machine key.

7. Slide the Driving Pulley (6) onto the motor

shaft and insert a 5 x 25mm key.

8. Align the two pulleys and insert a M8 x 10mm

set screw into each one. Tighten the set screws

using the Hex Key (11).

9. Attach the V-Belt (5) to the pulleys.

Sander Disc

Hex Key

Abrasive Disc

6

Combination Sander

Содержание 133720

Страница 1: ...ada 888 645 2986 WARNING Read and understand all instructions before operating this machine Failure to follow these instructions may result in electric shock fire and orserious injury SPECIFICATIONS M...

Страница 2: ...es not work Cease operation and repair switch or replace sander 9 Keep the Power Cord away from heat oil sharp edges or moving parts Cease operation and replace Power Cords immediately if damaged 10 D...

Страница 3: ...tighten the belt tracking locking knob and turn belt sander on and off as before If belt is still not centered unlock again and continue to adjust 5 Hold workpiece securely with both hands when sandin...

Страница 4: ...bly Support Bar V Belt Driving Pulley small Driven Pulley Work Stop Dust Exhaust Sander Disc Hex Key Rubber Foot Abrasive Disc Miter Gauge Assembly Leg Frame short Brace short Frame long Brace long Ha...

Страница 5: ...lt 3 Turn stand assembly upside down and attache 4 rubber feet 12 using M8 x 25mm socket head bolts 8mm flat washers and M8 hex nuts 4 Turn stand assembly right side up and place Belt Sander 1 on top...

Страница 6: ...ander Disc before Proceeding V Belt Driven Pulley Hex Key Driving Pulley 5 Remove the disc cover and attach the Disc Housing Assembly 3 using M8 x 20mm hex head bolts and 8mm flat washers 6 Slide the...

Страница 7: ...ng M8 x 10mm set screw 15 Using a square ensure that the table is perpendicular to the disc sander Secure the table in this position 16 To use table assembly with belt sander repeat steps 13 through 1...

Страница 8: ...The Miter Gauge Using The Miter Gauge 5 Use miter gauge to maintain a precise angle when sanding and also to secure the workpiece for a more even finish Hex Nut Locking Knob MAINTENANCE MAINTENANCE W...

Страница 9: ...9 Combination Sander TROUBLE SHOOTING TROUBLE SHOOTING...

Отзывы: