background image

25


Is There Something Wrong With Your Cooker? 


Before  contacting  your  Service  Centre  or  Installer,  check  the  guide  below,  there 

may be nothing wrong with your cooker. 


Problem 

Check 

Ignition does not 

work. 

If all burners fail to ignite 

Check that the electricity supply is turned on. 

Check that sparks appear at all the burners; a clicking noise 

should be heard.  

If the electricity supply has failed, the hob burners, grill and 

oven(s) can be lit with a match. 

If one burner fails to ignite


Check that the burner is dry and that spillage of food or 

cleaning fluid remains are not affecting the ignitor or burner 

ports. 

Clean away any debris with a dry nylon brush such as an old 

toothbrush. If a wire wool pad has been used for cleaning 

around the burner ensure the ignitor is free from any stray 

strands. Any water on the burner should be dried with a cloth 

or kitchen towel. 


Are cooking results not satisfactory? 


Problem 

Check 

Grilling 

Uneven cooking front 

to back 

Ensure that the grill is positioned centrally below the grill 

burner 

Baking – General  

Uneven rising of cakes 

Ensure that the oven shelf is level by using a spirit level 

on the rod shelf and adjusting the feet. The oven should 

be checked both left to right and front to back. 

Sinking of cakes 

The following may cause cakes to sink: 

1.  Cooking at too high a temperature. 

2.  Using normal creaming method with soft margarine.  

Over/Under cooking 

Fast/Slow cooking 

Refer  to  the  cooking  times  and  temperatures  given  in 

the  cooking  charts  provided,  however,  it  may  be 

necessary  to  increase  or  decrease  temperatures  by  1 

gas mark to suit personal tastes. Do not use oven/meat 

tins greater than 56mm (2¼”) in height. 


Содержание G797

Страница 1: ...ctory set for the category of gas stated and cannot be converted for use on any other gas The cooker must be installed in accordance with the regulations in force and only used in a well ventilated space Read these instructions prior to using the cooker and retain them for future reference by belling ...

Страница 2: ...90 396 93 68 EC concerning gas safety Oven accessories that could come into contact with foodstuffs are made with materials that comply with the provisions of the 89 109 EC directive dated 21 12 88 Contents Introduction 2 Instructions for the installer 3 12 Technical information 3 Technical Data 5 Position 6 7 Electrical connection 9 Gas connection 10 11 For Your Safety 12 Know your cooker 13 Usin...

Страница 3: ... through these instructions thoroughly to make sure that you have not missed anything If you still need help then please contact including a daytime telephone number if possible Consumer Relations Department Belling Appliances Ltd Talbot Road Mexborough South Yorkshire S64 8AJ BELLING HELPLINE Tel 01709 579902 Please quote the cooker model and serial number with your enquiries This can be found on...

Страница 4: ... prescribed by the electrical safety standards The manufacturer disclaims all responsibility if these instructions are not followed Should you have any doubts seek the assistance of a qualified person Before connecting the appliance ensure that the rating plate data corresponds to that of the gas and electricity supply The safety and automatic adjustment devices of the appliance may during its lif...

Страница 5: ...n your interest and that of safety to ensure compliance with the law In the UK CORGI registered installers work to safe standards of practice The cooker must also be installed in accordance with BS 6172 Failure to install the cooker correctly could invalidate the warranty liability claims and could lead to prosecution LOCATION The cooker may be located in a kitchen kitchen diner or a bed sitting r...

Страница 6: ...le and knobs GENERAL Gas connection Rp BSP male Supply pressure Natural Gas 20mbar for G20 Pressure test point Front left hotplate burner injector G797 BURNER TYPE INJECTOR SIZE RATING RAPID 110 2 7 kW SEMI RAPID 95 1 75 kW AUXILIARY 72 1 0 kW NATURAL G20 OVEN GRILL 130 125 3 3 3 0 kW ...

Страница 7: ...ve the hob top a greater clearance is desirable if discoloration is to be avoided otherwise the shelf etc should be protected Dependent on the kitchen layout please refer to the relevant diagram below The rear wall and surfaces adjacent to or surrounding the appliance must be able to resist a temperature rise of 65 C We recommend fitting ceramic tiles to protect the surrounding surfaces ...

Страница 8: ...nstallation These feet are used to level the oven and adjust its height in relation to the surrounding cabinetry It is important that the cooker is placed on a firm level surface and that the feet are adjusted to ensure that the cooker is perfectly level An unleveled cooker can affect the cooking results To level the cooker simply adjust the feet screwing up or down as required ...

Страница 9: ...sed from most hardware outlets and DIY shops REAROFOVEN SECURELY ATTACH STABILITY CHAIN USING SCREW SUPPLIED Note The power supply cable must be positioned so that no part of the cable can come into contact with any surface which could reach temperatures in excess of 75 C Firmly fix chain to rear of cooker Chain to be as short as possible Stability Hook ...

Страница 10: ...ow Note The removed plug cannot be used for any other appliance and should therefore be properly disposed of and not left where children might find it and plug it into a supply socket with the obvious consequent danger Important The wires in the mains lead on this appliance are coloured in accordance with the following code Green and Yellow Earth Blue Neutral Brown Live As the colours may not corr...

Страница 11: ...ng backplate is used it must be chased into the wall Connection to the cooker should be made with an approved appliance flexible connection to BS 669 A length of 0 9 to 1 2m is recommended The length of hose chosen should be such that when the cooker is in situ the hose does not touch the floor The temperature rise of areas at the rear of the cooker that are likely to come in contact with the flex...

Страница 12: ... steady flame Check for a steady flame on the low setting 2 Check that with the oven set to 8 the burner ignites and maintains full rate Leave the oven full on with the door closed for 10 minutes and check that when the control is turned to gas mark 1 that the flame reduces 3 Check that the grill burner ignites and burns with a steady flame 4 Check that the oven light operates Instruct the user on...

Страница 13: ...ildren unsupervised where the cooker is installed as all surfaces will get hot during and after use NEVER allow anyone to sit or stand on any part of the cooker NEVER store items that children may attempt to reach above the cooker NEVER heat up unopened food containers as pressure can build up causing the container to burst NEVER store chemicals food stuffs pressurised containers in or on the cook...

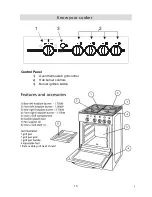
Страница 14: ...13 Know your cooker Control Panel 1 Oven thermostat grill control 2 Hob burner controls 3 Burner ignition button 1 Removable grill heat shield 1 3 2 ...

Страница 15: ...trols are in the OFF position LIGHTING THE HOB BURNERS Push in and turn the appropriate hotplate control knob 2 in an anti clockwise direction to the full on position keeping the knob pushed in press and hold the ignition button until the burner lights When the burner has lit release the ignition button and turn the control knob to the required setting ADJUSTING THE HOB BURNERS When the burner is ...

Страница 16: ... food Always dry food thoroughly before frying and lower it slowly into the hot oil or fat Frozen foods in particular will cause frothing and spitting if added too quickly Never heat fat or fry with a lid on the pan Keep the outside of the pan clean and free from streaks of oil or fat In the unfortunate event of a chip pan fire 1 Switch Off the hob burner 2 Smother flames with a fire blanket or da...

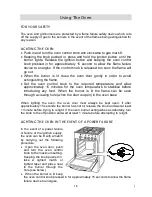
Страница 17: ...ion button and keep the grill knob pressed for approximately 15 seconds to allow for the flame failure device to energise If the control knob is released too soon the flame will go out When Grilling the oven door must always be kept open If after approximately 15 seconds the burner has not lit release the knob and wait at least 1 minute before trying to relight If the grill burner extinguishes acc...

Страница 18: ... such as poultry pork or veal are thoroughly cooked grill on the first position and turn the food regularly To prevent the food sticking to the grill pan grid brush lightly with oil before use For browning foods such as lasagne cauliflower cheese etc use the runner 1 or 2 dependant on depth of dish The charts below serve as a guide for times and positioning for cooking with the grill Food Shelf po...

Страница 19: ...ature to stabilise before introducing any food When the burner is lit the flame can be seen through a viewing hole when the door is open in the oven base When lighting the oven the oven door must always be kept open If after approximately 15 seconds the burner has not lit release the knob and wait at least 1 minute before trying to relight If the oven burner extinguishes accidentally turn the knob...

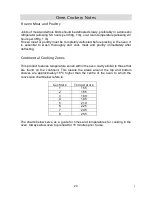
Страница 20: ...lowed to come to room temperature before cooking and frozen meat or poultry must be completely defrosted before placing in the oven b The weight of any stuffing used should be added before calculating the cooking time c Place meat poultry in the main oven meat pan supplied with your cooker Small joints weighing less than 1 75kg 31 2 lbs should be roasted in a smaller meat pan tin or they may be po...

Страница 21: ... meat and poultry immediately after defrosting Continental Cooking Zones This product features temperature zones within the oven cavity similar to those that are found on the continent This means the areas around the top and bottom shelves are approximately 15ºC higher than the centre of the oven to which the conversion chart below refers to Gas Mark Temperature 1 155 2 165 3 180 4 195 5 210 6 225...

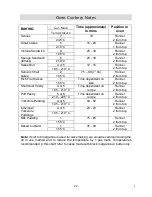
Страница 22: ...ork 180 195 C 30 35 mins per 450g 1 lb 30 mins over Runner 2 from top of oven 3 or 4 Chicken Turkey Up to 4 kg 8lb 180 195 C 23 28mins per 450g 1 lb 25 mins over Runner 2 from top of oven 2 or 3 Turkey 4 to 5 5kg 8 to 12 lb 165 180 C 17 19 mins per 450g 1 lb at plus 15 mins extra For every 450g 1 lb over 5 5kg 12 lb allow 15 mins per 450g 1lb and roast at 150ºC Runner 2 from top of oven 1 or 2 Cas...

Страница 23: ...n size Runner 2 from top 4 or 5 Shortcrust Pastry 195 210 C Time dependant on recipe Runner 2 from top 5 or 6 Puff Pastry 210 225 C Time dependant on recipe Runner 2 from top 4 or 5 Yorkshire Pudding 195 210 C 40 50 Runner 2 from top 4 or 5 Individual Yorkshire Puddings 195 210 C 20 25 Runner 2 from top 1 Milk Pudding 155 C 75 85 Runner 2 from top 1 Baked Custard 155 C 35 40 Runner 2 from top Note...

Страница 24: ... hot and never use abrasive powders pads or corrosive spray products COOKER INTERIOR The oven should be cleaned after each use to remove cooking residuals and grease which if burnt on when the oven is used again will form deposits or stains as well as unpleasant smells Do not leave vinegar coffee milk salty water or the juice of lemon or tomato on enamelled surfaces for any length of time Always w...

Страница 25: ...YOUR PRODUCT To minimise the risk of injury to children please dispose of your product carefully and safely Remove all doors and lids where fitted Remove the mains cable where fitted by cutting off flush with the appliance and always ensure that no plug is left in a condition where it could be connected to the electricity supply To help the environment Local Authority instructions should be follow...

Страница 26: ...ng around the burner ensure the ignitor is free from any stray strands Any water on the burner should be dried with a cloth or kitchen towel Are cooking results not satisfactory Problem Check Grilling Uneven cooking front to back Ensure that the grill is positioned centrally below the grill burner Baking General Uneven rising of cakes Ensure that the oven shelf is level by using a spirit level on ...

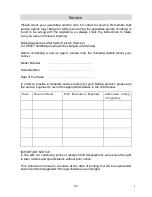
Страница 27: ...ease note the following details about your cooker Model Number Serial Number Date of Purchase In order to provide a complete service history for your Belling product please ask the service engineer to record the appropriate details in the chart below Date Nature of fault Parts Replaced or Repaired Authorised Stamp or Signature IMPORTANT NOTICE In line with our continuing policy of research and dev...

Страница 28: ...Belling Appliances Ltd Mexborough South Yorkshire S64 8AJ G797 021220 by belling ...

Отзывы: