background image

EN

USER’S MANUAL 

BR16

52

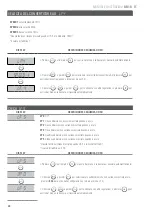
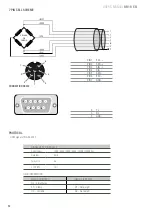
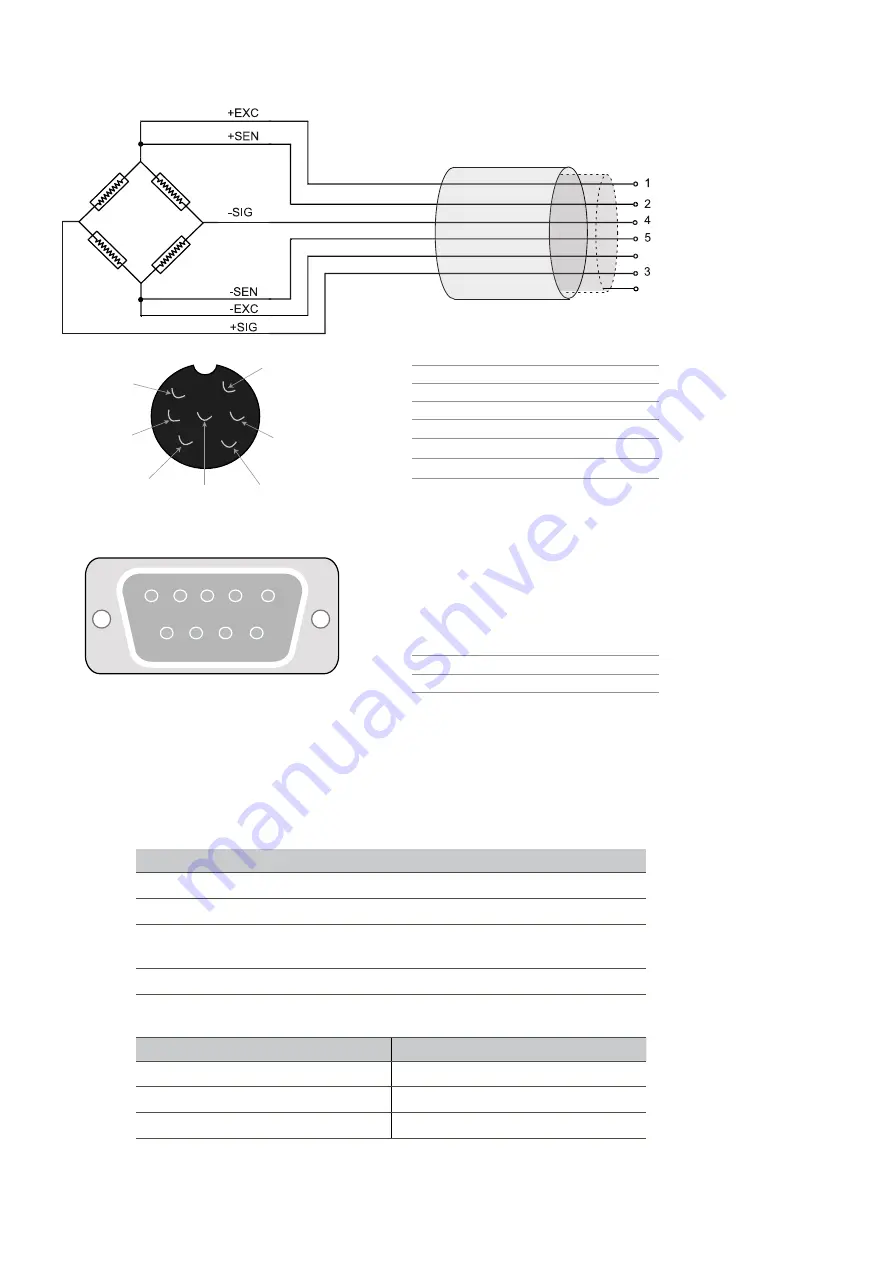
7 PIN CELL SCHEME

6

2

5

4

7

1

3

6

7

CÉLULA 

DE

CARGA


PIN 1

EXC +

PIN 2

SEN+

PIN 3

SIG +

PIN 4

SIG -

PIN 5

SEN -

PIN 6

EXC -

PIN 7

GND

CONNECTION RS232

5

4

3

2

1

9

8

7

6

2

Tx

3

Rx

5

GND

PROTOCOL

UART signal of EIA-RS232 C

SIGNAL UART  EIA-RS232 C

Serial output

1200 / 2400 / 4800 / 9600 / 19200 / 34800 bps

Data Bits

8 bits

Parity bits

No

STOP BITS

1 bit

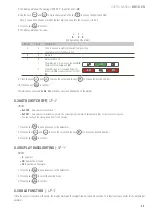
HEAD INFORMATION

HEAD 1 (2 BYTES)

HEAD 2 (2 BYTES)

OL – Extracharge
ST – Stable

NT – Net weight

US – U

nstable

GS – Net weight

Содержание 260657

Страница 1: ...omply with new regulations Il produttore si riserva il diritto di modificare senza preavviso le caratteristiche dei suoi prodotti al fine di introdurre dei miglioramenti tecnici o di conformarsi alle nuove normative ufficiali Le constructeur se réserve le droit de modifier les caractéristiques de ses produits en vue d y apporter des améliorations techniques ou de respecter de nouvelles réglamentat...

Страница 2: ...BR16 2 ...
Страница 3: ... CERO ECF 2 15 9 3 CALIBRACIÓN DE PESO ECF 3 15 10 PARÁMETROS TÉCNICOS 16 11 GARANTÍA 20 ES FR 1 SPÉCIFICATIONS 21 2 ALIMENTATION 21 3 AVANT SON UTILISATION 21 4 CONSOMMATION 21 5 CONNEXION DE LA CAPTEURS DE CHARGE À L INDICATEUR 21 6 DESCRIPTION DE L AFFICHAGE ET DU CLAVIER 23 7 MODE COMPTE PIÈCES 23 8 CONFIGURATION DE PARAMÈTRES 24 8 1 COMPTES INTERNES A D UF 1 24 8 2 CONFIGURATIOºN DES LIMITES ...

Страница 4: ...IBRAZIONE DELLO ZERO PESO ECF 1 45 9 2 CALIBRAZIONE DELLO ZERO ECF 2 45 9 3 CALIBRAZIONE DEL PESO ECF 3 45 10 PARAMETRI TECNICI 46 11 GARANZIA 50 1 SPECIFICATIONS 51 2 POWER 51 3 BEFORE USE 51 4 CONSUMPTION 51 5 CONNECTING THE CHARGING CELL TO THE INDICATOR 51 6 DISPLAY AND KEYBOARD DESCRIPTION 53 7 PIECE COUNTING MODE 54 8 PARAMETER CONFIGURATION 54 8 1 INTERIOR CALCULATIONS A D UF 1 54 8 2 CONST...

Страница 5: ...ST UND MINDESTGEWICHT UF 2 69 8 3 AUTOMATISCHES ABSCHALTEN UF 3 69 8 4 KONFIGURATION DER DISPLAYBELEUCHTUNG UF 4 69 8 5 HOLD FUNKTION UF 5 70 8 6 DATENAUSGANG RS 232 UF 6 70 8 7 KONFIGURATION DER GESCHWINDIGKEIT DES STROMRICHTERS UF 7 73 8 8 NULL TEILWERT UF 8 73 8 9 KONFIGURATION DER GRAVITATION UF 9 74 9 KALIBRIERUNG NUR FÜR AUTORISIERTES PERSONAL 74 9 1 KALIBRIERUNG VON NULL GEWICHT ECF 1 74 9 ...

Страница 6: ...ones eléctricas 3 No colocar ningún objeto sobre la plataforma en el momento de poner en marcha el indicador 4 Por favor permita que la balanza se precaliente durante 2 3 minutos antes de su utilización 5 Evitar cambios de temperatura muy bruscos y corrientes de aire 6 No sobrecargar la balanza nunca exceder la capacidad máxima 4 CONSUMO Consumo normal en reposo approx 12mA 333h Consumo con la ret...

Страница 7: ... 7 GND CONNEXIÓN RS232 5 4 3 2 1 9 8 7 6 2 Tx 3 Rx 5 GND PROTOCOLO UART signal of EIA RS232 C SEÑAL UART DE EIA RS232 C Salida serie 1200 2400 4800 9600 19200 34800 bps Bits de datos 8 bits Bits de paridad No Bits de stop 1 bit INFORMACIÓN CABECERAS Cabecera 1 2 BYTES Cabecera 2 2 BYTES OL Sobrecarga ST Estable NT Peso neto US INESTABLE GS Peso bruto ...

Страница 8: ... bruto del producto las demás teclas quedan deshabilitadas 2º función Para incrementar los valores dentro del modo programación 1º función Transmisión manual de datos a través del puerto RS 232 a un PC o impresora y según modo elegido 2º función Tecla de confirmación dentro del modo programación 7 MODO CUENTA PIEZA 1 Presione la tecla hasta que la pantalla muestre Pcs 2 Presione sucesivamente para...

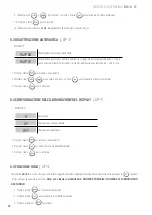
Страница 9: ...asar al siguiente parámetro pulsar la tecla y la pantalla indicará el voltaje de la batería 3 Pulsar la tecla para volver al menú UF 8 2 CONFIGURACIÓN DE LOS LÍMITES DE PESO SUPERIOR E INFERIOR UF 2 1 Pulsar la tecla para acceder al parámetro 2 El display mostrará el mensaje 000000L Límite inferior 3 Utilizar las teclas y para mover el cursor y la tecla para seleccionar el número deseado 4 Pulsar ...

Страница 10: ...ver el cursor y la tecla para seleccionar el tiempo deseado 3 Pulsar la tecla para confirmar 8 4 CONFIGURACIÓN DE LA ILUMINACIÓN DEL DISPLAY UF 4 MODOS A Automática ON Iluminación activada siempre OFF Iluminación desactivada 1 Pulsar la tecla para acceder al parámetro 2 Pulsar la tecla para seleccionar el modo deseado 3 Pulsar la tecla para confirmar 8 5 FUNCIÓN HOLD UF 5 Los modo HOLD permiten qu...

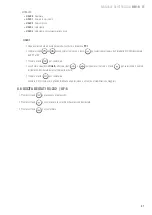
Страница 11: ...el rango de HOLD deseado de 001 a 100 Pulsar la tecla para confirmar La pantalla mostrará time 8 use la teclas y para mover el cursor y la tecla para seleccionar el número de repeticiones deseado durante el rango de hold Pulsar la tecla para confirmar Ejemplo PCt pequeño y time grande implica más precisión y mayor tiempo de estabilización 8 6 SALIDA DE DATOS RS 232 UF 6 1 Pulsar la tecla para acce...

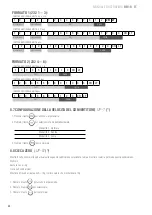
Страница 12: ...uo con formato 2 Envío de trama sin acumulación manual presionando la tecla con formato 2 Formato 3 impresora FORMATO AUTOMÁTICO DE PESO O PIEZAS ENVÍO DE TRAMA 232 7 Envío de trama y acumulación manual pasando por cero y presionando la tecla con formato 3 Si estando la pantalla a 0 se presiona dos veces seguidas la tecla se imprime la línea de total Y se borra la memoria de pesadas Nota Acumulaci...

Страница 13: ...me el resumen de tiquets Y se borra la memoria de pesadas NOTA totalización no disponible en metrologia legal ENVÍO DE TRAMA 232 10 Envío de trama y acumulación automática a la estabilidad pasando por cero y presionando la tecla con formato 4 Si estando la pantalla a 0 se presiona dos veces seguidas la tecla se imprime el resumen de tiquets Y se borra la memoria de pesadas NOTA totalización no dis...

Страница 14: ...oz 1 2 3 4 5 6 7 8 9 1 2 3 4 CR LF Datos Unidad 13 BYTES ASCII PARA LA UNIDAD pcs 1 2 3 4 5 6 7 8 1 2 3 CR LF Datos Unidad 8 7 CONFIGURACIÓN DE LA VELOCIDAD DEL CONVERTIDOR UF 7 1 Pulsar la tecla para acceder al parámetro 2 Pulsar la tecla para seleccionar el modo deseado Modo 1 Normal Modo 2 Rápido Modo 3 Lento 3 Pulsar la tecla para confirmar 8 8 CIEGA CERO UF 8 Muestra 0 en pantalla hasta llega...

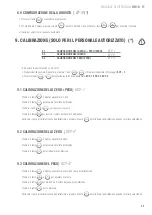
Страница 15: ...SO ECF 1 Pulsar la tecla el display mostrará CALZ Pulsar la tecla para poner a cero la lectura del display Pulsar las teclas y para mover el cursor Pulsar la tecla introducir el valor de la pesa de calibración Colocar la pesa de calibración sobre la plataforma y pulsar la tecla para efectuar la calibración una vez la lectura sea estable 9 2 CALIBRACIÓN DE CERO ECF 2 Pulsar la tecla el display most...

Страница 16: ...as teclas o para cambiar de parámetro y la tecla para salir del menú y el visor se reiniciará automáticamente LF 1 CALIBRACIÓN DE PESO LF 1 DISPLAY DESCRIPCIÓN y SECUENCIA DE USO La calibración se puede realizar con cualquier peso pero el peso no debe ser inferior a 1 3 de la máxi ma capacidad ni nunca debe ser sobrepasada Presione la tecla para empezar la calibración de zero presione para salir d...

Страница 17: ...ión anterior Proceda con la calibración de peso después de LF2 LF 2 Presione la tecla para empezar y mostrará el VALOR INTERNO Presione para salir del menú y la báscula se reiniciará automáticamente 262144 Presione para continuar con la configuración presione para salir de la configuración y volver al menú LF2 100001 Utilice y y después para seleccioinar las UNIDADES Y MODO DE PESA JE según la tab...

Страница 18: ...camente CIEGA LF 5 DISPLAY DESCRIPCIÓN Y SECUENCIA DE USO LF 5 ZP 0 OFF ZP 1 Una división no se mostrará estando a cero ZP 2 Dos divisiones no se mostrarán estando a cero ZP 3 Tres divisiones no se mostrarán estando a cero ZP 4 Cuatro divisiones no se mostrarán estando a cero ZP 5 Cinco divisiones no se mostrarán estando a cero Esta función queda bloqueada cuando UF 5 se encuentra en modo HOLD 1 E...

Страница 19: ... para continuar o para salir del menú y la báscula se reiniciará automática mente LF 7 00 La pantalla mostrará el número de pre calibración durante un segundo 9 8035 Presione para continuar 9 8035 Utilice y 0 9 y después para introducir el valor de gravedad presione ESC para salir de la configuración y volver al menú LF 7 CERO INICIAL LF 8 SEtZ Y resetea el punto de cero cada vez que se reinita la...

Страница 20: ...de material por un periodo de 1 año a partir de la fecha de entrega Durante este periodo GIROPÈS se hará cargo de la reparación del indicador Esta garantía no incluye los daños ocasionados por uso indebido o sobrecargas La garantía no cubre los gastos de envío portes necesarios para la reparación del indicador ...

Страница 21: ...s chocs électriques 3 Ne placez pas d objets sur la plateforme au moment de la mise en marche de l indicateur 4 Laissez la balance préchauffer pendant 2 3 minutes avant utilisation 5 Évitez les changements brusques de température et les courants d air 6 Évitez de surcharger la balance ne dépassez jamais la capacité maximale 4 CONSOMMATION Consommation normale au repos environ 12mA 333h Consommatio...

Страница 22: ...6 EXC PIN 7 GND CONNEXION RS232 5 4 3 2 1 9 8 7 6 2 Tx 3 Rx 5 GND PROTOCOLE signal UART de EIA RS232 C SIGNAL UART DE EIA RS232 C Sortie série 1200 2400 4800 9600 19200 34800 bps Bits de données 8 bits Bits de parité No Bits de stop 1 bit INFORMATION TÊTES Tête 1 2 OCTETS Tête 2 2 OCTETS OL Surcharge ST Stable NT Poids net US INSTABLE GS Poids brut ...

Страница 23: ...du produit les autres touches sont désactivées 2ème fonction Pour augmenter les valeurs dans le mode de programmation 1ère fonction Transmission manuelle des données via le port RS 232 à un PC ou une imprimante et selon le mode choisi 2ème fonction Touche de confirmation dans le mode de programmation 7 MODE COMPTE PIÈCES 1 Appuyez sur la touche jusqu à ce que l écran affiche Pcs 2 Appuyez successi...

Страница 24: ... au paramètre suivant appuyez sur la touche et l écran indiquera la tension de la batterie 3 Appuyer sur la touche pour revenir au menu UF 8 2 CONFIGURATION DES LIMITES DE POIDS SUPÉRIEURE ET INFÉRIEURE UF 2 1 Appuyez sur la touche pour accéder au paramètre 2 L écran affichera 000000L limite inférieure 3 Utilisez les touches et pour déplacer le curseur et la touche pour sélectionner le numéro dési...

Страница 25: ...che pour sélectionner le temps désiré 3 Appuyer sur la touche pour confirmer 8 4 CONFIGURATION DE L ÉCLAIRAGE DE L AFFICHAGE UF 4 MODES A Automatique ON Éclairage toujours activé OFF Éclairage désactivé 1 Appuyez sur la touche pour accéder au paramètre 2 Appuyez sur la touche pour sélectionner le mode désiré 3 Appuyez sur la touche pour confirmer 8 5 FONCTION HOLD UF 5 Les modes HOLD permettent un...

Страница 26: ... et plus de temps de stabilisation 8 6 SORTIE DE DONNÉES RS 232 UF 6 1 Appuyez sur la touche pour accéder au paramètre 2 Appuyez sur la touche pour sélectionner la vitesse de transmission désirée 3 Appuyez sur la touche pour confirmer FORMAT DES DONNÉES Aucun format 232 0 Sortie RS 232 Désactivée Format 1 PC FORMAT AUTOMATIQUE DE POIDS OU PIÈCES ENVOI DE TRAME 232 1 232 2 232 3 Envoi de trame sans...

Страница 27: ... sur la touche et la ligne totale est imprimée Et on efface la mémoire des pesées Remarque Accumulation et totalisation non disponible pour la métrologie légale 232 8 Envoi de trame et accumulation automatique à la stabilité en passant par 0 avec format 3 Si l écran est à 0 on appuie deux fois de suite sur la touche et la ligne totale est imprimée Et on efface la mémoire des pesées Remarque Accumu...

Страница 28: ... automatique à la stabilité en passant par zéro et en appuyant sur la touche avec format 4 Si l écran est à 0 on appuie deux fois de suite sur la touche et le résumé des tickets est imprimé Et on efface la mémoire des pesées REMARQUE totalisation non disponible en métrologie légale REMARQUE Chaque fois qu une accumulation est terminée le viseur affiche le total cumulé pendant 3 secondes FORMAT 1 2...

Страница 29: ...r sur la touche pour confirmer 8 8 ZÉRO AVEUGLE UF 8 Affiche 0 jusqu à atteindre la prochaine division sélectionnée En commençant à afficher des valeurs à partir de cette division Exemple balance avec e 2g aveugle en 5 divisions Il affichera 0 jusqu à atteindre 2x5 10g la première valeur qui sera affichée sera 12g 1 Appuyez sur la touche pour accéder au paramètre 2 Appuyez sur la touche pour sélec...

Страница 30: ...lonnage une fois que la lecture est stable 9 2 ÉTALONNAGE DE ZÉRO ECF 2 Appuyez sur la touche l écran affichera CALZ Appuyez sur la touche pour mettre la lecture de l affichage à zéro Appuyez sur la touche pour effectuer l étalonnage 9 3 ÉTALONNAGE DE POIDS ECF 3 Appuyez sur la touche l écran affichera la valeur du poids d étalonnage Appuyez sur les touches et pour déplacer le curseur Appuyez sur ...

Страница 31: ... SÉQUENCE D UTILISATION L étalonnage peut être effectué avec n importe quel poids mais le poids ne doit pas être inférieur à 1 3 de la capacité maximale ou ne doit jamais être dépassé Appuyez sur la touche pour démarrer l étalonnage du zéro appuyez sur pour quitter l étalonnage et revenir au menu LF1 LF 1 CAL Z 150 00 kg Utilisez et 0 9 puis pour entrer le poids avec lequel sera fait l étalonnage ...

Страница 32: ...onfiguration précédente Continuez l étalonnage du poids après LF2 LF 2 Appuyez sur la touche pour démarrer et cela affichera VALEUR INTERNE Appuyez sur pour quitter le menu et la balance sera automatiquement réinitialisée 262144 Appuyez sur pour continuer la configuration appuyez sur pour quitter la configuration et revenir au menu LF2 100001 Utilisez et et pour sélectionner les UNITÉS ET LE MODE ...

Страница 33: ...PTION ET SÉQUENCE D UTILISATION LF 5 ZP 0 OFF ZP 1 Une division ne sera pas affichée en étant sur zéro ZP 2 Deux divisions ne seront pas affichées en étant sur zéro ZP 3 Trois divisions ne seront pas affichées en étant sur zéro ZP 4 Quatre divisions ne seront pas affichées en étant sur zéro ZP 5 Cinq divisions ne seront pas affichées en étant sur zéro Cette fonction est bloquée lorsque UF 5 est en...

Страница 34: ...ur pour quitter le menu et la balance redémarrera automatiquement LF 7 00 L écran affichera le nombre de pré étalonnages pendant une seconde 9 8035 Appuyez sur pour continuer 9 8035 Utilisez et 0 9 et pour introduire la valeur de gravité appuyez sur ESC pour quitter la configuration et revenir au menu LF 7 ZÉRO INITIAL LF 8 SEtZ Y remet à zéro le point zéro à chaque fois que la balance est réiniti...

Страница 35: ...our une période de 1 an à compter de la date de livraison Durant cette période Giropès se chargera de la réparation de l indicateur Cette garantie ne couvre pas les dommages causés par une mauvaise utilisation ou une surcharge La garantie ne couvre pas les frais d expédition fret nécessaires à la réparation de l indicateur ...

Страница 36: ... perturbazioni elettriche 3 Durante l avvio dell indicatore non collocare nessun oggetto sulla piattaforma 4 Prima di utilizzare la bilancia consentirne il preriscaldamento per 2 3 minuti 5 Evitare bruschi cambi di temperatura e correnti d aria 6 Non sovraccaricare mai la bilancia né superare la capacità massima 4 CONSUMO Consumo normale a riposo 12mA 333h ca Consumo con la retroilluminazione 36mA...

Страница 37: ...ND COLLEGAMENTO RS232 5 4 3 2 1 9 8 7 6 2 Tx 3 Rx 5 GND PROTOCOLLO UART signal of EIA RS232 C SEGNALE UART DI EIA RS232 C Uscita serie 1200 2400 4800 9600 19200 34800 bps Bit di dati 8 bits BIT DI PARITÀ No Bit di stop 1 bit INFORMAZIONI INTESTAZIONI Intestazione 1 2 BYTE Intestazione 2 2 BYTE OL Sovraccarico ST Stabile NT Peso netto US INSTABILE GS Peso lordo ...

Страница 38: ... peso lordo del prodotto gli altri tasti sono disattivati 2 funzione Per aumentare i valori in modalità di programmazione 1 funzione Trasmissione manuale di dati mediante la porta RS 232 a un PC o una stampante e secondo la modalità scelta 2 funzione Tasto di conferma in modalità di programmazione 7 MODALITÀ CONTAPEZZI 1 Premere il tasto hfinché lo schermo non visualizza Pcs 2 Premere successivame...

Страница 39: ...al parametro seguente premere il tasto e lo schermo indicherà il voltaggio della batteria 3 Premere il tasto per tornare al menu UF 8 2 CONFIGURAZIONE DEI LIMITI DI PESO SUPERIORE E INFERIORE UF 2 1 Premere il tasto per accedere al parametro 2 Il display visualizzerà il messaggio 000000L Limite inferiore 3 Utilizzare i tasti e per spostare il cursore e il tasto per selezionare il numero desiderato...

Страница 40: ... il cursore e il tasto per selezionare il tempo desiderato 3 Premere il tasto per confermare 8 4 CONFIGURAZIONE DELL ILLUMINAZIONE DEL DISPLAY UF 4 MODALITÀ A Automatica ON Illuminazione sempre attivata OFF Illuminazione disattivata 1 Premere il tasto per accedere al parametro 2 Premere il tasto per selezionare la modalità desiderata 3 Premere il tasto per confermare 8 5 FUNZIONE HOLD UF 5 La moda...

Страница 41: ...lo di HOLD desiderato da 001 a 100 Premere il tasto per confermare Lo schermo visualizzerà time 8 utilizzare i tasti e per spostare il cursore e il tasto per selezionare il numero di ripetizioni desiderato durante l intervallo di hold Premere il tasto per confermare Esempio PCt piccolo e time grande implicano una precisione e un tempo di stabilizzazione maggiori 8 6 USCITA DEI DATI RS 232 UF 6 1 P...

Страница 42: ...me continuo con formato 2 Invio di frame senza accumulo manuale premendo il tasto con formato 2 Formato 3 stampante FORMATO AUTOMATICO DI PESO O PEZZI INVIO DI FRAME 232 7 Invio di frame e accumulo manuale passando per zero e premendo il tasto con formato 3 Con lo schermo a 0 se si preme due volte consecutive il tasto si stampa la linea del totale E si cancellano le pesature in memoria Nota Accumu...

Страница 43: ...nto degli scontrini e si cancellano le pesature in memoria N B totale non disponibile in metrologia legale INVIO DI FRAME 232 10 Invio di frame e accumulo automatico alla stabilità passando per zero e premendo il tasto con formato 4 Con lo schermo a 0 se si preme due volte consecutive il tasto si stampa il riassunto degli scontrini E si cancellano le pesature in memoria N B totale non disponibile ...

Страница 44: ... 1 2 3 4 CR LF Dati Unità 13 BYTES ASCII PER LE UNITÀ pcs 1 2 3 4 5 6 7 8 1 2 3 CR LF Dati Unità 8 7 CONFIGURAZIONE DELLA VELOCITÀ DEL CONVERTITORE UF 7 1 Premere il tasto per accedere al parametro 2 Premere il tasto per selezionare la modalità desiderata Modalità 1 Normale Modalità 2 Rapida Modalità 3 Lenta 3 Premere il tasto per confermare 8 8 CIECA ZERO UF 8 Mostra 0 sullo schermo fino ad arriv...

Страница 45: ...remere il tasto il display visualizzerà CALZ Premere il tasto per azzerare la lettura del display Premere i tasti e per spostare il cursore Premere il tasto per inserire il valore del peso di calibrazione Collocare il peso di calibrazione sulla piattaforma e premere il tasto per effettuare la calibrazione quando la lettura sarà stabile 9 2 CALIBRAZIONE DELLO ZERO ECF 2 Premere il tasto il display ...

Страница 46: ...ambiare parametro e il tasto per uscire dal menu e lo schermo si riavvierà automaticamente LF 1 CALIBRAZIONE DEL PESO LF 1 DISPLAY DESCRIZIONE E SEQUENZA D USO La calibrazione può essere effettuata con qualsiasi peso ma il peso non deve essere inferiore a 1 3 della capacità massima e quest ultima non deve essere mai superata Premere il tasto per iniziare la calibrazione dello zero premere per usci...

Страница 47: ...te Procedere con la calibrazione del peso dopo LF2 LF 2 Premere il tasto per iniziare e lo schermo visualizzerà il VALORE INTERNO Premere per uscire dal menu e la bascula si riavvierà automaticamente 262144 Premere il tasto per continuare con la configurazione premere per uscire dalla con figurazione e tornare al menu LF2 100001 Utilizzare e e quindi per selezionare le UNITÀ e la MODALITÀ DI PESA ...

Страница 48: ...ESCRIZIONE E SEQUENZA D USO LF 5 ZP 0 OFF ZP 1 Una suddivisione non verrà mostrata quando è a zero ZP 2 Due suddivisioni non verranno mostrate quando è a zero ZP 3 Tre suddivisioni non verranno mostrate quando è a zero ZP 4 Quattro suddivisioni non verranno mostrate quando è a zero ZP 5 Cinque suddivisioni non verranno mostrate quando è a zero Questa funzione rimane bloccata quando UF 5 è in modal...

Страница 49: ...mere per continuare o paper uscire dal menu e la bascula si riavvierà automatica mente LF 7 00 Lo schermo mostrerà il numero di precalibrazione per un secondo 9 8035 Premere per continuare 9 8035 Utilizzare e 0 9 e quindi per inserire il valore della gravità premere ESC per uscire dalla configurazione e tornare al menu LF 7 ZERO INIZIALE LF 8 SEtZ Y resetta il punto dello zero ogni volta che si ri...

Страница 50: ...ne e di materiali della durata di un anno a partire dalla data di consegna Durante questo periodo GIROPÈS SL si farà carico della riparazione della stesso Questa garanzia non include i danni causati da uso improprio o sovraccarichi La garanzia non copre le spese di spedizione trasporto necessarie alla riparazione dell indicatore ...

Страница 51: ...any object on the platform when switching on the indicator 3 Please warm up the scale during 2 3 minutes before using it 4 Avoid sudden changes in temperature and draughts 5 Don t overload the scale do not exceed its maximum capacity 4 CONSUMPTION Normal consumption at rest approx 12mA 333h Consumption with backlight aprox 36mA 111 11h Consumption with backlight and output RS 232 aprox 48mA 83h Ba...

Страница 52: ...EXC PIN 7 GND CONNECTION RS232 5 4 3 2 1 9 8 7 6 2 Tx 3 Rx 5 GND PROTOCOL UART signal of EIA RS232 C SIGNAL UART EIA RS232 C Serial output 1200 2400 4800 9600 19200 34800 bps Data Bits 8 bits Parity bits No STOP BITS 1 bit HEAD INFORMATION HEAD 1 2 BYTES HEAD 2 2 BYTES OL Extracharge ST Stable NT Net weight US Unstable GS Net weight ...

Страница 53: ...the maximum capacity 2º function To move a space to the left or down into the programming mode 1º function To subtract the weight of a container 2º function To move a space to the right or up in the programming mode 1º function To display the net or gross weight of a product when a tare has been made When the gross weight of the product is displayed the other keys are disabled 2º function To incre...

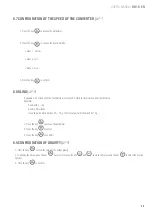
Страница 54: ...GHT LIMITS SUPERIOR AND INFERIOR UF 2 8 3 AUTO SWITCH OFF UF 3 8 4 CONFIGURATION OF THE ILLUMINATION OF THE DISPLAY UF 4 8 5 HOLD FUNCTION UF 5 8 6 RS 232 DATA EXIT UF 6 8 7 CONFIGURATION OF THE SPEED OF THE AD CONVERTER UF 7 8 8 BLIND UF 8 8 9 CONFIGURATION OF THE GRAVITY UF 9 To access the configuration of parameters when the screen is in zero the user must press at the same time the keys and Pr...

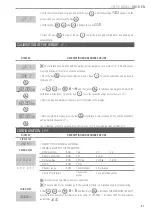
Страница 55: ... key to choose the desired number 10 Press the key to confirm The indications on screen Lo Ok Hi will appear on screen depending on the weight 8 3 AUTO SWITCH OFF UF 3 MODES AoFF 00 Auto switch off deactivated AoFF 01 Auto switch off activated in a minute The scale is going to switch off automatically after 1 minute of not being used You can configure the value wished from 1 to 99 minutes 1 Press ...

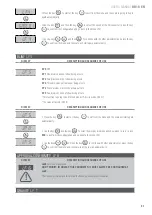
Страница 56: ... of hold Press the key to confirm Example PCt small and big time means more accuracy and longer stabilization 8 6 RS 232 DATA EXIT UF 6 1 Press the key to access to the parameter 2 Press the key to select the transmision speed desired 3 Press the key to confirm 232 0 EXIT RS 232 DEACTIVATED FORMAT OF THE DATA Format 1 PC VARIOUS FORMATS AVAILABLE CONNECTION SENDING 232 1 232 2 232 3 Connection sen...

Страница 57: ... the weights is removed Format 4 printer DIFFERENT POSSIBLE FORMATS 232 9 232 10 Connection sending and manual accumulation passing 0 and pressing the key with format 4 Connection sending and automatic accumulation to stability passing 0 and pressing the key with format 4 If the user presses the key twice one after the other when the screen is in 0 the summarizing of the tickets is printed If the ...

Страница 58: ...4 5 6 7 8 9 1 2 3 4 CR LF Headboard 1 Headboard 2 data Unit 19 BYTES ASCII FOR THE UNIT pcs 1 2 1 2 1 2 3 4 5 6 7 8 1 2 3 CR LF Headboard 1 Headboard 2 data Unit FORMAT 2 232 4 6 12 BYTES ASCII FOR THE UNITIES kg g t lb 1 2 3 4 5 6 7 8 1 2 CR LF data Unit 15 BYTES ASCII FOR THE UNITIES tl T lboz 1 2 3 4 5 6 7 8 9 1 2 3 4 CR LF data Unit 13 BYTES ASCII FOR THE UNIT pcs 1 2 3 4 5 6 7 8 1 2 3 CR LF d...

Страница 59: ... starts to show values from that division Example Scale with e 2g Blind in 5 divisions It will show 0 until it reaches 25 10 g the first value it will show will be 12g 1 Press the key to access the parameter 2 Press the key to select 3 Press the key to confirm 8 9 CONFIGURATION OF GRAVITY UF 9 1 Press the key to view the value of the actual gravity 2 To change the value press the key next you must...

Страница 60: ...e calibration once the reading is steady ECF 2 CALIBRATION OF ZERO Press the key the display will show CALZ Press the key to put the reading of the display to zero Press the key to calibration CALIBRATION OF WEIGHT SPAN Press the key the display will show the value of the weight of calibration Press the keys and to move the cursor Pulsar la tecla to modify the value of the weight of calibration Pu...

Страница 61: ...cale as it is indicated in the display 150 00 kg Once everything is steady press the key to calibrate it press the key ESC to exit the calibration and go back to the menu LF1 THE CALIBRATION IS GOING TO FINISH AND THE SCALE WILL GO VACK TO THE WEIGHING MODE AUTOMATICALLY CONFIGURATION LF 2 DISPLAY DESCRIPTION AND SEQUENCE OF USE FIRST STEP DISPLAY OF THE INTERNAL COUNTING 262144 SECOND STEP POSSIB...

Страница 62: ...nu LF2 100001 Use the keys and 0 9 and then press the key to choose the UNITS OF WEIGHT press the key to exit from the configuration and go back to the menu LF2 000000kg Use the keys and 0 9 and then press the key to choose the MAXI MUM WEIGHT press the key to exit from the configuration and go back to the menu LF2 d 0 0kg Use the keys and Then To move the decimal point press the key To exit from ...

Страница 63: ...ow being at zero ZP 5 Five divisions will not show being at zero This function is going to be blocked when UF 5 is in mode HOLD 1 The value of factory is ZP 0 LF 5 DISPLAY DESCRIPTION AND SEQUENCE OF USE Press the key to start or the key to exit from the menu and the scale will start again automatically LF 5 ZP 0 Use the key and the key to select how many divisions will show when in zero press ESC...

Страница 64: ...ERO LF 8 SEtZ Y resets of the point of zero every time that the scale is begun again SEtZ n resets of the point zero OFF DISPLAY DESCRIPTION AND SEQUENCE OF USE Press the key to start or the key to exit from the menu and the scale will start again automatically LF 8 Use the key and then the key to choose the mode of zero initial press the key to exit from the configuration and go back to the menu ...

Страница 65: ...che Störungen 3 Wenn Sie die Anzeige einschalten darf sich kein Gegenstand auf der Wägeplatte befinden 4 Warten Sie nach dem Einschalten 2 3 Minuten damit sich die Waage vorwärmen kann 5 Vermeiden Sie plötzliche Temperaturschwankungen und Zugluft 6 Überladen Sie die Waage nicht und überschreiten Sie nie die Maximalkapazität 4 VERBRAUCH Normalverbrauch im Standby ca 12 mA 333 h Verbrauch mit Hinter...

Страница 66: ...TIFT 6 EXC STIFT 7 GND ANSCHLUSS RS232 5 4 3 2 1 9 8 7 6 2 Tx 3 Rx 5 GND PROTOKOLL UART signal of EIA RS232 C UART SIGNAL EIA RS232 C Serienausgang 1200 2400 4800 9600 19200 34800 bps Daten Bits 8 Bit Paritätsbits Keine STOPP Bits 1 Bit DATEN KOPFZEILE Kopfzeile 1 2 BYTE Kopfzeile 2 2 BYTE OL Überladen ST Stabil NT Nettogewicht US INSTABIL GS Bruttogewicht ...

Страница 67: ... das Bruttogewicht eines Produkts angezeigt wird sind die anderen Tasten deaktiviert 2 Funktion Um die Werte im Programmiermodus zu erhöhen 1 Funktion Manuelle Datenübertragung auf einen PC oder Drucker über den Port RS 232 und gemäß ausgewähltem Modus 2 Funktion Bestätigungstaste im Programmiermodus 7 STÜCKZÄHLMODUS 1 Drücken Sie die Taste bis im Display Pcs erscheint 2 Drücken Sie nacheinander u...

Страница 68: ...um Wägemodus zurückzukehren 8 1 INTERNES ZÄHLEN A D UF 1 1 Drücken Sie die Taste um die interne Zählfunktion der Waage anzuzeigen 2 Drücken Sie die Taste um zum nächsten Parameter zu gelangen Im Display erscheint die Batterie spannung 3 Drücken Sie die Taste um zum Menü UF zurück zu gelangen 8 2 KONFIGURATION DER GEWICHTSGRENZEN HÖCHST UND MINDESTGEWICHT UF 2 1 Drücken Sie die Taste um auf den Par...

Страница 69: ... zu bestätigen Im Display erscheinen die Anzeigen Lo Ok Hi nach dem Gewicht 8 3 AUTOMATISCHES ABSCHALTEN UF 3 MODI AoFF 00 Automatisches Abschalten deaktiviert AoFF 01 Automatisches Abschalten aktiviert Die Waage schaltet sich automatisch ab wenn inner halb von 1 Minute keine Aktion durchgeführt wird Wählen Sie die Abschaltzeit zwischen 1 und 99 Minuten 1 Drücken Sie die Taste um auf den Parameter...

Страница 70: ...Bewegung HOLD 2 Scheitelwert HOLD 3 Hold stabil HOLD 4 Hold stabil mit Auto Löschen auf Null HOLD 1 Wurde dieser Parameter ausgewählt zeigt das Display PCt Verwenden Sie die Tasten und um den Cursor zu bewegen und die Taste um den gewünschten Wert des HOLD Bereiches von 001 bis 100 auszuwählen Drücken Sie die Taste um zu bestätigen Im Display erscheint time 8 Verwenden Sie die Tasten und um den Cu...

Страница 71: ...it Format 2 Rasterübermittlung ohne Speicherung durch Drücken der Taste mit Format 2 Format 3 Drucker AUTOMATISCHES FORMAT VON GEWICHT ODER STÜCK RASTERÜBERMITTLUNG 232 7 Rasterübermittlung und manuelles Speichern über Null und durch Drücken der Taste mit Format 3 Wenn das Display 0 zeigt drücken Sie zweimal nacheinander die Taste Die Summenzeile wird gedruckt Der Wägespeicher wird gelöscht Bitte ...

Страница 72: ...gebnis wird gedruckt Der Wägespeicher wird gelöscht HINWEIS Summierung nicht durch rechtliches Messwesen erhältlich RASTERÜBERMITTLUNG 232 10 Rasterübermittlung und automatisches Speichern bei Stabilität über Null und durch Drücken der Taste mit Format 4 Wenn das Display 0 zeigt drücken Sie zweimal nacheinander die Taste Das Kartenergebnis wird gedruckt Der Wägespeicher wird gelöscht HINWEIS Summi...

Страница 73: ...heit 13 BYTES ASCII FÜR DIE EINHEIT pcs 1 2 3 4 5 6 7 8 1 2 3 CR LF Daten Einheit 8 7 KONFIGURATION DER GESCHWINDIGKEIT DES STROMRICHTERS UF 7 1 Drücken Sie die Taste um auf den Parameter zuzugreifen 2 Drücken Sie die Taste um den gewünschten Modus auszuwählen Modus 1 Normal Modus 2 Schnell Modus 3 Langsam 3 Drücken Sie die Taste um zu bestätigen 8 8 NULL TEILWERT UF 8 Das Display zeigt 0 bis die ...

Страница 74: ...e Im Display erscheint CALZ Drücken Sie die Taste um die Displayanzeige auf Null zu setzen Drücken Sie die Tasten und um den Cursor zu bewegen Drücken Sie die Taste und geben Sie den Wert des Kalibriergewichts ein Stellen Sie das Kalibriergewicht auf die Wägeplatte und drücken Sie die Taste um die Kalibrierung zu starten sobald die Anzeige stabil ist 9 2 KALIBRIERUNG VON NULL ECF 2 Drücken Sie die...

Страница 75: ...urch das Gerät eingeschaltet wird Wenn im Display 1001 erscheint lassen Sie die Taste los Drücken Sie die Taste um Zugriff auf die Tasten zu erhalten oder um den Parameter zu ändern Drücken Sie die Taste um das Menü zu verlassen Die Anzeige startet automatisch neu LF 1 KALIBRIERUNG DES GEWICHTS LF 1 DISPLAY BESCHREIBUNG und ABFOLGE Die Kalibrierung kann mit jedem Gewicht erfolgen wobei die Last ni...

Страница 76: ... KEHRT AUTOMATISCH ZUM WÄGEMODUS ZURÜCK KONFIGURATION LF 2 DISPLAY BESCHREIBUNG und ABFOLGE ERSTER SCHRITT ANZEIGE DER INTERNEN ZÄHLUNGEN 262144 ZWEITER SCHRITT MÖGLICHE WERTE DER PARAMETER A Metrisches System 0 NO 1 kg 2 T 3 g 1 0 0 0 0 1 B Amerikanisches Sys tem 0 NO 1 lb 2 lb oz C andere Einheiten 0 NO 1 TW kg 2 HK kg 3 VISS D PCS 0 OFF 1 ON A B C D E F E zweifacher Bereich 0 OFF 1 mehrere Inte...

Страница 77: ...EMODUS gemäß der vorstehenden Tabelle auszuwählen Drücken Sie um die Kalibrierung zu beenden und zum Menü LF2 zurück zu kehren 000000kg Verwenden Sie und und dann um die MAXIMALKAPAZITÄT auszuwählen Dabei müssen Sie die Anzahl der Dezimalzeichen beachten die im nächsten Schritt ausgewählt wird Drücken Sie um die Kalibrierung zu beenden und zum Menü LF2 zurück zu kehren d 0 0kg Verwenden Sie und da...

Страница 78: ...ilungen befindet sich nicht auf Null ZP 5 Fünf Unterteilungen befinden sich nicht auf Null Diese Funktion ist gesperrt wenn UF 5 sich im HOLD Modus 1 befindet Die Werkseinstellung ist ZP 0 DISPLAY BESCHREIBUNG und ABFOLGE Drücken Sie um zu beginnen oder um das Menü zu verlassen Die Waage startet automatisch neu LF 5 ZP 0 Verwenden Sie und dann um die Unterteilungen auszuwählen die sich nicht auf N...

Страница 79: ...ion zu beenden und zum Menü LF 7 zurück zu kehren START NULL LF 8 SEtZ Y setzt den Nullpunkt immer zurück wenn die Waage neu startet SEtZ n Zurücksetzen des Nullpunktes Off DISPLAY BESCHREIBUNG und ABFOLGE Drücken Sie um zu beginnen oder um das Menü zu verlassen Die Waage startet automatisch neu LF 8 Verwenden Sie und dann um den Modus Start Null auszuwählen Drücken Sie um die Konfiguration zu bee...

Страница 80: ...marca propiedad de est une marque de trade mark propiety of Pol Empordà Internacional Calle F Parcela 15 16 17469 VILAMALLA Girona SPAIN T 34 972 527 212 F 34 972 527 211 ...

Отзывы: