


EN
1
Instruction manual
©2010 Gildewerk NL
Subject to changes. The conditions held at the
county court in Haarlem apply to all services and
goods supplied by Gildewerk.
The Gildewerk store display rack is a practical storage
and display unit for candles which are ready to be sold.
With this store rack, you can exhibit your products
to potential buyers in a professional manner.
Before you use this store rack, you will have to assemble it.
This is easily done if you follow these step-by-step
instructions, and the only tool you’ll need is the spanner
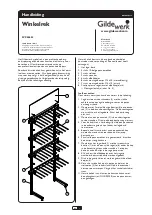
supplied with the item. First study the diagram carefully.
Store display rack
GW1003HL-14
PVP-00002
www.gildewerk.com
The Netherlands
1
2
3
4
5
7
The store display rack consists of the components
(please check whether you have received all the parts):
1. The logo board
2. 4 x 10-piece peg racks
3. 2 x adjustable feet
4. 2 x stands
5. 6 x caps
6. 8 x assembly bolts M6 x 30 (steel coloured)
7. 2 x assembly bolts M6 x 15 (black)
8. 2 sets plastic rings with caps (white)
+ assembly spanner (in box no 4)
Assembly
The numbers refer to the numbers on the diagram.
1. Place the two black stands (4) with the flat rear sides
on an even surface with the feet facing upwards.
2. Using 2 steel-coloured bolts (6), fix a peg rack (2)
into the holes second from the top. The top holes are
for mounting the logo board. Don’t tighten the bolts
just yet!
3. Now fix another peg rack (2) in the bottom holes
of the stands. Don’t tighten these bolts either.
4. For stability’s sake, it is important to fix one peg rack
to the bottom and another just below the logo board.
5. Now determine where you would like to position
the rest of the peg racks and mount them loosely to
the stands.
6. Once all the peg racks are mounted, tighten the bolts.
7. Now fix the logo board (1) using the two black bolts,
(7) along with the nylon washers (8) under the heads
of the bolts, into the top holes of the stands. Make sure
that the heads of the bolts fit into the washers.
8. Now click the white caps over the washers, covering
the black bolts.
9. Cover the unused holes with caps (5).
10. Place the store display rack upright and set it vertically
using the adjustable feet (3). You could use a spirit-level
to do this. Make sure that it is stable.
11. The store display rack is now ready and candles can
be hung on the pegs using hanging cards (OHK-00200).
Gildewerk B.V.
A. Hofmansweg 41
NL-2031 BH Haarlem
T 31–(0)23 –532 22 55
F 31–(0)23 –534 09 65


