background image

ES - 44

E

sp

año

l

3. Presione 

 y seleccione 

Predeterminado

.

4. Presione 

 para establecer como predeterminado el tema 

del reloj seleccionado.
En la vista Reloj se exhibirá el tema del reloj predeterminado.

Conmutación entre Vista de reloj y 
Vista de presentación

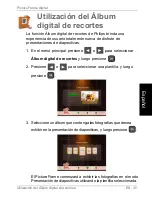
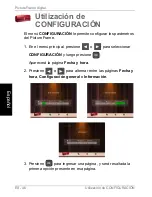
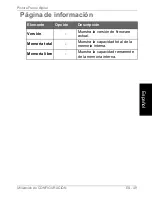
Se puede presionar 

 para alternar entre la vista 

Reloj y la vista Presentación de diapositivas.

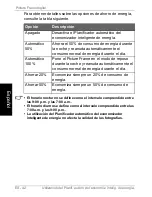
• Cuando se pasa de Vista reloj a Vista de presentación, el 

ejecutada la última vez.

• Si la última presentación de diapositivas fue ejecutada desde la 

tarjeta de memoria o la unidad USB y ya no está disponible, el 

memoria interna.

Philips_Photo_Only_UM_ES.book  Page 44  Tuesday, August 3, 2010  4:11 PM

Picture Frame digital 

Picture Frame inicia la presentación de diapositivas que fue 

Picture Frame comenzará una presentación de diapositivas desde la 

Utilización de RELOJ (botón G)

Содержание GH-7AWP

Страница 1: ...User Manual Mode d emploi Manual del usuario GiiNii GH 7AWP GH 8DNP GH ADNP www giinii com Digital Picture Frame...

Страница 2: ......

Страница 3: ...contents hereof without obligation to notify any person of such revision or changes Safety instructions instructions below Retain this User Manual for future reference Read the safety and operating i...

Страница 4: ...mitting from this product or power immediately and contact your dealer for inspection or service Use a smooth soft cloth to clean the surface of the screen Do not use liquid cleaners or glass cleaners...

Страница 5: ...a memory card USB flash drive 16 Compatible memory card formats 17 Step 6 Copying photos to internal memory 18 Step 8 Replacing the paper mat 20 Using the main menu 22 Managing photos 24 Manually copy...

Страница 6: ...by using the TIMELINE album 38 Selecting a clock skin 41 Switching between Clock view and Slideshow view 42 Date and Time page 45 General Settings page 46 Information page 47 Frequently asked questio...

Страница 7: ...lash drive Allows you to select a preferred power saving option for the feature Allows you to use albums to manage and sort your photos easily Allows you to display photos in slideshow using various k...

Страница 8: ...ation Card x 1 7 Warranty Card x 1 Actual product appearance may vary from the illustrations shown in this User Manual Available accessories may vary depending on the area where you 3 Magnetic remote...

Страница 9: ...ion 1 Adjustable back stand See Step 1 Using the adjustable back stand on page 11 for details 2 Power button Step 2 Connecting to power on page 13 for details Digital Picture Frame 2 3 4 5 6 1 7 Press...

Страница 10: ...and xD Picture Card xD memory card Play back photos stored in the inserted card See Step 6 Copying photos to internal memory on page 18 for details 6 Power jack Connect one end of the AC power adapte...

Страница 11: ...s on page 7 for details 3 ESC button ESCAPE button See Using the control buttons on page 7 for details 4 Scroll wheel OK button See Using the control buttons on page 7 for details 5 Kensington securit...

Страница 12: ...dscape wall mounting me horizontally on a wall 8 Wall mount hole for portrait wall mounting rame vertically on a wall 9 Magnetic area for placing remote control No Description Remote control storage G...

Страница 13: ...oll wheel OK button Press this button to enter or confirm your operation selection Scroll this button to the left to select the previous item Scroll this button to the right to select the next item 3...

Страница 14: ...ecurely in the designated area shown below paper matting Maximum vertical and horizontal angle approximately 30 degrees Approximately 1 4 m 4 6 ft or less Using the remote control GH ADNP only Digital...

Страница 15: ...Clock view and Slideshow view 3 ESC Escape Returns to the previous page and or access menu page 4 RIGHT Moves right or moves to the next item 5 MENU Displays the pop up menu 6 LEFT Moves to the left o...

Страница 16: ...tery holder into the remote control Failure to replace the battery in the correct manner may damage the battery Use only the specified battery type Recycle or dispose used batteries properly according...

Страница 17: ...Getting started EN 11 English Getting started Step 1 Using the adjustable back stand 1 Gently pop out the back stand as shown below Digital Picture Frame...

Страница 18: ...or 2 3 Pull out the back stand and adjust accordingly to the preferred viewing angle this direction provides the best viewing and operating experience Digital Picture Frame 2 To place the Picture Fra...

Страница 19: ...er as below 1 and press the Power 2 Power systems and plug types may vary depending on your country region Digital Picture Frame By using the wall mount holes you can hang the Picture Frame 1 Place th...

Страница 20: ...urself with how the control buttons work This simple process is automatically disabled after the first use You can turn on the tutorial by going into SETTINGS Step 4 Basic setup Select a language and...

Страница 21: ...S and then press The Date and Time page appears 2 Press to highlight the Year field press or to select a year and then press to confirm the setting 3 Press to move to the Month field press to highligh...

Страница 22: ...ry card or USB flash drive that contains supported files into the For more information about the supported file formats refer to Specifications on page 51 SD SDHC MultiMediaCard Memory Stick Memory St...

Страница 23: ...cards use FAT16 and FAT32 file systems in Windows only Formatting memory cards with NTFS or MAC is not supported To use a microSD a miniSD or a Memory Stick Micro M2 card a card adapter is required Me...

Страница 24: ...lash drive To copy all photos contained in the inserted memory card or USB flash drive select the check mark and press to proceed select the cross mark start playing back the photos automatically from...

Страница 25: ...drive vice versa The files in the memory cards and USB flash drive cannot be viewed edited via USB connection Digital Picture Frame Step 7 Connecting the PictureFrame You can connect the PictureFrame...

Страница 26: ...to replace the supplied paper mat soft towel Be careful not to scratch the unit the UNLOCK position then carefully lift up the core unit from the wood frame 3 Remove the existing paper mat Digital Pic...

Страница 27: ...arted EN 21 English 4 Install the supplied bonus paper mat position Digital Picture Frame 5 Install the PictureFrame to the wooden frame and secure the PictureFrame by tightening the EZ Lock Screws to...

Страница 28: ...he See for details 2 CLOCK CALENDAR Allows you to set your favorite clock skins See for details 3 DIGITAL SCRAPBOOK Allows you to display photos in slideshow with various preloaded templates See for d...

Страница 29: ...os on page 36 for details 5 PHOTO ALBUMS Allows you to manage your photos and sort them by using different albums See Managing photos on page 24 for details 6 SETTINGS See Using SETTINGS on page 44 fo...

Страница 30: ...age 18 you can manually copy photos from external storage devices to the internal memory and tag photos to an album The example below demonstrates how to copy photos from a memory card to the internal...

Страница 31: ...n mark showing in orange 6 Press or to move to the photo you wish to select and then press to confirm the selection The selected photo will have a blue selection mark Repeat Step 6 to select more phot...

Страница 32: ...le source including USB Memory Card and Internal Memory the default albums in the internal memory including TIMELINE Pre installed Library Uncategorize Family Friends and Vacation The USB and Memory C...

Страница 33: ...n press or to go to the previous or next page to browse photos If not skip this step 4 Press to enable the selection mark showing in orange 5 Press or to move to the photo you wish to select and then...

Страница 34: ...Managing photos EN 28 English 7 From the pop up menu press or to select Tag It then press 8 Select the destination album for the photos to be stored Digital Picture Frame...

Страница 35: ...he photo you wish to select and then press to confirm the selection The selected photo will have a blue selection mark Repeat Step 3 to select more photos as desired 4 Press If you wish to select all...

Страница 36: ...he PHOTO ALBUMS menu press or to select TIMELINE and then press 2 Press When the marks appear press or to adjust the settings in the Year field and then press again In this step you can also search fo...

Страница 37: ...ken in the time span you specified above will appear on the screen Creating a new album 1 In the PHOTO ALBUMS menu press display the pop up menu and then press to select Create Album 2 In the Album Na...

Страница 38: ...put press or to move to Done and then press 3 Now the new album is created Modifying an album 1 In the PHOTO ALBUMS menu press or to select an album for which you wish to modify the album name and the...

Страница 39: ...he PHOTO ALBUMS menu Deleting photos 1 In the PHOTO ALBUMS menu press or to select an album and then press 2 Press to enable the selection mark showing in orange 3 Press or to move to the photo you wi...

Страница 40: ...ect and then press to confirm the selection The selected photo will have a blue selection mark Repeat Step 3 to select more photos as desired 4 Press If you wish to select all the photos shown on the...

Страница 41: ...tion The selected photo will have a blue selection mark Repeat Step 3 to select more photos as desired 4 Press If you wish to select all the photos shown on the current page select Select All in the p...

Страница 42: ...and Memory Card albums only appear when a USB flash 2 Press or to select the album that contains the photos you wish to display in slideshow and then press If you wish to pause the slideshow press Vi...

Страница 43: ...he transition effect you wish to apply to the slideshow Slideshow Interval selects the slideshow interval between photos The default transition effect Pan Zoom does not allow customized interval setti...

Страница 44: ...isplay in slideshow In this step you can also search for photos taken in a specific period of time under the TIMELINE album by pressing and selecting the time frame 3 Select and then press to start pl...

Страница 45: ...option and confirm with For details about the power saving options refer to the table below Option Description Off Auto 50 Saves 50 on power consumption during nighttime and automatically resumes norm...

Страница 46: ...es not affect the photo quality nighttime and automatically resume normal power consumption during daytime Save 20 Always saves 20 on power consumption Save 50 Always saves 50 on power consumption Opt...

Страница 47: ...menu press or to select CLOCK CALENDAR and then press 2 Press or to select a desired skin Using CLOCK G button Digital Picture Frame Using CLOCK G Button The PictureFrame provides various preloaded c...

Страница 48: ...lideshow view You can press to toggle between Clock view and Slideshow view When switching from Clock view to Slideshow view the If the last slideshow was playing from memory card or USB and is Intern...

Страница 49: ...Press or to select a template and then press 3 Select an album that contains the photos you wish to display in slideshow and then press using the selected template Digital Picture Frame GiiNii SCRAPB...

Страница 50: ...the main menu press or to select SETTINGS and then press The Date and Time page appears 2 Press or to toggle among Date and Time General Settings and Information pages 3 Press to enter a page and the...

Страница 51: ...tem Option Description Date Allows you to set the date Time Allows you to set the time Mode Allows you to select a time format 12 hour clock or 24 hour clock Current Time Zone Allows you to select the...

Страница 52: ...re Resize Resizes the photos to save memory space Normal Keeps the original file size Smart Cropping Full screen Selects to display photos in original size or full screen Original Language English Set...

Страница 53: ...nformation page Item Option Description Version Shows the current firmware version Total Memory Shows the total capacity of the internal memory Free Memory Shows the remaining capacity of the internal...

Страница 54: ...s long side as shown on your product box To display your side Why are my photos appearing upside down frame Progressive and EXIF images a mini USB cable Digital Picture Frame What types of image files...

Страница 55: ...eliminate this issue However please always keep a copy of the original photos on the computer The frame froze and will not respond what can I do If the frame freezes it is easy to restart by unpluggin...

Страница 56: ...ouraged to try to correct the interference by one of the following measures Reorient or relocate the receiving antenna Increase the separation between the equipment and receiver Connect the equipment...

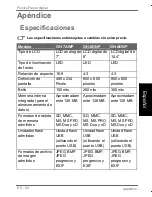
Страница 57: ...ghtness 150 cd m2 250 cd m2 300 cd m2 Built in internal memory for data storage Approximately 128 MB Approximately 128 MB Approximately 128 MB Supported memory card formats SD MMC MS MS PRO MS Duo and...

Страница 58: ...s Input Power AC 100 220 V AC 100 220 V AC 100 220 V Output Power DC 5 V 1 A DC 5 V 1 A DC 5 V 2 A Auto picture rotation angle switch Yes Yes Yes Clock Calendar Yes Yes Yes Back Stand Yes foldable Yes...

Страница 59: ...GH 7AWP GH 8DNP GH ADNP Interchangeable Frame Capability Yes Yes Yes Frame 1 wooden frame 1 wooden frame 1 wooden frame Paper mat Yes Yes Yes EN 53 Appendix GiiNii Digital PictureFrame Model English...

Страница 60: ...D microSD MMC MS xD 8MB TOSHIBA 32MB Kodak Canon 64MB LEXAR SanDisk MS Pro Duo SONY MS Pro Duo 128MB Panasonic SanDisk M2 256MB SanDisk RIDATA OLYMPUS M 512MB TwinMOS SanDisk Transcend FUJIFILM TOSHIB...

Страница 61: ...H Transcend A DATA TOSHIBA PQI A DATA SanDisk APACER 60X SanDisk Silicon Power Ultima II 80X 4GB Kingston SDHC Class 6 Transcend SanDisk SanDisk MS Pro HG Duo A DATA SDHC Class 6 SONY MS Pro Duo Silic...

Страница 62: ...s 6 Kingston Transcend SDHC Class 6 SanDisk Kingston SDHC Class 6 16GB Transcend SDHC Class 6 TOSHIBA SanDisk MS Pro Duo 32GB SONY MS Pro Duo Mark2 SONY MS Pro Duo Capacity Memory card formats SD mini...

Страница 63: ...Appendix EN 57 English Memo Digital Picture Frame...

Страница 64: ...droit de r viser la pr sente publication et d effectuer des changements de temps autre du contenu de la pr sente publication sans l obligation d aviser qui que ce soit d une telle r vision ou modific...

Страница 65: ...int rieur des logements peuvent facilement tre endommag es par des corps trangers N utilisez pas d adaptateur de courant inconnu autre que celui un adaptateur de courant inconnu est tr s dangereux et...

Страница 66: ...pareil ne comprend aucune pi ce pouvant tre entretenue par l utilisateur et toute modification non autoris e annulera la garantie M me si l cran cristaux liquides est fabriqu gr ce une technologie de...

Страница 67: ...Consignes de s curit FR iv Fran ais Note de service Cadre photo num rique Picture Frame...

Страница 68: ...m moire ou d une cl USB Formats de carte m moire compatibles 18 tape 6 Copier des photos vers la m moire interne 19 tape 8 Remplacement du passe partout en papier 21 Utilisation du menu principal 23...

Страница 69: ...TIMELINE 40 Planificateur auto intelligent pour conomie d nergie 41 S lection d une apparence d affichage de l horloge 43 Basculement entre les modes horloge et diaporama 44 Utilisation de l album per...

Страница 70: ...ns une m moire interne sur une carte m moire ou une cl USB Vous offre un choix d options d conomie d nergie gr ce la fonction Planificateur auto intelligent Vous permet de g rer et classer facilement...

Страница 71: ...hium CR2025 x 1 Uniquement GH ANDP 4 Guide de d marrage rapide x 1 5 Mode d emploi x 1 6 Carte d enregistrement x 1 7 Carte de garantie x 1 L apparence r elle de l appareil peut diff rer des illustrat...

Страница 72: ...pe 1 Utilisation du pied arri re r glable la page 12 pour plus de d tails 2 Bouton d alimentation Appuyez sur le bouton d alimentation pour allumer tape 2 Branchement de l alimentation la page 14 pour...

Страница 73: ...afficher les photos enregistr es sur la partir d une carte m moire Voir tape 6 Copier des photos vers la m moire interne la page 19 pour plus de d tails 6 Prise d alimentation Branchez une extr mit d...

Страница 74: ...2 Bouton G Voir Utilisation des boutons de commande la page 7 pour plus de d tails 3 Bouton CHAP Voir Utilisation des boutons de commande la page 7 pour plus de d tails 4 Bouton de la roulette de d f...

Страница 75: ...antivols Kensington cet emplacement afin d aider prot ger 6 Verrou EZ Vous pouvez vous servir des vis de blocage EZ pour verrouiller ou d verrouiller le cadre en bois 7 Fente de suspension pour fixat...

Страница 76: ...roulette vers la gauche pour d placer le champ de s lection vers la gauche ou le haut ou encore pour s lectionner l l ment pr c dent Faites tourner la roulette vers la droite pour d placer le champ de...

Страница 77: ...t l commande Angle vertical et horizontal maximum approx 30 degr s Approx 1 4 m 4 6 pi ou moins Utilisation de la t l commande Uniquement GH ANDP Le PictureFrame est muni d un capteur de t l commande...

Страница 78: ...e les modes horloge et diaporama 3 CHAP Annule l op ration en cours et ou retourne l cran pr c dent 4 DROITE BAS D place le champ de s lection vers la droite ou le bas ou s lectionne l l ment suivant...

Страница 79: ...uvez la languette de verrouillage situ e l arri re de la t l commande et poussez la vers la droite 2 Tirez le logement de la pile 7 OK Entre ou confirme une op ration s lection N Ic ne Description Fon...

Страница 80: ...appropri e pourrait endommager celle ci Utilisez uniquement des piles approuv es indiqu es dans ce mode d emploi Recyclez ou liminez les piles us es de mani re ad quate en respectant les directives e...

Страница 81: ...2 Fran ais tape 1 Utilisation du pied arri re r glable 1 Tirez doucement le pied arri re tel qu illustr ci dessous D marrage du Picture Frame D marrage du Picture Frame Cadre photo num rique Picture F...

Страница 82: ...de vue que vous pr f rez Il est recommand de placer le cadre photo l horizontale car cette orientation offre une meilleur vue tout en facilitant le contr le du verticalement un mur en vous servant des...

Страница 83: ...e bouton d alimentation pour allumer le 2 Les syst mes d alimentation et les types de fiche peuvent varier selon votre pays ou r gion d alimentation 1 Placez le Picture Frame sur une surface plane D m...

Страница 84: ...roc dure sera automatiquement d sactiv apr s la premi re pouvez r activer l affichage du tutoriel en acc dant au menu CONFIGURATION tape 4 Configuration de base S lectionnez la langue d affichage et r...

Страница 85: ...a t 2 Appuyez sur pour mettre en surbrillance le champ Ann e appuyez sur ou pour s lectionner l ann e puis appuyez nouveau sur pour confirmer le r glage 3 Appuyez sur pour d placer le champ de s lecti...

Страница 86: ...harge par l appareil dans le logement pour carte m moire correspondant du Pour plus d informations sur les formats de fichier pris en charge par Sp cifications techniques la page 53 SD SDHC MultiMedia...

Страница 87: ...vos cartes m moire assurez vous de n utiliser que les syst mes de fichiers FAT16 et FAT32 sous Windows Le formatage des cartes m moire avec NTFS ou MAC n est pas pris en charge Il est n cessaire d uti...

Страница 88: ...registr es sur la carte m moire ins r e ou la cl USB s lectionnez la coche puis appuyez sur pour confirmer Pour afficher des photos sans les copier vers la m moire puis appuyez afficher les photos enr...

Страница 89: ...Vous pouvez maintenant transf rer librement les fichiers le feriez avec d autres types de p riph riques de stockage Vous pouvez copier des photos depuis votre ordinateur vers le Les fichiers enregist...

Страница 90: ...r le passe partout en papier 1 Placez une serviette propre ou un autre tissu doux sur une tissu avec le c t face vers le bas Prenez bien soin de ne pas cadre D marrage du Picture Frame Cadre photo num...

Страница 91: ...4 Placez le passe partout de remplacement dans le cadre place en tournant les vis de blocage EZ en position VERROUILLER D marrage du Picture Frame Cadre photo num rique Picture Frame 5 Replacez le Pi...

Страница 92: ...lligent pour conomie d nergie Vous permet de s lectionner une option d conomie Voir Planificateur auto intelligent pour conomie d nergie la page 41 pour plus de d tails 2 HORLOGE Vous permet de choisi...

Страница 93: ...O Vous permet d afficher des photos en mode diaporama Voir Affichage des photos la page 38 pour plus de d tails 5 ALBUM Vous permet de g rer vos photos et de les classer en diff rents albums Voir Gest...

Страница 94: ...s depuis un p riph rique de stockage externe vers la m moire interne et tiqueter des photos pour les assigner un album L exemple ci dessous indique comment copier des photos depuis comment tiqueter de...

Страница 95: ...er le champ de s lection affich en orang 6 Appuyez sur ou pour d placer le champ de s lection jusqu la photo que vous voulez s lectionner puis appuyez sur pour confirmer La photo s lectionn e sera mar...

Страница 96: ...s 8 Depuis le menu qui appara tra appuyez sur ou pour s lectionner tiqueter ceci puis appuyez sur 9 S lectionnez un album de destination par d faut pour que les photos y soient copi es et class es Cad...

Страница 97: ...lle Amis et Vacances Les sources USB et Carte m moire n appara tront que lorsqu une Pour plus de d tails concernant l album CHRONOLOGIE voir la section Gestion de vos photos l aide de l album CHRONOLO...

Страница 98: ...photo que vous voulez s lectionner puis appuyez sur pour confirmer La photo s lectionn e sera marqu e d un cadre bleu R p tez l tape 5 pour s lectionner les autres photos que vous souhaitez s lection...

Страница 99: ...sur pour activer le champ de s lection affich en orang 3 Appuyez sur ou pour d placer le champ de s lection jusqu la photo que vous voulez s lectionner puis appuyez sur pour confirmer La photo s lect...

Страница 100: ...tos l aide de l album CHRONOLOGIE Dans le menu ALBUM vous pouvez utiliser l album CHRONOLOGIE pour rechercher des photos dans la m moire interne selon le laps de temps sp cifi 1 Dans le menu ALBUM app...

Страница 101: ...ervalle de temps souhait 3 Appuyez sur pour d placer le champ de s lection jusqu au champ Mois puis r p tez l tape 2 pour r gler les param tres 4 Appuyez sur pour d placer le champ de s lection jusqu...

Страница 102: ...nu contextuel puis appuyez sur pour s lectionner Cr er un album 2 Dans le champ Nom de l album qui appara tra utilisez le clavier l cran pour entrer le nom que vous voulez pour votre nouvel album Appu...

Страница 103: ...mp de s lection jusqu Termin puis appuyez sur 3 Le nouvel album est maintenant cr Modification d un album existant 1 Dans le menu ALBUM appuyez sur ou pour s lectionner un album dont vous souhaitez mo...

Страница 104: ...menu ALBUM appuyez sur ou sur pour s lectionner un album puis appuyez sur 2 Appuyez sur pour activer le champ de s lection affich en orang 3 Appuyez sur ou pour d placer le champ de s lection jusqu l...

Страница 105: ...pour confirmer La photo s lectionn e sera marqu e d un cadre bleu R p tez l tape 3 pour s lectionner les autres photos que vous souhaitez s lectionner 4 Appuyez sur Si vous voulez s lectionner toutes...

Страница 106: ...e d un cadre bleu R p tez l tape 3 pour s lectionner les autres photos que vous souhaitez s lectionner 4 Appuyez sur Si vous voulez s lectionner toutes les photos affich es sur la page actuelle s lect...

Страница 107: ...USB et Carte m moire n appara tront que lorsqu une 2 Appuyez sur ou pour s lectionner l album contenant les photos que vous souhaitez afficher en diaporama puis appuyez sur Si vous souhaitez interrom...

Страница 108: ...on que vous souhaitez attribuer au diaporama Intervalle du diaporama s lectionne la dur e d intervalle entre les photos du diaporama L effet de transition par d faut D placement et Zoom ne permet pas...

Страница 109: ...textuel d finissez un laps de temps comprenant un ensemble de photos que vous souhaitez afficher en diaporama Dans ce menu vous pouvez galement rechercher des photos prises au cours d une p riode sp c...

Страница 110: ...rmettant de r duire la consommation 1 Dans le menu principal appuyez sur ou pour s lectionner Planificateur auto intelligent pour conomie d nergie puis appuyez sur 2 Appuyez sur ou pour s lectionner l...

Страница 111: ...chage des photos Option Description D sactiv D sactive le Planificateur auto intelligent pour conomie d nergie Auto 50 conomise 50 de la consommation lectrique pendant la nuit et retourne automatiquem...

Страница 112: ...rloge suivez les tapes d crites ci dessous 1 Dans le menu principal appuyez sur ou sur pour s lectionner l option HORLOGE puis appuyez sur 2 Appuyez sur ou pour s lectionner l apparence d affichage d...

Страница 113: ...loge et diaporama Vous pouvez appuyer sur pour basculer entre les modes horloge et diaporama Lorsque vous basculer du mode horloge au mode diaporama le Si le dernier diaporama tre affich provenait d u...

Страница 114: ...is appuyez sur 2 Appuyez sur ou pour s lectionner un mod le puis appuyez sur 3 S lectionnez un album contenant des photos que vous souhaitez afficher en diaporama puis appuyez sur diaporama selon le m...

Страница 115: ...on CONFIGURATION puis appuyez sur Le menu Date et heure appara t 2 Appuyez sur ou pour basculer entre les menus Date et heure R glage g n ral et Information 3 Appuyez sur pour acc der un menu et la pr...

Страница 116: ...Description Date Vous permet de r gler la date Heure Vous permet de r gler l heure Mode Vous permet de s lectionner le format d affichage de l heure format 12 heures ou format 24 heures Fuseau horair...

Страница 117: ...r conomiser de l espace m moire Normal Conserve la taille d origine des fichiers Rognage intelligent Plein cran Choisissez si vous souhaitez afficher les photos dans la taille d origine ou en plein cr...

Страница 118: ...ne Quels formats de carte m moire sont compatibles Les formats de carte m moire SD SDHC MMC MS MS PRO MS Duo et xD sont compatibles avec le plus reportez vous la section Formats de carte m moire compa...

Страница 119: ...otos seront supprim es si je retire la carte SD dans les m tadonn es des photos tiquet es de sorte que celui ci se souviendra des classifications des photos par albums la prochaine fois que la carte S...

Страница 120: ...solution d origine de certaines photos Pourquoi la fonction Chronologie est elle non disponible pour les photos enregistr es sur ma cl USB La fonction Chronologie n est disponible que pour les photos...

Страница 121: ...ence de l une des fa ons suivantes R orientez ou repositionnez l antenne de r ception Augmentez la distance entre l appareil et le r cepteur Branchez l appareil dans une prise dont le circuit diff re...

Страница 122: ...250 cd m2 300 cd m2 M moire interne int gr e pour stockage de donn es Approx 128 MB Approx 128 MB Approx 128 MB Formats de carte m moire compatibles SD MMC MS MS PRO MS Duo et xD SD MMC MS MS PRO MS D...

Страница 123: ...issan e c d entr e CA 100 220 V CA 100 220 V CA 100 220 V Puissance de sortie CC 5 V 1 A CC 5 V 1 A CC 5 V 2 A Changement d orientation d angle automatique des images Oui Oui Oui Horloge Calendrier Ou...

Страница 124: ...GH 8DNP GH ADNP Capacit d orientation interchangeable Oui Oui Oui Cadre 1 cadre en bois 1 cadre en bois 1 cadre en bois Passe pa out rt en papier Oui Oui Oui Fran ais Annexe FR 55 Cadre photo num riqu...

Страница 125: ...m moire SD miniSD microSD MMC MS xD 8 MB Toshiba 32 MB Kodak Canon 64 MB LEXAR SanDisk MS Pro Duo SONY MS Pro Duo 128 MB Panasonic SanDisk M2 256 MB SanDisk RIDATA OLYMPUS M 512 MB TwinMOS SanDisk Tra...

Страница 126: ...end A DATA Toshiba PQI A DATA SanDisk APACER 60X SanDisk Silicon Power Ultima II 80X 4 GB Kingston SDHC Class 6 Transcend SanDisk SanDisk MS Pro HG Duo A DATA SDHC Class 6 SONY MS Pro Duo Silicon Powe...

Страница 127: ...on Transcend SDHC Class 6 SanDisk Kingston SDHC Class 6 16 GB Transcend SDHC Class 6 Toshiba SanDisk MS Pro Duo 32 GB SONY MS Pro Duo Mark2 SONY MS Pro Duo Capacit Formats de carte m moire SD miniSD m...

Страница 128: ...Annexe FR 59 Fran ais Note de service Cadre photo num rique Picture Frame...

Страница 129: ...i n de notificar a nadie sobre dichos cambios o revisiones Instrucciones de seguridad instrucciones que aparecen a continuaci n Conserve este manual del usuario para consulta futura Antes de utilizar...

Страница 130: ...extra os o calor provenientes de este producto u otro signo de funcionamiento defectuoso p ngase en contacto con el distribuidor para su inspecci n o servicio t cnico Utilice un pa o suave para limpi...

Страница 131: ...ci n de una tarjeta de memoria o unidad flash USB 16 Formatos de tarjetas de memoria compatibles 17 Paso 6 Copiado de fotograf as a la memoria interna 18 Paso 8 Reemplazo de la esterilla de papel 20 U...

Страница 132: ...utilizando el lbum CRONOGRAMA 40 Utilizaci n del Planif autom del economiz intelig de energ a 41 Selecci n de un tema del reloj 43 Conmutaci n entre Vista de reloj y Vista de presentaci n 44 Utilizac...

Страница 133: ...opci n de ahorro de energ a autom tico del economizador inteligente de energ a Le permite utilizar lbumes para administrar y ordenar sus fotograf as con facilidad Le permite exhibir fotograf as en fo...

Страница 134: ...a de inicio r pido x 1 5 Manual del usuario x 1 6 Tarjeta de registro x 1 7 Tarjeta de garant a x 1 La apariencia real del producto puede variar de aquella que aparece en las ilustraciones de este ma...

Страница 135: ...m s informaci n consulte Paso 1 Utilizaci n del pedestal trasero ajustable en p gina 11 2 Bot n de encendido de encendido Para obtener m s informaci n consulte Paso 2 Conexi n de la alimentaci n el c...

Страница 136: ...PRO MS PRO Memory Stick Duo MS Duo y xD Picture Card xD Puede reproducir las fotograf as almacenadas en la tarjeta insertada Se puede copiar fotograf as desde la tarjeta insertada consulte Paso 6 Copi...

Страница 137: ...a obtener m s informaci n consulte Utilizaci n de los botones de control en p gina 7 3 Bot n ESC bot n ESCAPE Para obtener m s informaci n consulte Utilizaci n de los botones de control en p gina 7 4...

Страница 138: ...ado EZ Se pueden utilizar los tornillos del candado EZ para bloquear o desbloquear el marco de madera 7 Ranura para colgar para el montaje apaisado en la pared pared 8 Ranura para colgar para el monta...

Страница 139: ...lecci n Deslice este bot n hacia la izquierda para desplazarse hacia la izquierda arriba o seleccionar el elemento anterior Deslice este bot n hacia la derecha para desplazarse hacia la derecha abajo...

Страница 140: ...e ilustraci n la esterilla de papel Apunte el control remoto a la pantalla del M ximo ngulo vertical y horizontalaproximadamente 30 grados Aproximadamente 1 4 m 4 6 pies o menos Picture Frame digital...

Страница 141: ...gresa a la p gina anterior 4 DERECHA ABAJO Desplaza hacia la derecha o abajo o selecciona el elemento siguiente 5 Men Exhibe el men emergente 6 IZQUIERDA ARRIBA Desplaza hacia la izquierda o arriba o...

Страница 142: ...acia el control remoto Proteja la pila de los excesos de calor y humedad Si no se reemplaza la pila de forma correcta esto podr a ocasionarle da os Utilice s lo las pilas especificadas aprobadas Recic...

Страница 143: ...Comienzo ES 11 Espa ol Comienzo Paso 1 Utilizaci n del pedestal trasero ajustable 1 Retire suavemente el pedestal trasero tal como se muestra a continuaci n Picture Frame digital...

Страница 144: ...ngulo de visi n preferido que esta orientaci n proporciona la mejor experiencia de visualizaci n y utilizaci n horizontal o verticalmente en la pared Picture Frame digital 1 2 2 Para colocar el Pictur...

Страница 145: ...ndica a continuaci n 1 y presione el Bot n de encendido 2 Los sistemas de alimentaci n el ctrica y los tipos de enchufe pueden variar de acuerdo con su pa s regi n Picture Frame digital 1 Coloque el P...

Страница 146: ...arse con la manera en que funcionan los botones de control Este sencillo proceso queda autom ticamente deshabilitado luego del primer uso Usted puede reinstalar el tutorial yendo a CONFIGURACI N Paso...

Страница 147: ...presione Aparecer la p gina Fecha y hora 2 Presione para resaltar el campo A o presione o para seleccionar un a o y luego presione de nuevo para confirmar la configuraci n 3 Presione para pasar al cam...

Страница 148: ...o unidad flash USB compatible y que contenga archivos como se ilustra a continuaci n Para obtener m s informaci n sobre los formatos de archivo admitidos consulte Especificaciones en p gina 54 SD SDH...

Страница 149: ...o formatee sus tarjetas de memoria utilice s lo los sistemas de archivos FAT16 y FAT32 en Windows El portarretratos no es compatible con tarjetas de memoria formateadas con el sistema de archivos NTFS...

Страница 150: ...o unidad flash USB Para copiar todas las fotograf as almacenadas en la tarjeta de memoria o en la unidad flash USB seleccione y presione para continuar seleccione la marca en forma de cruz y presione...

Страница 151: ...le Ahora usted puede transferir libremente los archivos del viceversa Los archivos presentes en las tarjetas de memoria y la unidad flash USB no pueden ser visualizados editados a trav s de una conexi...

Страница 152: ...las instrucciones listadas a continuaci n 1 Coloque una toalla u otro pa o flexible sobre una superficie 2 Gire los tornillos del candado EZ ubicado en la parte trasera Picture Frame digital Su Pictu...

Страница 153: ...la esterilla de papel existente 4 Instale la esterilla de papel de regalo suministrada apretando los tornillos del candado EZ hacia la posici n BLOQUEO Picture Frame digital 5 Instale el PictureFrame...

Страница 154: ...inteligente de energ a Le permite seleccionar una opci n de ahorro de energ a Para obtener m s informaci n consulte Utilizaci n del Planif autom del economiz intelig de energ a en p gina 41 2 RELOJ L...

Страница 155: ...ermite exhibir las fotograf as en el modo de presentaci n de diapositivas Para obtener m s informaci n consulte Visualizaci n de fotograf as en p gina 38 5 LBUM Le permite administrar sus fotograf as...

Страница 156: ...gina 18 se puede copiar fotograf as manualmente desde dispositivos externos de almacenamiento a la memoria interna y rotular fograf as en un lbum El siguiente ejemplo demuestra c mo copiar fograf as...

Страница 157: ...5 Presione para habilitar la marca de selecci n que se exhibir en anaranjado 6 Presione o para pasar a la fotograf a que desea seleccionar y luego presione para confirmar la selecci n La fotograf a s...

Страница 158: ...ES 26 Espa ol 8 En el men emergente presione o para seleccionar Rotularla y luego presione 9 Seleccione un lbum predeterminado deseado para copiar las fotograf as a ese lbum especificado y luego orden...

Страница 159: ...oria interna los lbumes predeterminados en la memoria interna entre ellos Cronograma Biblioteca preinstalada No categorizado Familia Amigos y Vacaciones Los archivos fuente USB y Tarjeta de memoria s...

Страница 160: ...memoria interna 3 Si hubiera m s de una p gina puede presionar o para pasar a la p gina anterior o siguiente para revisar fograf as De lo contrario omita este paso 4 Presione para habilitar la marca...

Страница 161: ...radas en la p gina actual seleccione Seleccionar todas en el men emergente y presione Luego contin e al paso 7 7 En el men emergente presione o para seleccionar Rotularla y luego presione 8 Seleccione...

Страница 162: ...que desea seleccionar y luego presione para confirmar la selecci n La fotograf a seleccionada tendr una marca de selecci n azul Repita el paso 3 para seleccionar m s fotograf as tal como se desee 4 P...

Страница 163: ...el intervalo de tiempo especificado 1 En el men LBUM presione o para seleccionar CRONOGRAMA y luego presione 2 Presione Cuando aparezcan las marcas presione o para ajustar los par metros del campo A...

Страница 164: ...Presione para pasar a y luego presione para comenzar a reproducir Aparecer n en la pantalla las fotograf as tomadas en el intervalo de tiempo que fue especificado m s arriba Creaci n de un nuevo lbum...

Страница 165: ...resar la letra Para alternar entre letras y n meros presione Para a adir un espacio presione o para pasar a Espacio y luego presione Para eliminar su ltima entrada presione o para desplazarse a Atr s...

Страница 166: ...parece utilice el teclado en pantalla para ingresar el nombre deseado 4 Una vez que haya terminado de modificar el nombre del lbum presione para salir Eliminaci n de un lbum 1 En el men LBUM presione...

Страница 167: ...ar a la fotograf a que desea seleccionar y luego presione para confirmar la selecci n La fotograf a seleccionada tendr una marca de selecci n azul Repita el paso 3 para seleccionar m s fotograf as tal...

Страница 168: ...ci n La fotograf a seleccionada tendr una marca de selecci n azul Repita el paso 3 para seleccionar m s fotograf as tal como se desee 4 Presione Si desea seleccionar todas las fotograf as mostradas en...

Страница 169: ...seleccionada tendr una marca de selecci n azul Repita el paso 3 para seleccionar m s fotograf as tal como se desee 4 Presione Si desea seleccionar todas las fotograf as mostradas en la p gina actual...

Страница 170: ...e memoria s lo aparecer n cuando tarjeta de memoria 2 Presione o para seleccionar el lbum que contiene las fotograf as que desea exhibir en la presentaci n de diapositivas y luego presione Si desea pa...

Страница 171: ...ci n que se desea aplicar a la presentaci n de diapositivas Intervalo de la presentaci n de diapositivas selecciona el intervalo de tiempo que transcurre entre cada fotograf a El efecto de transici n...

Страница 172: ...y luego presione 2 En la pantalla emergente especifique un intervalo de tiempo que incluya las fotograf as que desea exhibir en la presentaci n de diapositivas En este paso usted puede tambi n buscar...

Страница 173: ...rg a suministra varias opciones predefinidas de ahorro de energ a 1 En el men principal presione o para seleccionar Planificador autom tico del economizador inteligente de energ a y luego presione 2 P...

Страница 174: ...economizador inteligente de energ a no afecta la calidad de las fotograf as Opci n Descripci n Apagado Desactiva el Planificador autom tico del economizador inteligente de energ a Autom tico 50 Ahorr...

Страница 175: ...a vista Reloj siga los pasos detallados a continuaci n 1 En el men principal presione o para seleccionar RELOJ y luego presione 2 Presione o para seleccionar un tema del reloj deseado Utilizaci n de R...

Страница 176: ...ra alternar entre la vista Reloj y la vista Presentaci n de diapositivas Cuando se pasa de Vista reloj a Vista de presentaci n el ejecutada la ltima vez Si la ltima presentaci n de diapositivas fue ej...

Страница 177: ...para seleccionar lbum digital de recortes y luego presione 2 Presione o para seleccionar una plantilla y luego presione 3 Seleccione un lbum que contenga las fotograf as que desea exhibir en la presen...

Страница 178: ...para seleccionar CONFIGURACI N y luego presione Aparecer la p gina Fecha y hora 2 Presione o para alternar entre las p ginas Fecha y hora Configuraci n general e Informaci n 3 Presione para ingresar u...

Страница 179: ...nto Opci n Descripci n Fecha Le permite configurar la fecha Hora Le permite configurar la hora Modo Le permite seleccionar un formato de hora reloj de 12 horas o de 24 horas Zona horaria actual Le per...

Страница 180: ...rar espacio de memoria Normal Mantiene el tama o de archivo original Recortado inteligente Pantalla completa Permite seleccionar si las fotograf as se exhibir n en su tama o original o en pantalla com...

Страница 181: ...gina de informaci n Elemento Opci n Descripci n Versi n Muestra la versi n de firmware actual Memoria total Muestra la capacidad total de la memoria interna Memoria libre Muestra la capacidad remanent...

Страница 182: ...rgo tal como se muestra en la caja de su producto Para exhibir sus fotograf as en Por qu mis fotograf as aparecen al rev s G relo hacia el lado opuesto Qu tipos de archivo de imagen puedo visualizar J...

Страница 183: ...ivo de base en la resoluci n de pantalla de la unidad y reducir significativamente el tama o de la foto y eliminar este problema Sin embargo guarde una copia de la foto original si desea mantener la r...

Страница 184: ...s puede causar interferencia a las comunicaciones radiales Sin embargo no se puede garantizar que no ocurrir interferencia en una instalaci n en particular En el caso de que este dispositivo ocasionar...

Страница 185: ...ebe si existen en su rea empresas que recolecten televisores usados para el desarmado y recopilaci n de los materiales reutilizables o p ngase en contacto con su vendedor para obtener informaci n sobr...

Страница 186: ...oria interna integrada para el almacenamiento de datos Aproximadam ente 128 MB Aproximadam ente 128 MB Aproximadam ente 128 MB Formatos de tarjeta de memoria admitidos SD MMC MS MS PRO MS Duo y xD SD...

Страница 187: ...a 6 en 1 Receptor de RI No No S Alimentaci n el ctrica de entrada 100 220 V CA 100 220 V CA 100 220 V CA Potencia de salida 5 V CC 1 A 5 V CC 1 A 5 V CC 2 A Conmutador de rotaci n ngulo autom tico de...

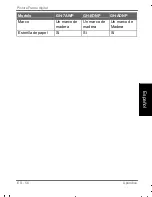
Страница 188: ...Espa ol Modelo GH 7AWP GH 8DNP GH ADNP Marco Un marco de madera Un marco de madera Un marco de Madera Esterilla de papel S S S Ap ndice ES 56 Picture Frame digital...

Страница 189: ...de memoria SD miniSD microSD MMC MS xD 8 MB TOSHIBA 32 MB Kodak Canon 64 MB LEXAR SanDisk MS Pro Duo SONY MS Pro Duo 128 MB Panasonic SanDisk M2 256 MB SanDisk RIDATA OLYMPUS M 512 MB TwinMOS SanDisk...

Страница 190: ...scend A DATA TOSHIBA PQI A DATA SanDisk APACER 60X SanDisk Silicon Power Ultima II 80X 4 GB Kingston SDHC clase 6 Transcend SanDisk SanDisk MS Pro HG Duo A DATA SDHC clase 6 SONY MS Pro Duo Silicon Po...

Страница 191: ...ngston Transcend SDHC clase 6 SanDisk Kingston SDHC clase 6 16 GB Transcend SDHC clase 6 TOSHIBA SanDisk MS Pro Duo 32 GB SONY MS Pro Duo Mark2 SONY MS Pro Duo Capacidad Formatos de tarjeta de memoria...

Страница 192: ......

Страница 193: ...2010 GiiNii International All rights reserved D 03 08 10 P N TY 4J580 002...

Отзывы: