background image

SIEMENS SE565 Residential Gateway
User’s Guide

Chapter 5  Configuring Security Features

Firewall Settings

SIEMENS

47

13. Click 

Next

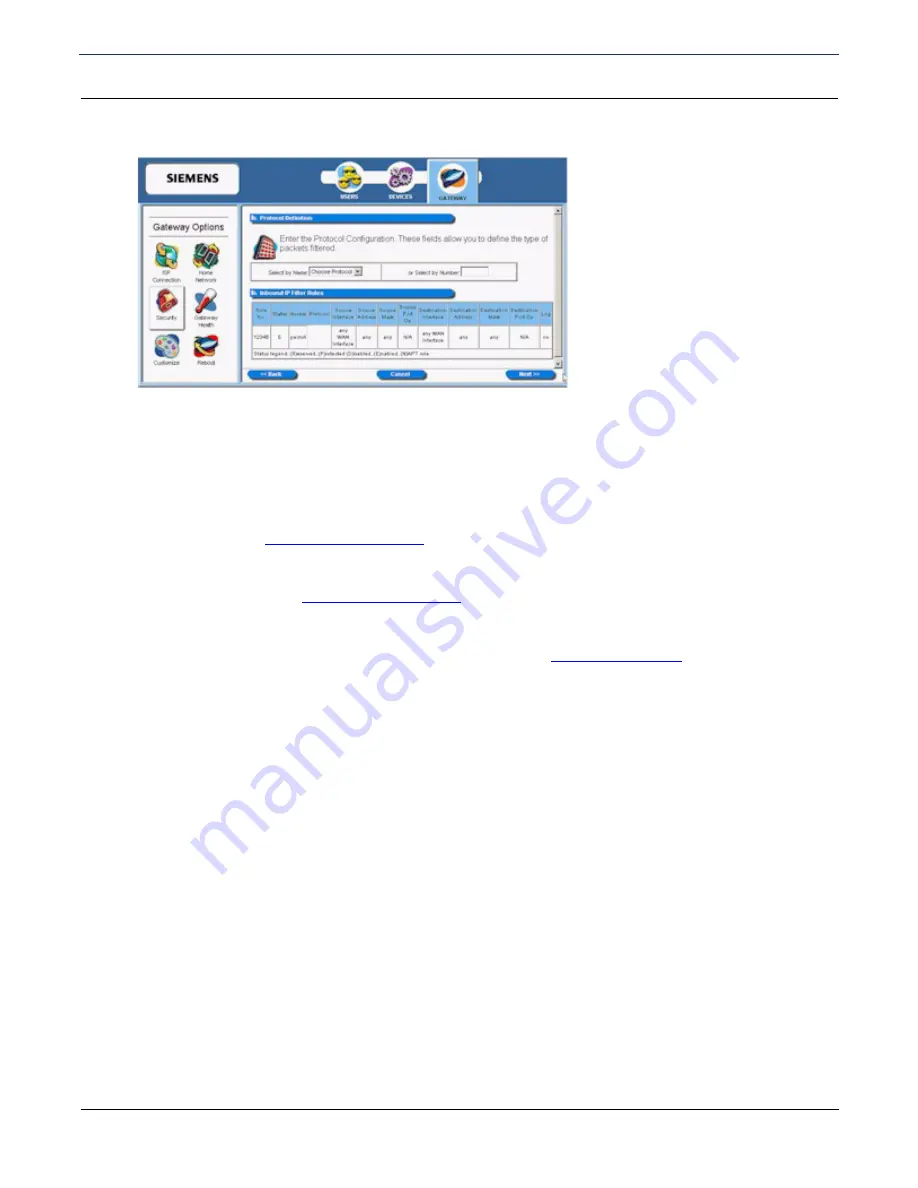
. This displays the Protocol Definition page. 

14. Do one of the following:

Select one of the following protocol options from the 

Select by Name

 drop-down menu. This defines the 

types of packets filtered.

Any Protocol

TCP

 (Transmission Control Protocol): 

Provides reliable, sequenced, and unduplicated delivery of bytes to remote or local users. Click 

Next


to display the 

TCP/UDP Options page

.

UDP

 (User Datagram Protocol): 

Provides for the exchange of datagrams without acknowledgement or guaranteed delivery. Click 

Next

 to display the 

TCP/UDP Options page

.

ICMP

 (Internet Control Message Protocol): 

A mechanism that provides for peer communication. The most commonly used application for this 
protocol is the PING command. Click 

Next

 to display the 

ICMP Options page

.

GRE

 (Generic Routing Encapsulation): 

A tunneling protocol that is used primarily for VPN (Virtual Private Networks). 

Type a protocol number in the 

Select by Number

 field.

15. Click 

Finish

.

Содержание SE565

Страница 1: ...gaset Communications GmbH Desejamos que tenham bons momentos com o seu Gigaset DA Kære Kunde Gigaset Communications GmbH er retlig efterfølger til Sie mens Home and Office Communication Devices GmbH Co KG SHC som fra deres side videreførte Siemens AGs Gigaset forretninger Siemens AGs eller SHCs eventuelle forklaringer i betjeningsvejledningerne skal derfor forstås som Gigaset Communications GmbHs ...

Страница 2: ...кви изложения направени от Siemens AG или SHC които се намират в ръководствата за потребителя следва да се разбират като изложения на Gigaset Communications GmbH Надяваме се да ползвате с удоволствие вашия Gigaset HU Tisztelt Vásárló A Siemens Home and Communication Devices GmbH Co KG SHC törvényes jogutódja a Gigaset Communications GmbH amely a Siemens AG Gigaset üzletágának utódja Ebből következ...

Страница 3: ...Part No 007 6565 001 Gigaset SE565 Residential Gateway User s Guide ...

Страница 4: ...es thereof Limited Warranty The following limited warranties provided by Siemens Subscriber Networks extend to the original end user of the Hardware licensee of the Software and are not assignable or transferable to any subsequent purchaser licensee 1 Hardware Siemens Subscriber Networks warrants that the Hardware will be free from defects in materials and workmanship and will perform substantiall...

Страница 5: ... or amended except by a written instrument executed by a duly authorized officer of Siemens Subscriber Networks Siemens Subscriber Networks neither assumes nor authorizes any authorized service center or any other person or entity to assume for it any other obligation or liability beyond that which is expressly provided for in this Limited Warranty including the provider or seller of any extended ...

Страница 6: ... IP Settings pages 9x ME 8 Checking TCP IP Settings pages 2000 9 Checking TCP IP Settings pages XP 10 Checking TCP IP Settings MAC OS 8 6 through 9 x 11 Checking TCP IP Settings MAC OSX 12 Configure Web Browser 13 For pages 9x 2000 13 For pages XP 13 Connecting to the Gateway 14 Using UPnP pages XP and Me 14 Using your Web Browser 14 Gateway Setup Wizard 15 Home page 17 Menu Bar 17 Tool Bar 18 Cha...

Страница 7: ...wall Security Level 42 Firewall Security Attack Detection 43 Firewall Security IP Filtering 45 Firewall DMZ 51 Firewall Snooze Control 52 Administrator Password 53 Address Translation 54 Address Translation With NAT 55 Address Translation With NAPT 56 Chapter 6 Miscellaneous Configuration Options Customize 58 Color Palette 59 Time Zone 60 Reboot 61 Chapter 7 Monitoring Gateway Health Statistics 63...

Страница 8: ...ss to computers and other networked devices Your gateway can act as a DHCP Server for devices on your local network Network Status and Statistics Using these diagnostic tools you can easily monitor the status of each network connection and evaluate network performance Security Features Password Protected Configuration Password protection is provided to prevent unauthorized users from modifying the...

Страница 9: ...lter Use the Content Filter to block individual user access to undesirable Web sites Content filtering can be defined differently for each user Time of Day Use Restrictions Limit the time of day during which individual users have access to the Internet Time limitations can be defined differently for each user Minimum System Requirements At a minimum your computer must be equipped with the followin...

Страница 10: ... power circuit Physical Details Familiarize yourself with the front panel and back panel of the gateway before installing components Front Panel LEDs The front panel contains the following LEDs Power Off Power is off Green Power is on Flashing Flash write in progress Red The Power LED briefly shows red during power up This indicates that the SpeedStream is conducting the POST Power On Self Test th...

Страница 11: ...ord here to use your DSL connection through an existing phone line Reset Resets the gateway to default factory settings Four 10 100 Ethernet Ports Connect the RJ45 Ethernet cable here to connect your computers hubs or switches to the router You can configure port 4 as either a LAN or WAN port Power Connect the supplied power adapter provided with the router here Power Button Push this button to po...

Страница 12: ...res your telephone line you may need to separate the two signals so they do not interfere with each other A line filter may be included with some models prevents DSL traffic from disrupting the voice signal on the telephone line and vice versa Follow the procedures below to install line filters on any device telephones fax machines caller ID boxes that shares the same telephone line with your DSL ...

Страница 13: ...edure to connect the gateway to your computer The Gateway is connected to the PC and athe Internet through cable connections on the back of the device 1 With the PC powered off connect one end of the RJ 45 cable to any of the Gigaset device s Ethernet ports on the back panel and the other end of the Ethernet cable to the Ethernet port on the PC 2 Connect the DSL cable resembles a telephone cord to...

Страница 14: ...up For all non server versions of pages the TCP IP setting defaults to act as a DHCP client If using the default gateway settings and the default pages TCP IP settings you do not need to make any changes Although these are the default settings for the PC it is a good idea to verify that they have not been changed If TCP IP is not already installed on your computer refer to your system documentatio...

Страница 15: ...age 2 Select TCP IP protocol for your network card 3 Click Properties This displays the TCP IP Properties page Click the IP Address tab 4 Ensure that the Obtain an IP address automatically option is selected This is the default pages setting 5 Click OK to close each dialog 6 Restart the PC to ensure it obtains an IP address from the router 7 Configure internet access using the procedure described ...

Страница 16: ...nnection page 3 Right click Local Area Connections and select Properties This displays the Local Area Connections Properties page 4 Select Internet Protocol TCP IP from the list of components 5 Click Properties This displays the Internet Protocol TCP IP Properties page 6 Ensure that the Obtain an IP address automatically and Obtain DNS server address automatically options are selected 7 Click OK t...

Страница 17: ... and select Properties This displays the Local Area Connection Properties page 2 Select Internet Protocol TCP IP you may have to scroll down and click Properties This displays the Internet Protocol TCP IP Properties page 3 Ensure the Obtain an IP address automatically and Obtain DNS server address automatically options are selected 4 Restart the PC to ensure it obtains an IP address from the route...

Страница 18: ...wing from the Connect via drop down menu Ethernet or Ethernet built in if connecting via Ethernet Ethernet Adaptor en0 en1 if connecting via USB 3 Select Using DHCP Server from the Configure drop down menu 4 Close the TCP IP page and click Save 5 Reboot when configuration is saved Once rebooted the computer will pull an IP address from the DHCP server on the gateway 6 Configure the gateway using t...

Страница 19: ...ble click the Network icon under the Internet Network section This displays the Network page 3 Select one of the following from the Show drop down menu Built in Ethernet if connecting via Ethernet Ethernet Adaptor en0 en1 if connecting via USB 4 Select Using DHCP Server from the Configure IPv4 drop down menu 5 Click Apply Now and quit page 6 Configure the gateway using the procedure described in G...

Страница 20: ...e 6 Click I connect through a local area network LAN then click Next This displays the Local Area Network Internet Configuration page 7 Ensure all the boxes are deselected then click Next This displays the Set Up your Internet Mail Account page 8 Click No then click Next This displays the Completing the Internet Connection Wizard page 9 Click Finish to close the Internet Connection Wizard Setup is...

Страница 21: ...esktop shortcut Whether you accept the desktop shortcut or not you can find UPnP devices in My Network Places previously called Network Neighborhood 2 Double click the icon for the gateway either on the desktop or in My Network Places to access the gateway s configuration program 3 Refer to the Gateway Setup Wizard section for details of the initial configuration process Using your Web Browser The...

Страница 22: ...e and password for Internet service provided by your ISP Check the information supplied by your ISP for details 1 The first page of the Setup Wizard is the Setup page 2 Click Next on the Setup page to begin setup This displays the Gateway Administrator Setup page 3 An administrator account has access rights to the gateway configuration pages Optionally change the admin user name to a different adm...

Страница 23: ...Enable Time Client 9 Select your time zone from the Select Time Zone drop down menu then click Next This displays the Finish page 10 On the Finish page click Finish This displays the What do I do now page From this page you may click one of the following Surf Now Your Web browser re directs you to default home page of the Web browser you are using You may return to the gateway s configuration inte...

Страница 24: ...ink to access help Log In Drop down Menu The Log In drop down menu is used to log in or log out as a user or administrator There are two types of primary users that log into the gateway administrators and users Administrators have rights to all of the configuration options available on the gateway Users have limited access based on what is set by the administrator for each user Pay special attenti...

Страница 25: ...onfiguring users Refer to Chapter 3 Configuring Users and Devices for details on configuring devices Refer to Chapter 4 Configuring Advanced Features for details on configuring advanced features on the Gateway Users Button This button provides access to user profiles and the User Profile Wizard This wizard guides you through the steps required to set up and configure individual user profiles Once ...

Страница 26: ... in the tool bar Users and Devices Configuring Users Users are added and maintained from the User Profiles page accessed by clicking the Users button on the tool bar The User Profiles page provides details about all active user profiles if Enable User Profiling is selected The Enable User Profiling option must be selected on the User Profiles page for the content filtering option to be operational...

Страница 27: ...ser button in the left navigation pane This displays the Profile User Information page 2 Type a user name in Username 3 Type a password in Password 4 Re type the password in Confirm 5 Click Next This displays the Profile Content Filtering page At any time during user configuration you can click Finish to complete the user profile and accept the defaults for this user Content filtering restricts ac...

Страница 28: ...ption is selected type a word or Web address in the box under the Website word name table then click Add Entry The system responds by adding the word or Web address to the Website word name table Note The entries in the Website word name table may be either modified or deleted at any time by clicking either Edit or Delete next to the corresponding word or Web address 8 Click Next This displays the...

Страница 29: ...ime of day options to control the time of day a user can access the internet No time of day restrictions The user can access the Internet at any time Only allowed from The user can only access the Internet at the time range set in the time drop down menus Be sure to specify the from and until times the user can access the Internet 12 Select one of the following options to designate the number of m...

Страница 30: ... from any device 15 Click Next This displays the Customized Profile Icon page All user profiles have an icon that displays in the left navigation pane of the User Profiles page You may customize the color of this icon using the Customized Profile Icon page 16 To select a color do one of the following Select a color from the drop down menu Type a numeric color value in the box next to the color dro...

Страница 31: ... To edit a user profile 1 From the User Profiles page click the button in the left navigation pane corresponding to the user you want to edit This displays the Profile Monitor page 2 Click Edit Profile This displays the Profile Content Filtering page with the User Setup pane in the left navigation pane 3 Click on any item in the User Setup list to display the appropriate page 4 Make any changes 5 ...

Страница 32: ...igation pane corresponding to the user you want to delete This displays the Profile Monitor page 2 Click Delete User Viewing User Logs User logs provide time stamped information about the activity of the user over the network To view user logs 1 From the User Profiles page click the button in the left navigation pane corresponding to the user you want to delete This displays the Profile Monitor pa...

Страница 33: ... If you are logged in as a specific user you can only view devices associated with that user logon To use the Devices option 1 Click Devices in the tool bar This displays the Connected Devices page displaying general information about devices on your network 2 Click the icon of a connected device in the left navigation pane or click the device hyperlink under Connected Devices Summary This display...

Страница 34: ...n the Main page The options that display under the Gateway Options pane in the left navigation pane are based on how you logged into the system If you logged in as the administrator all options are turned on and enabled If you logged in as a user only the Gateway Health Customize and Reboot options are enabled This chapter is organized into parts that correspond to the following buttons shown in t...

Страница 35: ...ternet Options page All the advanced options in this section should only be configured with the help and guidance of your ISP Incorrect changes to any of these options could result in the failure of your Internet connection To access one of these options click its link on the Advanced Internet Options page Configure the ATM Virtual Circuits Create configure a PVC Permanent Virtual Circuit across a...

Страница 36: ...Circuit PVC A PVC is used to maintain a permanent connection between two points on a network Changes to ATM settings should not be made unless you are advised to do so by your Internet Service Provider To access the ATM virtual circuit option click the Configure ATM Virtual Circuit hyperlink on the Advanced Internet Options page This displays the ATM Virtual Circuit Wizard page Make any modificati...

Страница 37: ...nnections hyperlink from the Advanced Internet Options page This displays the Static Routes page 2 Type the IP address of the destination device in Destination 3 Type the net mask of the destination device in Net Mask 4 Optionally type the IP address of a destination gateway in Next Hop 5 Select a connection type from the Interface drop down menu 6 Click Apply The system responds by adding your ne...

Страница 38: ... done users can connect to your servers or DMZ computer from the Internet using your Domain name Refer to the section in this document titled Firewall DMZ for more information on DMZs To set up Dynamic DNS on the gateway 1 Click the Set up Dynamic DNS hyperlink from the Advanced Internet Options page This displays the Set Up Dynamic DNS page 2 Select the Enable option 3 Type the name provided to y...

Страница 39: ...t Options page This displays the RIP Configuration page 2 Select one of the following options from under the RIP Version heading next to the connection of your choice 1 Provides essential RIP packet formatting for routing information packets 2 Provides enhanced packet formatting for routing information packets by providing the following IP address subnet mask next hop and metric shows how many gat...

Страница 40: ...nced Settings to display a list of advanced features that allow you to manage the computers on your network This displays the Advanced Home Networking page The advanced options are listed below To access one of these options click its link on the Advanced Home Networking page IP Network Define the range for assigning IP addresses Server Ports Specify the ports used by common applications such as H...

Страница 41: ...ent or temporary IP addresses from a central server To configure the IP network option 1 Click the Configure the local SpeedStream Gateway IP Network hyperlink This displays the SpeedStream Gateway IP Network page 2 Select a range from the displayed options and click Save Settings Be sure to select an IP address range that is not in conflict with any existing devices 3 Optionally click the Custom ...

Страница 42: ...rs only To configure the server port option 1 Click the Configure the Local SpeedStream Gateway Server Ports hyperlink This displays the SpeedStream Gateway Server Ports page 2 Optionally type a port number in HTTP The default port for this field is 80 3 Optionally type a port number in FTP The default port for this field is 21 4 Optionally type a port number in Telnet The default port for this fi...

Страница 43: ...t you may be required to consult your Internet Service Provider for the appropriate settings To configure the LAN WAN port 1 Click the Configure the Local SpeedStream Gateway LAN WAN Port hyperlink This displays the SpeedStream Gateway LAN WAN Port page 2 Select one of the following options LAN Local Area Network Use the port as a connection to the network located in your home or premises WAN Wide...

Страница 44: ... and Gateway greatly reduces the amount of manual configuration required to use new applications and devices Only certain versions of pages XP and computer support the UPnP Universal Plug and Play function Before configuring this option make sure that UPnP is installed on your computer and enabled Follow the steps below for installing UPnP components 1 Select Start Control Panel 2 Select Add or Re...

Страница 45: ... Click Configure the Universal Plug and Play Settings link to display the UPnP Configuration page 9 Select one of the following operating modes to enable or disable UPnP Disable UPnP Prevents the Gateway from using the UPnP feature to communicate with other devices or your operating system Also may be disabled if your operating system does not support UPnP Enable Discovery and Advertisement only S...

Страница 46: ...NS 39 10 Select one of the following control options Enable Access Logging Logs UPnP transactions to the system log Read Only Mode Can read configuration information from a device cannot modify the device configuration 11 Click Apply to accept the settings This displays the UPnP finish page 12 Click Reboot ...

Страница 47: ...res are accessed through the Gateway button available on the tool bar on the Main page Click the Security button to configure security for the gateway This button is displayed only if you logged in as the administrator Clicking the Security button displays the Security Options page containing icons to access the security features This section is organized into parts that correspond to the followin...

Страница 48: ...n page Attack Detection Enable protection from common hacker attacks to your computer network from the Internet Click Configure to configure the Attack Detection feature This displays the Attack Detection Configuration page IP Filtering Configure inbound and outbound filter rules if your firewall Level setting is Custom Click Configure to configure IP filter rules This displays the Firewall IP Fil...

Страница 49: ...down menu This can be one of the following Off No firewall protection Data can move freely both in and out of the gateway Low Provides basic firewall protection Attack detection is enabled and only ports well known to the gateway can allow the flow of data High Provides maximum firewall protection Only certain applications are allowed through the firewall or traffic that is already in conversation...

Страница 50: ... each event that can be monitored Same Source and Destination Address An outside device can send a SYN synchronize packet to a host with the same source and destination address including port causing the system to hang When the receiving host tries to respond to the source address in the packet it ends up just sending it back to itself This packet could ping pong back and forth over 200 times cons...

Страница 51: ...llow an outside user Telnet access to a device on your network Fragmented TCP Header An outside device can send an attack using TCP packets with only a header and no payload When numerous packets are sent through the gateway in this manner your system slows and halts Fragmented UDP Header An outside device can send an attack using fragmented UDP headers to bring down a device on your network Fragm...

Страница 52: ...e Firewall IP Filter Configuration Wizard page 2 Do one of the following Click Add New IP Filter Rule to add new IP filter rules This displays the Basic Rule Definition page Click Clone IP Filter Level to clone IP filter rules already defined This displays the Clone Rule Definition page Once cloned you can modify the existing rules Add New IP Filter Rules The Basic Rule Definition page is displaye...

Страница 53: ...ace drop down menu 8 Select one of the following options Any IP Address Select this option if this rule applies to any IP address from the source This IP Address Select this option if a rule applies to a specific IP address from the source 9 If you selected This IP Address enter an IP address in the IP Address field and do one of the following Enter a netmask in the Netmask field Select or Host to...

Страница 54: ...y of bytes to remote or local users Click Next to display the TCP UDP Options page UDP User Datagram Protocol Provides for the exchange of datagrams without acknowledgement or guaranteed delivery Click Next to display the TCP UDP Options page ICMP Internet Control Message Protocol A mechanism that provides for peer communication The most commonly used application for this protocol is the PING comm...

Страница 55: ...1 field is acceptable as the source destination port Be sure to provide a value in the Port 1 field equal to A port equal to the numeric value in the Port 1 field is acceptable as the source destination port Be sure to provide a value in the Port 1 field greater than or equal to a port greater than or equal to the numeric value in the Port 1 field is acceptable as the source destination port Be su...

Страница 56: ... Firewall Settings SIEMENS 49 ICMP Options page The ICMP Options page is displayed if you select ICMP protocol from the Protocol Definition page 1 Do one of the following Select any of the ICMP options you wish to filter Select All Types to filter all options 2 Click Next 3 Click Finish ...

Страница 57: ...les and modify them according to your needs If you choose to clone IP filter rules the rules already defined in the Rule Definition table are discarded To clone IP filter rules 1 Select one of the following from the Select preconfigured firewall level for cloning drop down menu Low Clones low level IP filter rules High Clones high level IP filter rules 2 Click Apply This displays the Firewall IP F...

Страница 58: ...e Internet with no firewall protection To enable and configure the DMZ 1 Select DMZ from the Firewall Settings page 2 Click the Configure hyperlink next to DMZ This displays the Firewall DMZ Configuration page 3 Select one of the following DMZ enable options Disable DMZ The firewall is not bypassed Enable DMZ with this Host IP address The firewall is bypassed through an IP address typed in the box...

Страница 59: ... configure snooze control 1 Select Firewall Snooze Control from the Firewall Settings page 2 Click the Configure hyperlink next to Firewall Snooze Control This displays the Firewall Snooze Control page 3 Select one of the following options Disable Snooze Disables all snooze control In this mode the firewall is not bypassed Enable Snooze and set the Snooze time interval to Enables snooze for a spec...

Страница 60: ...f you have administrative rights to the gateway To change the administrator password 1 From the Security Options page click the Admin Password button This displays the Enter Network Password page 2 Provide the administrator log on ID and password then click OK This displays the gateway Administrator Setup page 3 Make any desired changes to the User Name New Password and Confirm Password 4 Click Sa...

Страница 61: ... page select the Address Translation button This displays the Address Translation NAT NAPT page 2 Select an interface from the Select Interface drop down menu 3 Select one of the following options Use no address translation Disables address translation Address Translation NAT Uses NAT for address translation NAT is an Internet standard that allows a LAN to use one set of IP addresses for internal ...

Страница 62: ... an address on the Internet It allows only one machine to access the Internet To enable and configure NAT address translation 1 Select Address Translation NAT from the Address Translation NAT NAPT page 2 Click the Configure hyperlink next to Address Translation NAT This displays the NAT Address Configuration page 3 Type the IP address of the one computer in your network that you wish to have acces...

Страница 63: ...users Only TCP UDP and ICMP protocols support NAPT To enable and configure NAPT address translation 1 Select Port By Pass NAPT from the Address Translation NAT NAPT page 2 Click the Configure hyperlink next to Port By Pass NAPT This displays the Port By Pass Configuration page 3 To enable an application for NAPT click the desired application from the Available Applications list The application is ...

Страница 64: ...l that allows VPN Virtual Private Network applications This option uses port 1723 Domain Domain is used for DNS options This option uses port 53 Select a protocol from the Select Protocol drop down menu This can be one of the following TCP Transmission Control Protocol Provides reliable sequenced and unduplicated delivery of bytes to a remote or local user UDP User Datagram Protocol A connectionle...

Страница 65: ...und color language and time zone settings of your router using customization options To access the customization options click the Customization button from the Gateway Options pane This displays the Customized Settings page Customization options discussed in this chapter Customize the router s display Reboot the router Customize the appearance of the configuration interface program Configure time...

Страница 66: ...n menus from the different display options select the colors you wish to use in the system 3 Optionally type a numeric color value in the box next to the particular color drop down menu The number is based on RGB Red Green Blue values For example the color red is represented by a value of ff0000 green is represented by a value of 00ff00 and blue is represented by a value of 0000ff If you are enter...

Страница 67: ... in entries in the system log To enable and configure the time zone feature 1 From the Customized Settings page click the Time Zone button This displays the Configure Time Zone page 2 Select Yes for Enable Time Client 3 Select a time zone from the Select Time Zone drop down menu Note The router s time server is unable to determine whether your time zone is currently observing daylight savings time...

Страница 68: ...tor level To reboot or reset factory defaults on the router 1 Click the Reboot button from the Gateway Options pane This displays the System Reboot page 2 If you want the factory default settings to be reset click Reset to Factory Defaults Reset should be used when you find it necessary to recover the factory default settings This may be necessary when a custom configuration did not go as planned ...

Страница 69: ...lth button from the Gateway Options pane This displays the Gateway Health page This chapter is organized into parts that correspond to the following buttons shown in the Gateway Health pane Used to measure the Internet statistics home networking statistics security statistics and the different gateway log files Reboot the system or resets all settings to gateway factory defaults Runs a diagnostic ...

Страница 70: ...d by your Internet Service provider to diagnose service related issues Internet statistics include either ATM or DSL statistics Home Networking Stats Home Networking statistics are helpful for troubleshooting issues on your home network These statistics are displayed for each physical interface connected to the gateway USB connection is not available on this model Security Stats Security breach at...

Страница 71: ...nection to the service provider is based on an Asynchronous Transfer Mode ATM network connection In addition statistical information is provided for each Virtual Circuit VC configured under the ATM Adaptation Layer AAL To view ATM statistics click the ATM hyperlink under Internet Stats View status and statistical information for the Digital Subscriber Line DSL when the physical WAN side connection...

Страница 72: ...ul for troubleshooting issues on your home network These statistics are displayed for each physical interface connected to the gateway View status and statistical information for LAN side Ethernet connectivity Pay special attention to the status up or down reported for each Ethernet port to verify that each cable is connected properly and detected by the gateway ...

Страница 73: ...ty displayed in the system log is defined using the checkboxes provided at the bottom of the page Click Apply after making any changes The system log can be cleared or saved to a text file using the appropriate buttons Clear Log or Save Log Firewall Logging displays attempts both failures and successes to access data through the firewall Firewall log entries are defined on the Firewall Settings Co...

Страница 74: ...tton from your Gateway Health page This displays the Diagnostics page To use the diagnostic option 1 Select a connection to test from the Connection to Test drop down menu You must move all the way to the bottom of this page to display this drop down menu 2 Click Run Diagnostics The system responds by displaying the results in the different tables Pay special attention to any tests that report a f...

Отзывы: