background image

9

8

9

8

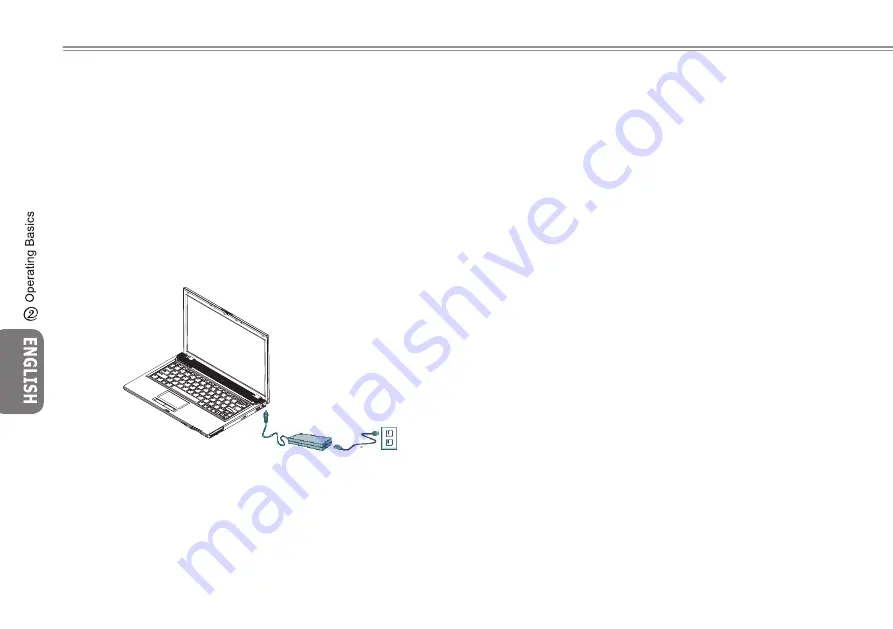
2.2 Connecting the AC Adapter

The AC adapter converts AC power to DC power and reduces the 
voltage supplied to the computer. It can automatically adjust to any 
voltage from 100 to 240 volts and outputs power at 19 volts, 3.42A, 
allowing you to use your notebook computer in almost any region. 

CAUTION: Use only the AC adapter and the power cord we recom-

mend. Using the wrong adapter may damage your computer. We 

assume no responsibilities for damages arising from misuse of AC 

adapters. 

To properly connect the adapter, follow the steps as below:

1. Connect the power cord to the AC adapter.
2. Connect the AC adapter to the DC power port on the right of 

your computer.

3. Connect the AC adapter power cord to an AC outlet.

2.3 Turning Your Notebook On and Off

►Turning on the power◄
Open the notebook lid, press and hold the power button for one or 
two seconds. The power indicator will glow blue once the computer 
is powered on. 

►Turning off the power◄
If you are not going to use your notebook computer for a while, it 
is best to turn off its power. Before turning off power, close all pro-
grams first and shut down the operating system

After turning off your notebook computer, make it a habit to leave 
the LCD panel open for a while after it has been used for an ex-
tended period of time. This allows the interior of your notebook 
computer to cool off. Closing the panel will force the heat up 
against the LCD screen, and doing so after a while may damage 
the screen. More importantly, never close the LCD panel for a long 
period of time when the computer is on or when the power saving 
function is disabled.

►Suspend mode◄
You can adjust default power management settings in the Power 
Option/Advanced dialog box. The Power Options dialog box pro-
vides several operating functions after your computer has been idle 
for a while. 

Содержание W451U

Страница 1: ...Copyright 2006 W451U Notebook User s Manual Original Issue 2006 02 ...

Страница 2: ...nd may result in fire or electri cal shock Use only the AC adapter and batteries that are supplied by your notebook manufacturer Using other types of battery or AC adapter may heighten the risk of fire or explosion Incorrectly placed batteries may result in an explosion Replace only with the same or compatible battery recommended by the manufacturer Please discard used batteries according to the man...

Страница 3: ...t to the new environment before turning on power When unplugging the power cord please make sure that you pull on its connector or on its strain relief loop and not on the power cord itself As you pull out the connector please ensure that it is pulled out evenly in order not to bend its connecting pins Also be fore you connect the power cord make sure that both connectors are correctly oriented an...

Страница 4: ...es connecting to PCMCIA cards see the option manual or installation instructions Federal Communications Commission FCC PART 68 Warning This equipment complies with Part 68 of the FCC Rules On the bottom of the computer is a label that contains among other in formation the FCC Registration Number and Ringer Equivalence Number REN for this equipment You must upon request provide this information to ...

Страница 5: ...ibility EMC Chap ter 3 Limits Section 3 Limits on the voltage fluctuations and flicker in low voltage power supply systems for equipment with rate current up to and including 16 A EN 60950 Safety of Information Technology Equipment NOTE EN 55022 emissions requirements provide for two classificatios Class A governs commercial use Class B is governs residential use BSMI Notice Taiwan Only Most notebook...

Страница 6: ...architecture providing you with a personal computer that is compact powerful and easy to use Designed for a wide range of general business and personal productivity applications this notebook is an ideal choice for use in the office at home and on the road This Manual contains all the information you need to set up and use your notebook computer It describes all of its features in a thorough yet ea...

Страница 7: ...3 Personalize Your W451U Notebook Computer 3 1 How to restore to the Factory Restore Point 16 3 2 BIOS Settings 18 3 3 BIOS update 22 3 4 Graphics System 24 3 5 Protecting Your W451U Notebook Computer 25 Chapter 4 Connecting to Peripherals 4 1 Using USB Port 27 4 2 Connecting to an External Monitor 27 4 3 Using the Port Replicator Connector 28 4 4 Using the LAN Port 29 4 5 Using the Modem Port 29 ...

Страница 8: ...1 W451U NOTEBOOK USER S MANUAL Chapter 1 The Grand Tour This chapter will show you basic components of the computer and briefly explain how they function The Grand Tour ...

Страница 9: ...lighting in your current environment 4 Stereo Speakers The built in dual speakers ouput stereo sound 5 Launch Keys Buttons for launching frequently used programs 6 Keyboard Inputs data into your computer 7 Palm Rest Comfortable extra space below the keyboard panel for your wrist or palm supports during typing 8 Touchpad buttons Function like the left and right buttons of a regular mouse 9 Touchpad...

Страница 10: ...ecurity lock Right View 1 IEEE 1394 Port Connects to your IEEE1394 Firewire compatible devices 2 New Card Slot Accepts additional New Card compatible modules 3 USB Port Connects to USB Devices 4 Optical Drive Internal optical drive load programs from a Compact Disc CD or a Digital Versatile Disc DVD 5 Status LED Indicator Indicates activity when the ODD is playing a media disc or is being accessed...

Страница 11: ...gital cameras MP3 players mobile phones and PDAs Bottom View 1 Battery Bay Equipped with a Lithium Ion Li Ion battery pack 2 Battery Latch Push latch to remove battery 3 Fan Heat Vent The built in fan ventilates heat inside your computer 4 Memory Compartment This compartment contains memory 5 Bluetooth Cover This compartment contains bluetooth 6 Hard Disc Compartment This compartment contains hard...

Страница 12: ...drive is being accessed Wireless LAN Activity Indicator The wireless LAN activity indicator tells you whether or not your computer is connected to a wireless network Media Card Status Indicator This light flicks when computer is reading a multimedia or SD card Num Lock Lights up when the numeric mode is turned on by pressing Num LK Press Num LK again to turn off the embedded numeric keyboard Caps L...

Страница 13: ...e your W451U notebook computer including connecting the AC adaptor turning the com puter on off using touch pad keyboard hot keys battery and so on If you are new to computers and to the operating system this chapter will guide you through some of the new exciting features ...

Страница 14: ...ery before use is also highly recom mended Li Ion Battery is vulnerable do not charge it with other power adapter otherwise fire or explosion may occur Replacing the Battery The battery will gradually weaken over time We recommend that you replace your battery when you notice a significant decrease of battery capacity To change the battery pack follow the steps below 1 Turn off the computer 2 Clos...

Страница 15: ...and hold the power button for one or two seconds The power indicator will glow blue once the computer is powered on Turning off the power If you are not going to use your notebook computer for a while it is best to turn off its power Before turning off power close all pro grams first and shut down the operating system After turning off your notebook computer make it a habit to leave the LCD panel ...

Страница 16: ...e the one shown below 2 Put the CD into the CD R W or DVD RW optional Drive An Auto Run installation screen will appear 2 5 Using the Launch Keys The easy access buttons located on the top of the left side allow you to easily access the internet and your E Mail client such as Microsoft Outlook There are 5 launch keys found next to the power button Internet Opens up your Internet Explorer browser E...

Страница 17: ... items To activate deactivate Light Sensor press Num Lk key first When Num Lock light beside Power Button is on release Num Lk key and press Fn Home Pause key Press this key to temporarily halt execution of a command Pressing any other keys to resume execution of a command Shift key Press this key in combination with letters to produce uppercase letters in typing Use this key in combination with th...

Страница 18: ...ime PgDn key Moves the cursor down one sreen at a time End key Moves the cursor to the end of a screen or a line Special Function Keys Embedded Numeric Keypad The embedded numeric keypad functions like the one on a desktop keyboard It is indicated by small characters located on the upper right hand corner of the keycaps Desired Access Num Lock On Num Lock Off Number keys on Type numbers in a embed...

Страница 19: ... the Fn keys with other keys it can simulate all key board functions of a regular desktop keyboard Fn F1 Suspend switch Fn F2 Activate or deactivate wireless functions Fn F3 Switch between LCD or CRT monotor Fn F4 Increase screen brightness Fn F5 Decrease screen brightness Fn F6 Audio mute Fn F7 Decrease audio volume Fn F8 Increase audio volume Fn F9 Play or pause media player Fn F10 Stop media pl...

Страница 20: ...e pointer over to the item with your finger on the pad and click twice on the left button to select menu items or simply tap twice on the touchpad To drag and drop Move the pointer over to the item with your finger on the pad click once on the left button beneath the Touchpad and select the item you want once the item is selected you can then drag the item by gliding your finger on the Touchpad cl...

Страница 21: ...l drive is normally used for installing operating system and software programs To insert and remove a disc from the drive 1 Press the button on the front of the drive to eject the disc tray and gently pull out the tray 2 Place the disc on the tray with label side up 3 Place the disc on the spindle and press it down gently until the disc clicks into place 4 Slide the tray back until it clicks shut ...

Страница 22: ...BIOS setup utility The W451U Notebook Computer has a BIOS setup utility which allows you to configure important system settings You will also learn how to upgrade components in order to improve system performance If you have questions about any of these settings please contact your vendor Personalize Your W451U Notebook Computer ...

Страница 23: ... see the Select Recover Type menu 2 Select a recovery option Click on the desired option or Press the Tab key until the desired option is highlighted then press the space bar Recover Boot Partition Select this option if you know that your hard drive is already partitioned into several drives if you would like to recover only the boot partition then select this option How ever the Recover Boot Part...

Страница 24: ...rmation during the re covery process Percentage of recovery completed Time elapsed Estimated time remaining The time it takes FirstWare Recover Pro to complete the recovery process ranges from 15 minutes to an hour depending on the size of the recovery image The more applications and utilities that were included in the factory setup the longer the process will take Amount of data in Kilobytes to b...

Страница 25: ... screen appears If your computer is already turned on reboot your computer and press the F2 key to enter the setup utility Navigating and Entering Information in BIOS Use the following keys to move between fields and to enter infor mation Item Description Select Screen Push the up and down arrow keys to move among selections then press Enter to make a selection Change Option Tab Select Field F1 Ge...

Страница 26: ...m Change Values F9 Setup Defaults ESC Exit Select Menu Enter Select SubMenu F10 Save and Exit BIOS SETUP UTILITY Main Advanced Boot Security Exit Video Features Internal Devices Configurations Plug Play O S WinXP USB BIOS Legacy Support Enabled Resume On LAN Disabled ATA Control Mode Enhanced AHCI Configuration Enabled Item Specific Help Select options for video display F1 Help Select Item Change Val...

Страница 27: ...Select Item Change Values F9 Setup Defaults ESC Exit Select Menu Enter Select SubMenu F10 Save and Exit BIOS SETUP UTILITY Boot menu Main Advanced Boot Security Exit Boot Menu Enabled Boot Time Diagnostic Screen Disabled Preboot Execution Environment Enabled Boot Device Priority Item Specific Help T h e B o o t M e n u Disable or Enable F1 Help Select Item Change Values F9 Setup Defaults ESC Exit S...

Страница 28: ...nfo Change User Password You can enter into the setup utility to change or remove user pass words however you cannot change or remove the Supervisor password nor can you access the diskette Change Supervisor Password A supervisor password is required before you can set a user password After selecting Change Supervisor Password enter a new password then re enter it to confirm The password you enter...

Страница 29: ...u update BIOS you will lose all settings you customized Please go to the Gigabyte website http www gigabyte com tw for the latest BIOS update utility To upgrade the BIOS on DOS 1 Insert the disk with BIOS updated into the diskette drive USB FDD USB Flash Disc or Floppy Disc 2 Power on the system with the diskette in the diskette drive 3 In the DOS prompt type the following command A Phlash16 xxxx ...

Страница 30: ...WinFlash 5 Choose the desired option Selecting Backup BIOS and Flash BIOS with new settings will erase all previous settings Specify the location of your backup and new BIOS files Click on Flash BIOS when ready 6 Click on OK to start running the program 7 Flash progress will be shown in the pop up window Please do not interrupt the process in order for the program to run correctly 8 The system will...

Страница 31: ...ormally you should use the resolution your LCD monitor was designed for Note Using a lower resolution than the screen was designed for will reduce the displaying area Using the computer in DOS mode produces the same effect because it uses a 640 by 480 resolution by default Dual Displays Under Windows operating system you may use an external moni tor and your notebook s LCD screen simultaneously Yo...

Страница 32: ...se an external monitor change the output mode in the Display properties dialog box first After changing the output mode you can then use the video display hot keys Note Light or dark pixels may appear on the LCD screen as a re sult of LCD s manufacturing limitations however this will not effect your LCD screen s normal functions 3 5 Protecting Your W451U Notebook Computer The W451U Notebook Comput...

Страница 33: ...26 26 Chapter 4 Connecting Peripherals This chapter will show you step by step how to connect your peripherals to the W451U notebook computer ...

Страница 34: ... below 1 Turn off your W451U notebook and make sure the monitor power switch is turned off 2 Connect the connector cable of the monitor to the VGA port at the left side of your notebook Secure the cable connection with the screws provided 3 Connect the monitor power cable and plug it into a properly grounded wall outlet 4 Turn on the monitor 5 Turn on your W451U notebook Both the LCD panel and the...

Страница 35: ...nners 4 External Monitor Port The external monitor port allows you to connect an external monitor 5 Parallel Port The parallel port or LPT port allows you to connect parallel devices such as a printer to your notebook 6 USB V2 0 Port The two USB ports allow you to connect USB devices such as external game pads pointing devices key boards and or speakers 7 RJ45 1000 100 10MHz Ethernet LAN Port Inte...

Страница 36: ...ws you to connect a phone line to a phone jack 1 Locate the RJ 45 cable in the accessories box that came with your notebook s shipping carton Each end of the cable has a connector 2 Connect one end of the cable into the network wall outlet or the HUB 3 Connect the other end of the cable into the computer s LAN port ...

Страница 37: ...Your Windows operating system should already contain the driver for your device if not you will be prompted to install the driver 4 The computer will beep twice to indicate successful installation A single beep means there was a problem recognizing the card Removing a Card 1 Press the eject button on the card slot to release the eject but ton then press the eject button again to release the card W...

Страница 38: ...pts SD MMC MS MS Pro cards 4 10 Using your Bluetooth optional and Wireless devices Your W451U computer supports both Bluetooth and Wi Fi compat ible devices To enable both wirless and Bluetooth functions at first please press the wireless Launch key which is located on the top of the left side Therefore you can press Fn Esc to enable or disable Bluetooth function only and press Fn F2 to turn on of...

Страница 39: ...32 32 Chapter 5 Troubleshooting In this chapter we will list some frequently encountered technical problems and tell you how to resolve them ...

Страница 40: ...ease refer to your Windows documentation The dial tone volume of the internal fax modem is too low How can I increase its volume Go to Start Control Panel Sounds Speech and Audio Devices under Device volume adjust your speaker volume by control ling the volume bar What kind of external microphone can I use with my notebook computer You will need to use a self amplifying microphone There are echoes...

Страница 41: ...unplug or eject your de vice using Safe Removal 2 In Safely Remove Hardware in the list of devices select the device that you want to unplug or eject and then click Stop This tells the system that you will be unplugging or ejecting the device 3 In Stop a Hardware device click OK A notification appears stating that it is now safe to unplug or eject the device Caution Unplugging or ejecting a device...

Страница 42: ...ical and hardware specifications of your W451U notebook computer Please note that the information men tioned here may not completely match your notebook computer s actual specifications Specification is subject to change without notice and the present manual may be modified at a later time ...

Страница 43: ...00 Mbps Fast Ethernet connection Build in 56Kbps V 92 fax data modern Three Universal Serial Bus USB 2 0 ports Dual band antenna WLAN Intel PRO Wireless 3945ABG IEEE 802 11a b g Option Audio Built in High Definition Audio Alzalia Built in two stereo speakers Dual Array Microphone Separate audio ports for headphone out and microphone in devices Keyboard and pointing devices 86 key US 87 key EU 90 ke...

Страница 44: ...37 37 W451U NOTEBOOK USER S MANUAL Appendix B Service Centers This appendix will list our global service centers for your W451U notebook computer ...

Страница 45: ... FAX 49 40 25492343 Sales 49 1803 428329 Tech WEB Address http www gigabyte de Ho Japan NIPPON GIGA BYTE CORPORATION TEL 81 3 5791 5438 FAX 81 3 5791 5439 WEB Address http www gigabyte co jp China G B T TECH TRADING CO LTD Shanghai TEL 86 21 63410999 FAX 86 21 63410100 WEB Address http www gigabyte com cn GuangZhou TEL 86 20 87586074 FAX 86 20 85517843 WEB Address http www gigabyte com cn Beijing ...

Страница 46: ...dd 47 allee des impressionnistes immeuble Gauguin 93420 Vil lepinte France TEL 800 44422983 800 GIGABYTE WEB Address http www gigabyte fr Russia Moscow Representative Office Of Giga Byte Technol ogy Co Ltd WEB Address http www gigabyte ru Poland Office of GIGA BYTE TECHNOLOGY Co Ltd in POLAND WEB Address http www gigabyte pl Czech Republic Representative Office Of GIGA BYTE Tech nology Co Ltd in CZEC...

Страница 47: ...40 ...

Отзывы: