background image

English

20

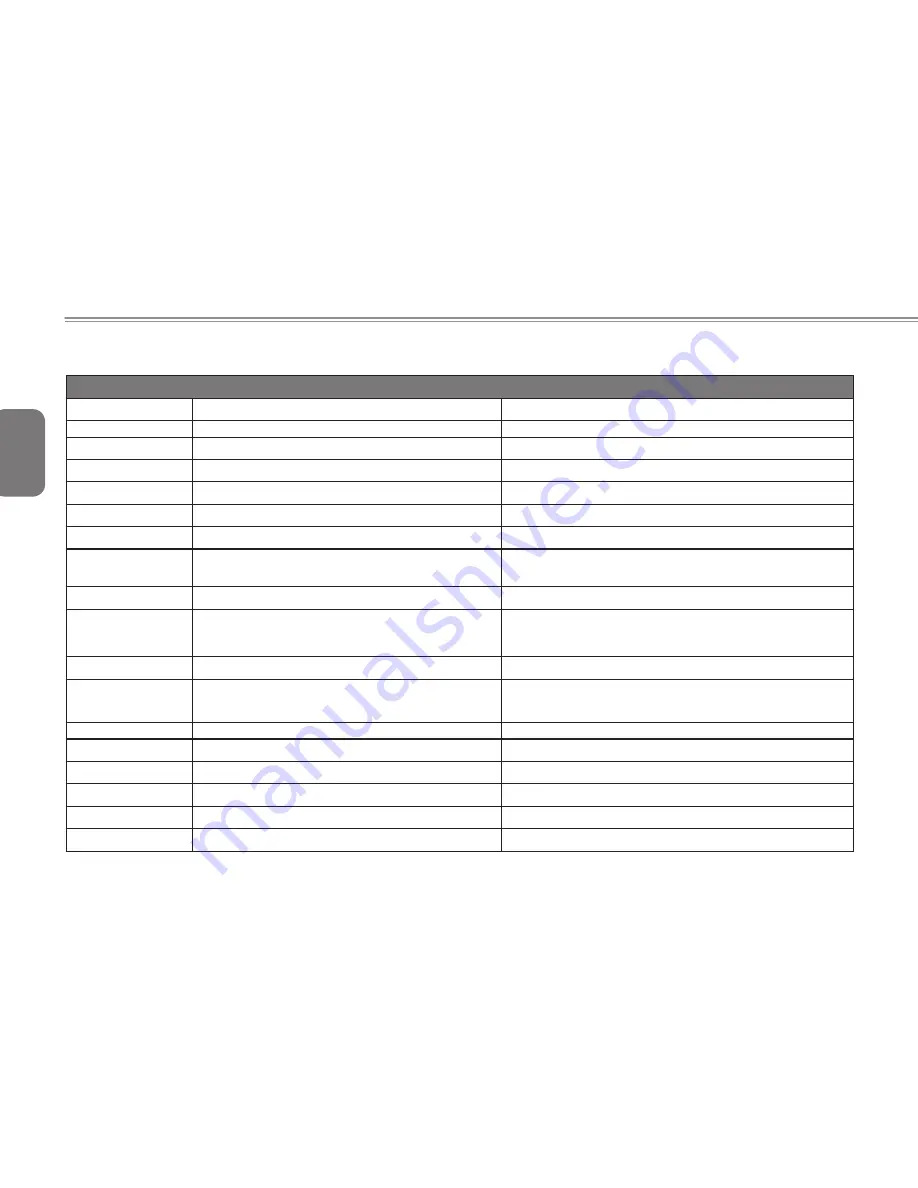
Q1441 Specifications

Specifications

Q1441N

Q1441M

CPU

Intel

®

 Arrandale 45nm processor 

Intel

®

 Arrandale 45nm processor 

OS

Windows

®

 7 Compliant

Windows

®

 7 Compliant

LCD Display

14.0” 16:9 LCD, 1366 x 768

14.0” 16:9 LCD, 1366 x 768

System Memory

14.0” 16:9 LCD, 1366 x 768 with LED back-light

14.0” 16:9 LCD, 1366 x 768 with LED back-light

Chipset

Intel

®

 HM55 Express Chipset 

Intel

®

 HM55 Express Chipset 

Video Graphics

NVIDIA GeForce 310M

Intel

®

 HD Graphics with dynamic frequency

Hard Disk Drive

2.5" 9.5mm SATA HDD 5400rpm


(Supports capacities of  250/320/500GB)

2.5" 9.5mm SATA HDD 5400rpm


(Supports capacities of  250/320/500GB)

Optical Drive

12.7mm DVD- Super Multi Dual-Layer Drive

12.7mm DVD- Super Multi Dual-Layer Drive

I/O Port

USB 2.0*2, eSATA/USB Combo, HDMI, D-SUB,

Mic-in, Headphone-out, RJ45, RJ11, 4-in-1 card 

reader, SIM Card slot

USB 2.0*2, eSATA/USB Combo, HDMI, D-SUB, Mic-in, 

Headphone-out, RJ45, RJ11, 4-in-1 card reader, SIM Card 

slot

Audio

Speaker 1.5 watt*2 internal Microphone

Speaker 1.5 watt*2 internal Microphone

Communications

Ethernet 10/100/1000 Base-T 

802.11 b/g/n

Ethernet 10/100/1000 Base-T 

802.11 b/g/n

Bluetooth

BT2.1+EDR

BT2.1+EDR

Webcam

1.3Mega pixel with 2 Digital microphone

1.3Mega pixel with 2 Digital microphone

Security

HDD Password, Kensington Lock

HDD Password, Kensington Lock

Battery

Li-Ion 6 cells, 2600mAh/cell 

Li-Ion 6 cells, 2200mAh/cell 

Dimensions

340 x 237 x 26~33.5mm

340 x 237 x 26~33.5mm

Weight

~2.5kg (with LCD, ODD, 6 cells)

~2.5kg (with LCD, ODD, 6 cells)

Содержание Q1441 Series

Страница 1: ... or transmitted in any form or by any means electronic mechanical by photocopy recording or otherwise without prior written consent Trademarks Product names used herein are for identication purposes only and may be the trademarks of their respective companies Microsoft MS DOS Windows and Windows Sound System are trademarks of the Microsoft Corporation Intel Atom are registered trademarks of Intel ...

Страница 2: ...that which is recommended by the manufacturer Using non recommended or non approved parts may cause damage or increase the risk of a fire or explosion In the event that another AC Adaptor is required advice should be sought from a GIGABYTE service agent in order to make sure that the correct part is recommended Please follow the battery installation guidelines Incorrect installation of batteries m...

Страница 3: ...n X Ray make sure that you keep a close eye on it when it is one the conveyor belt Hold on to your notebook until the last minute before placing it on the conveyor In some airports it could be stolen while you are stuck in a queue waiting to pass through the metal detector Notebooks and hard drives can pass through X Ray machines but never allow these to pass through a metal detector This can caus...

Страница 4: ...the keys by dipping a lint free soft cloth into it wringing out the excess liquid and wiping the keys Allow to dry for at least 5 minutes LCD It is best to use a microfiber cloth to clean the surface of the LCD If there are any marks or stains present it would be wise to use commercially available LCD cleaning kit When using a commercially available LCD cleaning kit never spray the liquid directly...

Страница 5: ...rovider is unable to repair the product the product will be replaced with a comparable product that is new or refurbished Warranty Limitations The GIGABYTE Limited Warranty does not cover the following Software including the operating system and applications supplied with the product This also includes third party software that may be installed after purchase Third party hardware products and acce...

Страница 6: ...rienced radio TV technician for help All external cables connecting to this basic unit must be shielded For cables connecting to PCMCIA cards see the option manual or nstallation instructions RF Exposure This equipment must be installed and operated in accordance with provided instructions and must not be co located or operating in conjunction with any other antenna or transmitter End users and in...

Страница 7: ...our service representative or qualified service person nel Keep children away from and promptly dispose of a damaged battery Always dispose of batteries carefully Batteries may explode or leak if exposed to fire or improperly handled or discarded Keep the battery away from metal appliances Affix tape to the battery contacts before disposing of the battery Do not touch the battery contacts with you...

Страница 8: ...d result in an explosion for example with some lithium batteries the following applies if the battery is placed in an operator access area there shall be a marking close to the battery or a statement in boththe operating and the servicing instructions if the battery is placed elsewhere in the equipment there shall be a marking close to the battery or a statement in the servicing instructions This ...

Страница 9: ...notebook computer This portable notebook computer provides excellent multimedia functionality and is designed to provide you reliable no fuss computing This manual will explain to you step by step how to setup and begin using your Q1441 Q1447 It provides basic configuring operation care and troubleshooting guidelines ...

Страница 10: ...Bottom View 6 Chapter 2 Getting Started 2 1 Power Sources 8 2 2 Recharging the battery 9 2 3 Starting your Notebook 10 2 4 Status Indicators 10 2 5 Using Function Keys 11 2 6 Using the Touch Pad 12 2 7 Memory Module Upgrade 13 2 8 WWAN 3G Connection optional 14 Chapter 3 GIGABYTE Smart Recovery 3 1 GIGABYTE Smart Recovery 16 Chapter 4 Troubleshooting 4 1 Identifying the Problem 18 4 2 GIGABYTE Ser...

Страница 11: ...vides basic information to help you get started and to use the Q1441 Q1447 notebook Some of the features described herein may not function properly or at all unless used in conjunction with the pre installed operating system Any change to the operating system may cause improper function ...

Страница 12: ...d confirmed that your notebook system is complete read through the following pages to learn about all of your notebook components NOTE Depending on the model you purchased the actual appearance of your notebook may vary from that shown in this manual These images are for illustration purposes 1 2 Familiarize Yourself with the Computer Opening The Display Panel To open the display panel simply lift...

Страница 13: ... lights correspond to specific operating modes These modes are Power on Suspend status battery AC adapter status hard drive activity HDD Num Lock Caps Lock and wireless transmission activity 5 Keyboard A full size keyboard with dedicated Windows keys 6 Multi Card Reader The memory card reader offers the fastest and most convenient method to transfer pictures music and data between your notebook an...

Страница 14: ...nect Universal Serial Bus devices It supports v2 0 of the USB standard which allows data exchange rates as high as 480 Mb s 5 Optical Disc Drive The optical drive allows you to play back and write media discs such as CDs DVDs 6 Optical Disc Drive Activity Indicator This light flickers to indicate activity when the ODD is playing a media disc or is being accessed by the operating system 7 Optical D...

Страница 15: ...Bus devices It supports v2 0 of the USB standard which allows data exchange rates as high as 480 Mb s 4 e SATA USB Combo Port The e SATA USB combo port allows you to connect an external device such as an external hard disk drive or optical drive 5 HDMI Port The HDMI port allows you to connect a video device such as a television or projector to your computer 6 External Monitor Port The external mon...

Страница 16: ...The battery bay contains the internal Lithium Ion battery 2 Compartment Covers The 3G module compartment contains the 3G module Optional configurations 3 Stereo Speakers The built in dual speakers allow for stereo sound 4 Cooling Vents These are open ports for the fan to dissipate heat from the computer s internal components Do not block or place the computer in such a position that you inadverten...

Страница 17: ...AL Chapter 2 Getting Started This chapter will show you the various ports and components of the Q1441 Q1447 and familiarizes you with the notebook Certain parts of the notebook can be user upgraded while others are fixed and cannot be changed ...

Страница 18: ...ure that you have at least one charged battery installed 2 Remove the AC adapter Your notebook will automatically switch from DC power to battery power CAUTION The Lithium Ion battery does not ship with a pre charge initially You will need to connect the AC adapter to useyour notebook PC the first time It is recommended that only the AC Adapter supplied with the Q1441 Q1447 is used Any other adapt...

Страница 19: ...tput rating Once your notebook PC goes into Suspend mode as a result of a dead battery you will be unable to resume operation until you provide a source of power either from an adapter or a charged battery Once you have provided power you can press the Suspend Resume button to resume operation In Suspend mode your data is maintained for some time but if a power source is not provided promptly the ...

Страница 20: ...lity If a fault is found your computer emits an audio warningand or displays an error message Depending on the nature of the problem you may be able to continue by starting the operating system or by entering the BIOS setup utility and revising the settings After satisfactory completion of the Power On Self Test POST your notebook loads the installed operating system CAUTION Never turn off your no...

Страница 21: ...omputer has 12 function keys F1 through F12 The functions assigned to these keys differ for each application You should refer to your software documentation to find out how these keys are used The FN key provides extended functions for the notebook and is always used in conjunction with another key FN F1 Places the notebook in Suspend mode Pressing the Power button returns it to active mode FN F2 ...

Страница 22: ...once and then immediately release it You also have the option to perform the clicking operation by tapping lightly on the TouchPad once Double Clicking Double clicking means pushing and releasing the left button twice in rapid succession This procedure does not function with the right button To double click move the cursor to the item you wish to select press the left button twice and then immedia...

Страница 23: ...crews securing the compartment cover 4 Lift up and remove the compartment cover The memory upgrade module can be severely damaged by electrostatic discharge ESD Be sure you are properly grounded when handling and installing the module 5 Align the connector edge of the memory upgrade module chip side up with the connector slot in the compartment 6 Insert the memory upgrade module at a 45o angle and...

Страница 24: ... you are not comfortable doing so please contact the supplier to install the Module for you Ensure the Q1441 Q1447 is off before proceeding 1 Shut down the power 2 Remove the Compartment Cover to reveal the Mini Card slots 3 Line up the 3 5G Mini Card with the slot making sure to check the alignment of the notch and press the card into the slot 4 There should be an antenna plug available to plug i...

Страница 25: ...English 15 Q1441 Q1447 SERIES USER S MANUAL Chapter 3 GIGABYTE Smart Recovery ...

Страница 26: ... feature is part of the netbook installation and it ships preset from the factory The Options menu allows you to launch the Windows Recovery tool to reinstall the operating system to factory defaults Below will briefly describe how to launch the Recovery Tool and to get the recovery started 1 Turn off or restart the Netbook 2 Turn the netbook on and press and hold the F9 key to launch the tool 3 T...

Страница 27: ...oblems can be resolved quickly simply and easily and are not always a system problem Should you encounter a problem that is not yet or differently listed please consult the GIGABYTE Website or call your unit supplier for assistance For website assistance go to the Support section of www GIGABYTE com tw for telephonic assistance please call the supplier of your unit or take the unit to the supplier...

Страница 28: ...ilure 5 Turn on your notebook Make sure it has been off at least 10 seconds before you turn it on 6 Go through the boot sequence 7 If the problem has not been resolved contact your support representative Before you place the call you should have the following information ready so that the customer support representative can provide you with the fastest possible solution Product name Product config...

Страница 29: ...English 19 Q1441 Q1447 SERIES USER S MANUAL Appendix ...

Страница 30: ...2 7mm DVD Super Multi Dual Layer Drive 12 7mm DVD Super Multi Dual Layer Drive I O Port USB 2 0 2 eSATA USB Combo HDMI D SUB Mic in Headphone out RJ45 RJ11 4 in 1 card reader SIM Card slot USB 2 0 2 eSATA USB Combo HDMI D SUB Mic in Headphone out RJ45 RJ11 4 in 1 card reader SIM Card slot Audio Speaker 1 5 watt 2 internal Microphone Speaker 1 5 watt 2 internal Microphone Communications Ethernet 10...

Страница 31: ...GB Optical Drive 12 7mm DVD Super Multi Dual Layer Drive 12 7mm DVD Super Multi Dual Layer Drive I O Port USB 2 0 2 eSATA USB Combo HDMI D SUB Mic in Headphone out RJ45 RJ11 4 in 1 card reader SIM Card slot USB 2 0 2 eSATA USB Combo HDMI D SUB Mic in Headphone out RJ45 RJ11 4 in 1 card reader SIM Card slot Audio Speaker 1 5 watt 2 internal Microphone Speaker 1 5 watt 2 internal Microphone Communic...

Страница 32: ...230V 50 Hz Bolivia 220V 50 Hz Bonaire 127V 50 Hz Bosnia 220V 50 Hz Botswana 231 V 50 Hz Region Voltage Frequency Brazil 127V 220 V 60 Hz Brunei 240V 50 Hz Bulgaria 230V 50 Hz Burkina Faso 220V 50 Hz Burundi 220V 50 Hz Cambodia 230V 50 Hz Cameroon 220V 50 Hz Canada 120V 60 Hz Canary Islands 220V 50 Hz Cape Verde 220V 50 Hz Cayman Islands 120V 60 Hz Central African Republic 220V 50 Hz Chad 220V 50 H...

Страница 33: ...20V 50 Hz Grenada 230V 50 Hz Guadeloupe 230V 50 Hz Guam 110V 60 Hz Guatemala 120V 60 Hz Guinea 220V 50 Hz Guinea Bissau 220V 50 Hz Region Voltage Frequency Guyana 240V 60 Hz Haiti 110V 60 Hz Honduras 110V 60 Hz Hong Kong 220V 50 Hz Hungary 230V formerly 220V 50 Hz Iceland 230V 50 Hz India 220V 50 Hz Indonesia 127V 230V 50 Hz Iran 220V 50 Hz Iraq 230V 50 Hz Ireland 230V formerly 220V 50 Hz Isle of ...

Страница 34: ... Nepal 230V 50 Hz Netherlands 230V formerly 220V 50 Hz Netherlands Antilles 127V 220V 50 Hz New Caledonia 220V 50 Hz Region Voltage Frequency New Zealand 230V 50 Hz Nicaragua 120V 60 Hz Niger 220V 50 Hz Nigeria 240V 50 Hz North Korea 220V 50 Hz Norway 230V 50 Hz Okinawa 100 V 60 Hz Oman 240V 50 Hz Pakistan 230V 50 Hz Panama 110V 60 Hz Papua New Guinea 240V 50 Hz Paraguay 220V 50 Hz Peru 220V 60 Hz...

Страница 35: ...ti 110V 220V 60 Hz 50 Hz Taiwan 110V 60 Hz Tajikistan 220V 50 Hz Tanzania 230V 50 Hz Thailand 220V 50 Hz Togo 220V 50 Hz Tonga 240V 50 Hz Trinidad Tobago 115V 60 Hz Tunisia 230V 50 Hz Turkey 230V 50 Hz Turkmenistan 220V 50 Hz Uganda 240V 50 Hz Ukraine 220V 50 Hz Region Voltage Frequency United Arab Emirates 220V 50 Hz United Kingdom 230V formerly 240V 50 Hz United States of America 120V 60 Hz Urug...

Страница 36: ...g Type Plug Picture Connector Type Connector Picture USA LP 30B LS15 Canada Japan LP 54 LS15 Taiwan LP 53 LS15 China PC 323 LS15 Korea LP E04 LS15 England LP 60L LS15 Singapore South Africa PE 364 LS15 PE 361 LS15 Plug Type ...

Страница 37: ...English 27 Q1441 Q1447 SERIES USER S MANUAL Australia LP 23A LS15 Germany LP 33 LS15 France Sweden Finland Norway Belgium Netherlands Austria Switzerland LP 37 LS15 Denmark LP 38 LS15 Italy PE 336 LS15 ...

Отзывы: