background image

English

9

1

2

3

4

5

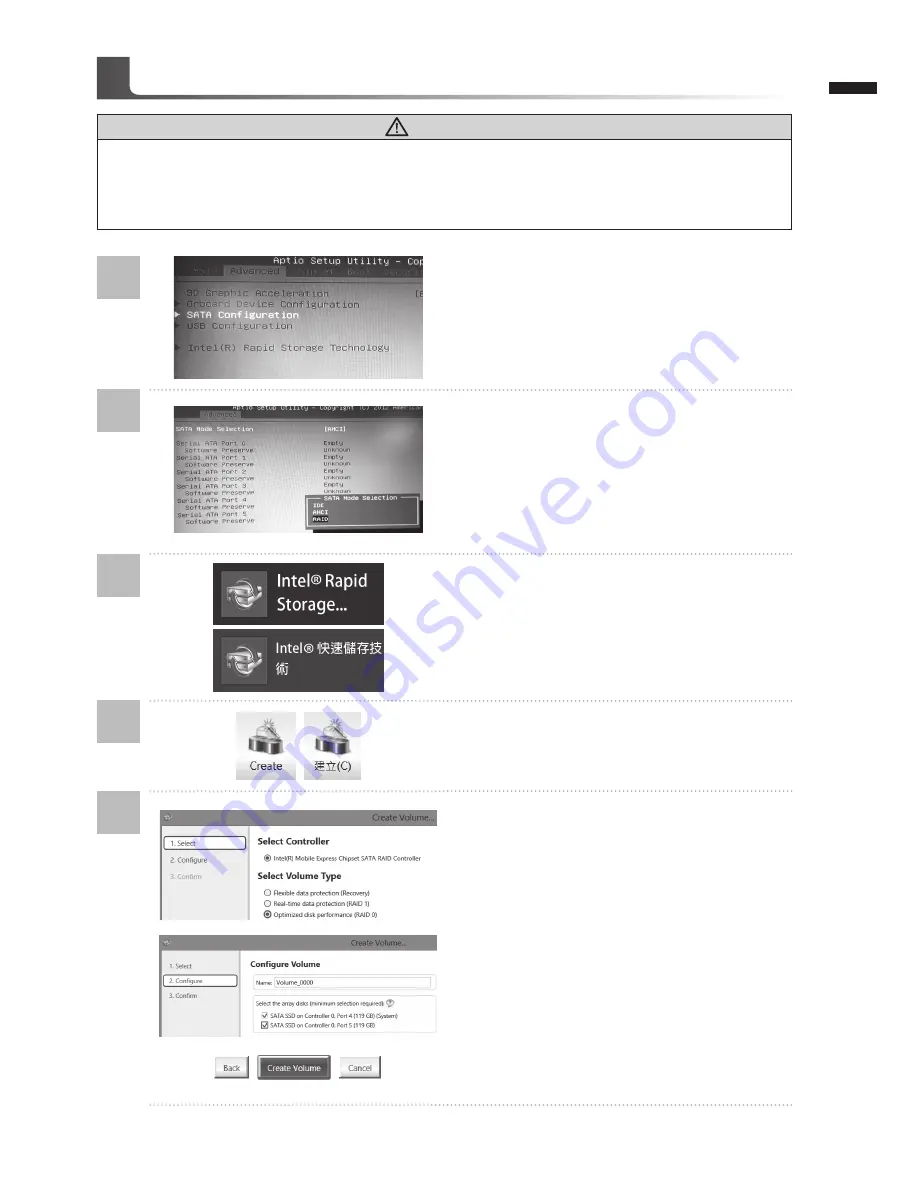
•  Press F2 when computer starts to Enter BIOS 

setup utility.

• Go to Advanced > SATA configuration.

•  Change "SATA Mode selection" from "AHCI" 

to "RAID".

•  Press F10 to save and exit. The system will 

restart automatically. 

•  Once the system restarts. Go to "All Apps" 

found at the bottom of the screen on Windows 

8 and execute Intel Rapid Storage program.

•  You  will  see  the  Intel  Rapid  Storage 

Technology Screen, Click> Create.

• 

 Under Select Volume Type choose Optimized 

disc performance (RAID 0/1), Click > NEXT.

•  Under Configure Volume you may set Name 

to your preferred name and select both 

controllers.

• 

 Click > Next. You will see Confirm Volume 

Creation. Click > Create volume.

•  Wait until the system migration is complete 

and restart the laptop.


WARNING


Please backup your data before you build and run RAID 0/1 on your system.


RAID 1 needs two storage drives of the same specification and capacity in your laptop.


 RAID 0 needs two storage drives of the same specification in your laptop. Different capacity is 

acceptable.

Setup Your System for RAID 0/1 

Содержание P25

Страница 1: ......

Страница 2: ...d may change without prior notice written or otherwise To install the battery please follow these steps 1 Target the battery s direction into the tenon mortise 2 Circulate the battery downwards until hearing the snap sound to lock the battery 3 Remember to slide the switch to the Lock position 1 Connect the power cord to the AC adapter 2 Connect the AC adapter to the DC in jack on the left side of...

Страница 3: ...e for the audio will not function until Windows Setup has completed Booting Up the Notebook for the First Time Depending on your configuration the Microsoft Windows Boot Screen will be the first screen that you will see as the notebook starts up Follow the on screen prompts and instructions and enter your personal information to complete the setup of the Windows Operating System ...

Страница 4: ... in the setup menu Smart Manager In Windows Mode Press Smart button to initiate Smart Manager Power Status LED Battery Status LED HDD Status LED Wireless Lan Status LED Bluetooth Status LED The LED indicators will show the battery capacity status when battery is inserted in power off mode 5 indicator lights on indicates that the battery capacity is 100 Only 1 indicator light on indicates that the ...

Страница 5: ...adphone Jack 3 USB Port x 2 4 Secure Digital Card Reader 5 HDMI Port 6 Ethernet Port 7 Kensington Lock Slot 1 Battery Bay 2 Woofer Speaker 3 Stereo Speakers 4 Hard Disk Bay Memory Bay Rear Bottom View Right View 2 4 1 3 3 1 7 2 4 5 6 ...

Страница 6: ...ggle Switche display output between the display screen external monitor if connected and both Fn F6 Touchpad Toggle Turn the internal touchpad on and off Fn F7 Speaker Toggle Turn the speaker on and off Fn F8 Volume Down Decrease the sound volume Fn F9 Volume Up Increase the sound volume Fn F10 N A There is no function for this model Fn F11 Bluetooth Enable disable the Bluetooth function Fn F12 We...

Страница 7: ...ger interface icons utilities and software versions may vary based on the purchased models Please operate GIGABYTE Smart Manager according to the actual version built in GIGABYTE Smart Setup During the off mode press Smart Button to enter Smart Setup menu You can choose BIOS Setup Utility Smart Recovery and other functions in this setup menu Press Continue to OS button to enter operating system Pr...

Страница 8: ...rked in blue 1 2 3 Fold the Mylar as shown in the picture and ensure that the Mylar covers the HDD from all sides Open the back cover of the laptop and connect the SATA Bus with HDD SSD 1 2 Once connected stick label over the Connector to ensure the HDD SSD does not slip out of the package Place the HDD SSD into the slot until securely placed Put the back cover on and fasten the screws Your laptop...

Страница 9: ...itions Website http www gigabyte com index aspx 1 2 3 1 Open the back cover or get the acces sory kit bag in the box you can find one mSATA SSD bracket and two screws inside Unfasten the screw and bracket from the mSATA SSD Leave the mSATA SSD in its slot 2 Fasten the mSATA bracket onto the 2nd mSATA SSD as shown Insert 2nd mSATA SSD with bracket Push the mSATAs lightly until the bracket falls in ...

Страница 10: ...eate Under Select Volume Type choose Optimized disc performance RAID 0 1 Click NEXT Under Configure Volume you may set Name to your preferred name and select both controllers Click Next You will see Confirm Volume Creation Click Create volume Wait until the system migration is complete and restart the laptop WARNING Please backup your data before you build and run RAID 0 1 on your system RAID 1 ne...

Страница 11: ... disk The window will pop out when the creation of recovery disk is done Please press F12 on starting the system when you need to restore the system Select boot from recovery USB disk and the system will be restored The time needed for restore will be around 30 mins time needed may vary by USB disk model WARNING You can backup original recovery image through this application in case of losing by d...

Страница 12: ...ake sure your PC is plugged in This will take a few minutes 2 1 3 Recovery Guide Note If the storage has been switched or the partition deleted the recovery option will no longer be available and a recovery service will be needed The recovery function is only available on devices with O S preinstalled Devices with DOS do not have the recovery function Launch System Recovery The system recovery fea...

Страница 13: ... you want to remove all of your files you can reset your PC completely Caution All personal data and files will be lost During the laptop turn on process press and hold F9 key to launch the tool 2 1 3 4 Turn off and restart the laptop Choose Troubleshoot to enter the recovery settings Also you can choose Continue to exit recovery system and continue to Windows 8 for files or data backup A progress...

Страница 14: ...ute recovery function 5 Choose Reset your PC Click on Next Choose a target operating system Click on Windows 8 Choose an option to recover your system Just remove my files Only personal data and files will be removed but computer settings will be kept Fully clean the drive The drive will be completely restored to factory default settings It takes more time Click on Reset to execute recovery functi...

Страница 15: ...or data backup Here are what will happen Your files and personalization settings won t be changed Your PC settings will be restored to factory default settings Apps from Windows Store will be kept Apps you installed from discs or websites will be removed A list of removed apps will be saved on your desktop Here are what will happen All of your personal files and apps will be removed Your PC settin...

Страница 16: ...m Image Recovery Recover Windows using a specific system image file Automatic Repair Fix problems that keep Windows from loading Command Prompt Use the Command Prompt for advanced trobleshooting UEFI Firmware Settings Change settings in your PC s UEFI firmware Startup Settings Change Windows Startup behavior ...

Страница 17: ...d information please refer to the warranty card or GIGABYTE service website as the below link http www gigabyte com support downloads technical support aspx FAQ FAQ Frequent Asked Questions please refer to the below link http www gigabyte com support downloads faq aspx ...

Отзывы: