Gigabyte GX2 Скачать руководство пользователя страница 14


Android keyboard 


2.3 Multimedia Message 

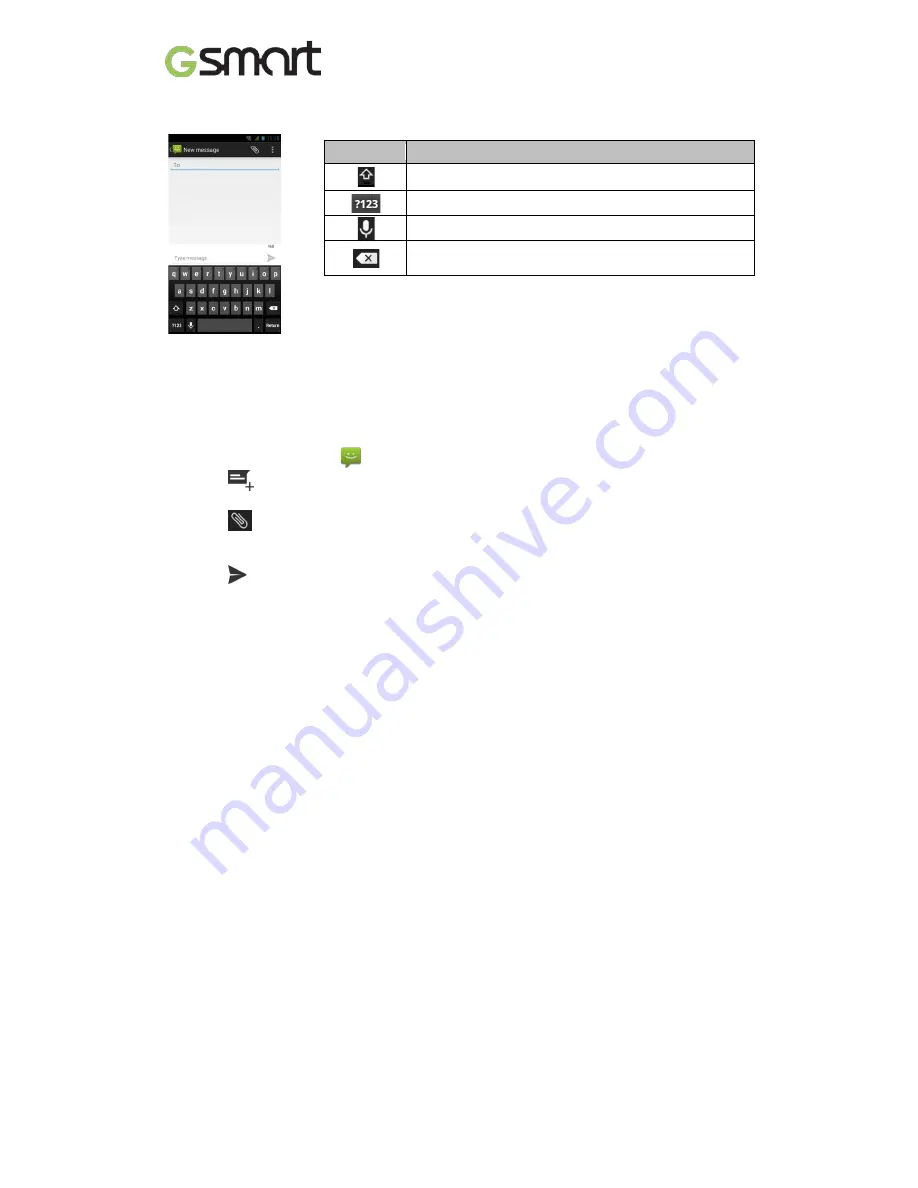
A Multimedia message or MMS can contain letters, an image, an audio, or a video file. 
 

To send MMS from Message screen 

(1)  Tap Applications tab > 

(2)  Tap 

  to create a new message. 

(3)  Enter the recipient’s phone numbers in the “To” field 

(4)  Tap 

  to attach pictures, capture picture, videos, capture video, audio, record audio, 

or slideshow. The message converts to a MMS message automatically. 

(5)  Enter your message with the on-screen keyboard in “Type message” filed. 

(6)  Tap 

  to send your message. 


Icons 

Function 


Tap to active Capital letter mode. 


Tap to activate the symbols and numerical keyboard. 


Tap to input something by voice. 


Tap to delete words. 

GX2 

13


Содержание GX2

Страница 1: ...GX2 ...

Страница 2: ...text music and pictures are owned by or authorized by original manufacturers to GIGA BYTE COMMUNICATIONS INC Reproduction transfer distribution or storage of part or all of the contents in this document in any form without the prior written permission of GIGA BYTE COMMUNICATIONS INC is prohibited GIGA BYTE COMMUNICATIONS INC GX2 1 ...

Страница 3: ...device has been damaged 2 When you follow the instructions to use your device it does not operate normally 3 The device has been exposed to water 4 Liquid has been spilled or an object has fallen onto the device Do Not push unauthorized objects into slots and openings in your device The device should be placed away from heat sources such as stoves radiators heat registers or other products that pr...

Страница 4: ...ts see http patents dts com Manufactured under license from DTS Licensing Limited DTS the Symbol DTS and the Symbol together are registered trademarks and DTS Studio Sound is a trademark of DTS Inc DTS Inc All Rights Reserved GX2 3 ...

Страница 5: ...ck Unlock 8 1 6 Contacts 8 1 7 The Home Screen 9 2 Phone Functions Messages 11 2 1 Voice Calls 11 2 2 Creating and sending a text message 12 2 3 Multimedia Message 13 3 Wi Fi Bluetooth 14 3 1 Wi Fi 14 3 2 Bluetooth 14 4 Multimedia Applications 15 4 1 Camera 15 4 2 Music 15 5 Pre Installed Programs Introduction 17 6 Managing Your Phone 19 6 1 Protecting Your Phone 19 6 2 Backup or Reset Your Phone ...

Страница 6: ...art EZ Key 16 Power 8 Touch Screen 17 Battery Cover 9 Menu 18 Speaker 1 2 Installing or uninstalling the SIM Card Battery and Memory Card SIM card The SIM card contains your phone number memory storage and details of network service To remove the back cover 1 Please turn over your phone with the back cover facing up 2 Please move your fingertip into the slot 3 Pull the back cover with your fingert...

Страница 7: ...out of card slot Battery Your phone comes with an embedded rechargeable battery Battery life varies depending on the network used applications and the type of connections attached to your phone To replace the back cover 1 Insert the cover into the slot from the bottom 2 Then press all around back cover fully until hearing clicks Memory card You may need a microSD card to store photos music videos ...

Страница 8: ...ct to the device via the USB cable 2 Plug the AC adapter to a socket to start the charge 3 For phone s safety please only use the original charger that comes with your device Any possible damage caused by using non original charger or any other equipment will not be under GIGABYTE Communication Inc s responsibility NOTE To ensure safety do not remove the battery from the phone while the AC adapter...

Страница 9: ...ock icon for unlocking the device Taking pictures Drag Lock icon to Camera icon to taking some pictures Muting the speaker Drag Lock icon to Mute icon to mute the speaker Making a phone call If you what to make a phone call please drag the Lock Icon to Phone icon 1 6 Contacts Contacts is your phonebook that you can store friends names phone numbers e mail addresses and other information Contacts c...

Страница 10: ... Home Screen Main functions You can slide the Home Screen from the left side to the right side or from the right side to the left side to switch it The icons located at the bottom of the home page have different functions Self defined Home Screen You can add the shortcuts and widgets Icons Descriptions Favorites Tray can keep your most important shortcuts and folders Tap to launch Application Draw...

Страница 11: ...rging Network and Connection Maximum signal strength Fewer bars indicate lower signal strength Left icon is SIM1 signal WCDMA GSM Right icon is SIM2 signal GSM GPRS EDGE 3G HSPA is in progress SIM1 supports GPRS EDGE 3G HSPAnetworks SIM2 supports GPRS EDGE networks Wi Fi is connected Wi Fi is in progress Wi Fi Network is activated Airplane mode Portable Wi Fi hotspot is activated Both USB tetherin...

Страница 12: ...rgency calls You have to unlock your device before making an emergency call Enter the international emergency number 112 and tap to make the emergency call Answering a call When there is an incoming call The phone will ring with the ring volume is turned on A notification message will appear on the screen Ending a call Tap It s the end icon to end a call To Start a Three way call 1 When you are al...

Страница 13: ...essage field 5 Tap to send your message You may select SIM1 or SIM2 If SIM2 inserted From Contact screen 1 Tap Applications tab 2 Tap a contact to display the contact information 3 Tap the icon to send the message 4 Compose your message 5 Tap to send your message NOTE If you exit Messages before sending unsent message will be saved as a draft automatically TouchPal keyboard Icons Function Tap to c...

Страница 14: ...phone numbers in the To field 4 Tap to attach pictures capture picture videos capture video audio record audio or slideshow The message converts to a MMS message automatically 5 Enter your message with the on screen keyboard in Type message filed 6 Tap to send your message Icons Function Tap to active Capital letter mode Tap to activate the symbols and numerical keyboard Tap to input something by ...

Страница 15: ...ter the necessary information then tap Save to save the settings 3 2 Bluetooth Bluetooth on your phone operates in three different modes On Bluetooth is turned on Your phone detects other Bluetooth devices but your phone is not visible to others Discoverable Bluetooth is turned on and your phone is visible to other Bluetooth devices Off Bluetooth is turned off To turn Bluetooth on or off 1 Tap App...

Страница 16: ...Display the flash mode Displays the last image Taking a photo 1 Tap Applications tab The screen switches to landscape view automatically 2 Tap to take a picture Recording a video 1 Tap Applications tab 2 Switch to recorder mode 3 Aim the phone at the subject 4 Tap to start to record tap to stop recording 4 2 Music You have to copy your audio files to the storage card before playing music because t...

Страница 17: ...ls Icon Function Album art picture or animation The area of audio information Slide to go forward or backward To play the song To pause the song Previous song Next song Tap to go to playlists To start or close shuffle function To repeat the current song all songs GX2 16 ...

Страница 18: ...y Views and edits photos and videos Gmail Google s web based e mail service Google Search Google s search service Google Settings Shortcuts to your Google settings Location Search Now Android Device Manager and Drive Apps Google Checks friends updates and post updates of your own Hangouts Google s instant messaging program Kingsoft Office Office Software Maps Google s mapping service for searching...

Страница 19: ... can simply reset contacts data or application data Sound Recorder Records a voice note System update Checking the system update information TouchPal X To set up your Touchpal Keyboard Voice Search Quickly to search your phone the web and nearby locations by speaking YouTube It is online video streaming service that to view search and upload videos GX2 18 ...

Страница 20: ...reen is off 1 Tap Applications tab Security Screen lock Pattern 2 Draw the unlock pattern by connecting at least four dots Then tap Continue 3 Draw the unlock pattern again and then tap Confirm 4 If you want to disable the function please tap Applications tab Security Screen lock Confirm the saved pattern and then tap None to disable it Set up Face Unlock You can use front facing shot to verify yo...

Страница 21: ...tworks and the individual usage Radio Band Standard GSM GPRS EDGE 850 900 1800 1900 MHz WCDMA HSDPA 850 900 1900 2100 MHz Connectivity GPS GPS AGPS Wi Fi IEEE 802 11 a b g n Bluetooth Bluetooth 4 0 USB Micro USB Audio Jack 3 5 mm stereo audio jack Digital Camera Rear Camera 13MP Color Camera with AF and Video Recording Front Camera 2MP External Memory Memory Card microSD supports up to 64GB Temper...

Страница 22: ...had been installed in your device for preventing any abnormal situation happens and saving more power as well If this document is modified please download the latest version on GSmart official website www gigabytecm com GX2 21 ...

Страница 23: ...Android 4 4 Introduction Android 4 4 0 ...

Страница 24: ... and Videos 14 4 2 Music 15 Chapter 5 Programs 17 5 1 Browser 17 5 2 Calculator 17 5 3 Calendar 18 5 4 Sound Recorder 18 5 5 Gmail 19 5 6 Maps 20 5 7 Clock 20 5 8 Play Store 20 5 9 YouTube 21 5 10 Google Search Google Now 21 5 11 Downloads 21 5 12 File Manager 21 5 13 FM Radio 22 5 14 Google 22 5 15 Connecting your phone to a computer 23 5 16 Screenshots 23 Chapter 6 Managing Your Phone 24 6 1 Man...

Страница 25: ...e call To make emergency calls You have to unlock your device before making an emergency call On the Phone screen input the international emergency number 112 and tap SIM1 or SIM2 to make the emergency call To make international calls 1 Go to the Phone screen 2 Tap and hold 0 until the is displayed which is international prefix code 3 Enter the country code area code and phone number 4 Then tap SI...

Страница 26: ...o enter another phone number 2 When someone answer your phone call tap Merge calls to set up the conference call 3 If you are having a call conversation and there is another incoming call you can tap to set up the conference calls also NOTE Conference call is a network service Please check with your network carrier for this function To manage other voice call features When you are having a call co...

Страница 27: ...e 1 Tap Application Drawer APPS tab 2 On tab tap a contact into information screen 3 Tap to make the video call Ending a video call Tap End icon to end a video call To manage other video call features When you are having a video call conversation Tap to activate speakerphone or tap again to cancel it Tap to mute microphone or tap again to un mute it Tap to switch the video windows Android 4 4 4 ...

Страница 28: ...window will show 3 Select an input method you want to use Personal Dictionary 1 Tap Application Drawer APPS tab Language input Personal dictionary 2 Tap to add the self defined words in the personal dictionary for English or all languages When you compose you can use them Tap the self defined word in the personal dictionary to edit it or tap to delete it Using Google Keyboard To toggle between upp...

Страница 29: ...ype your message and tap to send your message NOTE If you exit Messaging before sending unsent message will be saved as a draft automatically From People screen 1 Tap Application Drawer APPS tab 2 Tap a contact to display the contact information 3 Tap to send the message 4 Compose your message and tap to send your message From Phone screen 1 Tap Application Drawer APPS tab 2 Tap tab to view all ca...

Страница 30: ...ead 1 Tap Application Drawer APPS tab 2 Long press a message thread you want to delete 3 Tap to delete the message thread To delete a message within a thread 1 Tap Application Drawer APPS tab 2 Choose a message you want to delete 3 Tap and hold it until a Message options list shows 4 Tap Delete to delete the message To create a voice message 1 Tap Application Drawer APPS tab 2 Tap to create a new ...

Страница 31: ...Android 4 4 8 ...

Страница 32: ... Menu Settings ADD ACCOUNT 3 Please follow the Account setup steps to finish the settings To delete an Email account 1 Tap Application Drawer APPS tab 2 Tap Menu Settings 3 Tap one of your accounts If you have two more email accounts 4 Tap Remove account which is on the bottom of the page 5 Tap OK to confirm Composing and sending an Email 1 Tap Application Drawer APPS tab 2 Tap Account name to sel...

Страница 33: ...Reply all Tap to reply all recipients and sender Forward Tap to forward the e mail to other people 3 Enter the recipient and compose your e mail 4 Tap to send your email To delete an Email 1 Tap Application Drawer APPS tab 2 In your mail Inbox select the email you would like to delete 3 Tap to delete the email Android 4 4 10 ...

Страница 34: ... the connection icon will be displayed on the status bar To add Wi Fi network 1 Tap Application Drawer APPS tab Wi Fi 2 On Wi Fi screen tap And an on screen window will pop up 3 Follow the on screen instructions and enter the necessary information then tap Save to finish the settings To configure Wi Fi settings 1 Tap Application Drawer APPS tab Wi Fi 2 Tap Menu Advanced to check the Wi Fi settings...

Страница 35: ...ection you want to use 1 Tap Application Drawer APPS tab SIM management Data connection 2 Choose a SIM card you want to enable data access over Mobile network Enabling data roaming Please set up your data connection first and then follow the steps as below 1 Tap Application Drawer APPS tab SIM management Roaming Data roaming 2 Check the SIM card you want to connect to data when roaming Android 4 4...

Страница 36: ...h Devices A connection to a Bluetooth device is called a partnership You need to pair and create a partnership with a Bluetooth device to exchange information 1 Tap Application Drawer APPS tab Bluetooth 2 Tap SEARCH FOR DEVICES to search for a new device 3 Detected Bluetooth devices are displayed on the screen Tap one device to connect 4 Start to pair enter the password and then tap OK to finish p...

Страница 37: ...ge as the wallpaper To save an image as Contact photo 1 While viewing the image tap Menu Set picture as Contact photo 2 Choose a contact to add image 3 Drag your finger to select the crop area 4 Tap CROP to save the image as the contact photo To edit an image While viewing the image to edit an image To crop tap Menu Crop Drag your finger to select the area you want to keep Tap CROP to save the ima...

Страница 38: ...forward or backward To play the song To pause the song Previous song Next song Tap to go to playlists To start or close shuffle function To repeat the current song all songs Changing Playback options While playing music tap Menu button on the bottom of screen Tap Party shuffle to play all songs in shuffle order Tap Add to playlist to add the song Tap Use as ringtone to set up your personal rington...

Страница 39: ...ongs to a specific playlist or create a playlist 1 Tap Application Drawer APPS tab 2 In Songs tab long press a song you want to add then tap Add to playlist in the pop up submenu 3 Tap New to create a new playlist The song will be added to the new playlist automatically 4 You may check this new playlist in Playlists tab To remove a music file from the playlist 1 Tap Application Drawer APPS tab 2 I...

Страница 40: ... to enter the URL of the page that you want to set as your home page 3 Tap OK to save your settings To add the Bookmarks 1 While viewing a web page tap Menu Save to bookmarks 2 Edit the bookmark label and other information if needed 3 Tap Add to to save the bookmark to Home screen Bookmarks or Other Folder 4 Tap OK to save your settings Managing Bookmarks On a web page tap Menu Bookmarks History Y...

Страница 41: ...vents To add and schedule an event 1 Tap Application Drawer APPS tab 2 Tap Menu New event 3 Enter the details of the event 4 Select the dates in the fields of From and To For an all day event check ALL DAY 5 To set up the REPETITION select one of the options from the list 6 To set up a reminder select the time from the list 7 When finished tap DONE to return to the calendar NOTE The added and sche...

Страница 42: ...b automatically 1 Tap Application Drawer APPS tab 2 If you do not log in your Google Account tap NEW to create an account or tap Existing to sign in the Google account Please follow the on screen instruction to log in 3 Once logged in you can begin reading and sending emails from your Gmail account To remove Gmail account 1 Tap Application Drawer APPS tab ACCOUNTS Google the preferred Gmail accoun...

Страница 43: ...ernet and turn on the GPS you may be charged 5 7 Clock 1 Tap Application Drawer APPS tab 2 Tao to set alarms Tap to select the time in different cities Tap Settings adjust CLOCK ALARMS settings 3 Tap to use Timer function Tap to use Stopwatch function Tap to back to Clock function 5 8 Play Store Play Store allows you to find and download applications and fun games to your phone 1 Tap Application D...

Страница 44: ...ccount name into account information screen 5 Tap then Tap a video to upload 5 10 Google Search Google Now Search for the information in the Internet and on the phone Tap Application Drawer APPS tab You can also see the Google search bar on the Home screen 5 11 Downloads Files and other items you downloaded in Email or Browser are stored You can view reopen or delete what you ve downloaded 1 Tap A...

Страница 45: ...io frequency Next radio frequency Previous channel Next channel 5 14 Google You can check your friends updates post updates of your own and chat with your friends in Google 1 Tap Application Drawer APPS tab 2 If you do not log in your Google Account tap NEW to create an account or tap Existing to sign in the Google account Please follow the on screen instruction to log in Android 4 4 22 ...

Страница 46: ...torage on your device Please choose one of modes to connect with your computer 5 16 Screenshots Please press the and hold Volume Down Key and Power Key at the same time to capture any screen from the device Tap view screenshots Please refer the screenshots link Pictures Screenshots Android 4 4 23 ...

Страница 47: ... format you want Setting Alarms You can set up many alarms on your phone To set the alarm 1 Tap Application Drawer APPS tab 2 Tap to set up a new alarm 3 Tap to adjust the hour and the minute You can switch AM PM Tap OK to save the settings 4 Tap Repeat to select a day to sound the alarm 5 Tap CESIUM to set up the preferred ringtone as the alarm sounds Tap OK to save the settings 6 Check Vibrate t...

Страница 48: ... Stay awake to display the screen never sleep while charging To create a new ringtone mode You can create several audio profiles to use In the meanwhile you may also set up the voice call ringtone video call ringtone volumes and ringtone of events together 1 Tap Application Drawer APPS tab Audio profiles 2 Tap to add a new audio profile 3 Input the new profile name 4 Tap the new audio profile on t...

Страница 49: ...3 Managing your accounts Adding one or more Google Accounts 1 Tap Application Drawer APPS tab ACCOUNTS 2 Tap ADD ACCOUNT 3 Tap Google 4 Tap NEW to create an account or tap Existing to sign in the Google account Please follow the on screen instruction to sign in Syncing all your accounts automatically 1 Tap Application Drawer APPS tab ACCOUNTS 2 Tap the account you want to sync 3 Tap Menu Sync now ...

Страница 50: ...lication Drawer APPS tab Security Screen lock Password 2 Enter your password and then tap Continue Confirm your password then tap OK 3 If you want to disable screen lock security please tap Application Drawer APPS tab Security Screen lock Confirm your password and then tap Continue Tap None to disable it Set up unlock pattern You can further secure your data by locking the screen and requiring a s...

Страница 51: ...ing to reset the phone NOTE Before reset your device please remember to back up all your data and information Check IMEI on the phone You may check IMEI on the phone please choose the below instructions Input 06 IMEI will automatically appear on the screen Or tap Application Drawer APPS tab About phone Status IMEI information Functions and applications may vary by model Please visit www gigabytecm...

Отзывы: