background image

GV-R96P128D Graphics Accelerator

- 22 -

English

3.1.6. Display Properties pages

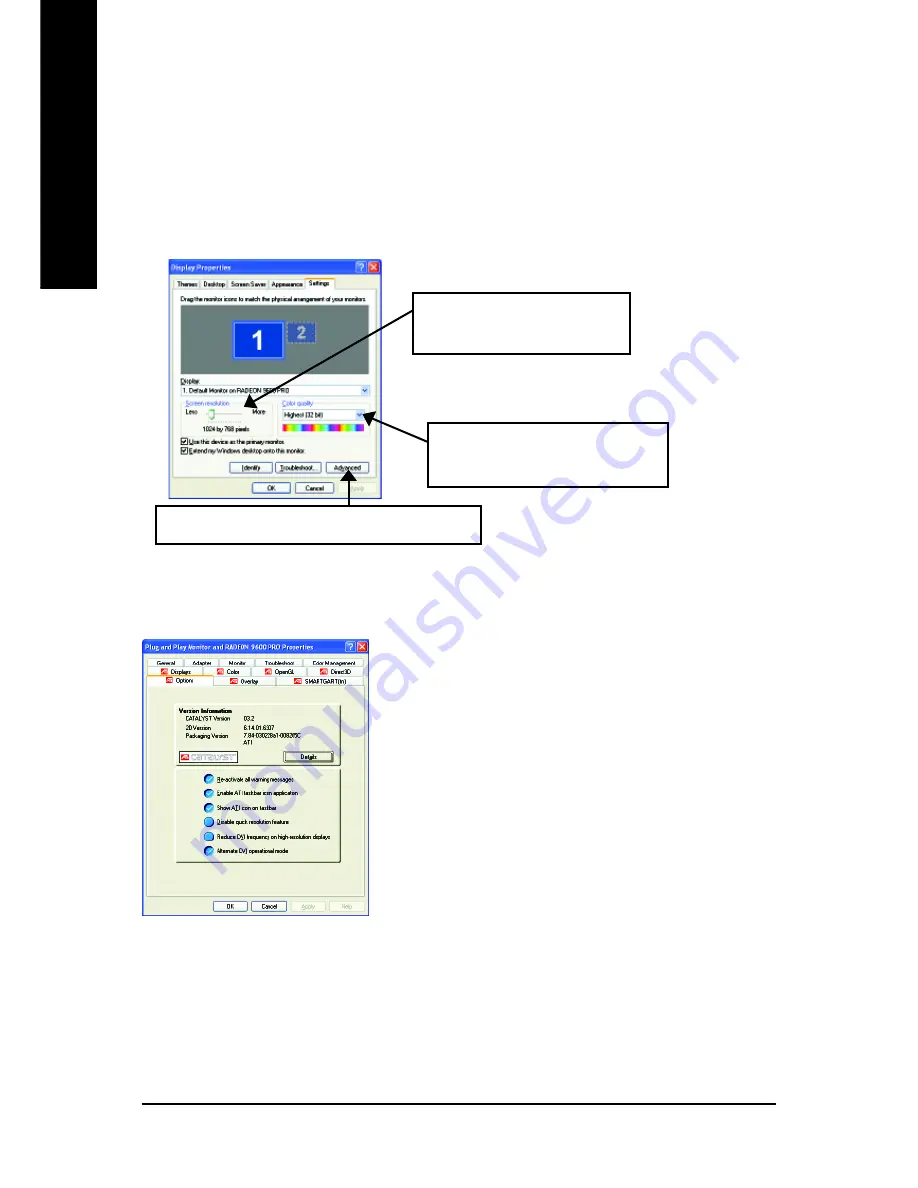
The screen shows the information of display adapter, color, the range of display area
and the refresh rate.

Settings (Resolutions and Color depth for windows)

The Setting properties page allows you to adjust the Direct 3D settings.

Options Properties

„

Version Information

 provides the Catalyst version

number, 2D version number and the driver build
information.

„

Details button

 access to the Details tab which lists the

card's hardware details and driver information.

„

Re-activate all warning messages

 allows you to

reactivate any disabled graphics warning messages.

„

Enable ATI taskbar icon application

 enables or disables

the ATI taskbar icon. However, this feature must be
enabled for ATI hotkey support.

Click "Advanced", into details settings:

„

Show ATI icon on taskbar

 adds or removes the ATI icon from the taskbar.

„

Disable quick resolution feature

 is accessible by left-clicking the ATI icon in the taskbar.

„

Reduce DVI frequency on high-resolution displays

 enables or disables to reduce the DVI

frequency when using high-resolution.

„

Alternate DVI operational mode

 enables or disables alternate DVI operational mode.

You can click the item to change
the color depth.

You can move the slider to the
change resolution.

Click "Advanced" icon for adapter and setting.

Содержание GV-R96P128D

Страница 1: ...GV R96P128D Radeon9600 PROGraphicsAccelerator Rev 102 12MD R96P128D 102 USER SMANUAL Upgrade your Life...

Страница 2: ...ear in this document nor does it make a commitment to update the information contained herein Please do not remove any labels on VGA card this may void the warranty of this VGA card June 20 2003 Taipe...

Страница 3: ...NDOWS ME WINDOWS XP DRIVER AND UTILITIES INSTALLATION 9 3 1 1 Operating system requirement 9 3 1 2 DirectX Installation 10 3 1 3 Driver Installation 12 3 1 4 Utilities on driver CD 15 3 1 5 Taskbar Ic...

Страница 4: ...licated and realistic visual effects than ever before GV R96P128D supports the new AGP 8X standard which allows large volumes of texture and vertex data to be transferred faster from system memory to...

Страница 5: ...r supply case 3 Place components on a grounded antistatic pad or on the bag that came with the components whenever the components are separated from the system The card contains sensitive electric com...

Страница 6: ...R TV out VGA Monitor Connector 15pin DVI Connector AV Output NTSC PAL TV Projector S VideoOutput DVI Output Digital LCD Monitor DVI I to D sub Connector VGA Output Analog LCD Monitor OR Analog LCD Mon...

Страница 7: ...card 1 Power off the computer and monitor then disconnect the display cable from the back of your computer 2 Remove the computer cover If necessary consult your computer s manual for help in removing...

Страница 8: ...w to fasten the card in place and replace the computer cover 6 Plug the display cable into your card then turn on the computer and monitor If your Graphics card came with a DVI connector you can conne...

Страница 9: ...des to setup your GV R96P128D driver Please follow the subsection 3 1 3 Step By Step Installation to install the driver for your GV R96P128D graphics accelerator 3 1 1 Operating system requirement z I...

Страница 10: ...cceleration support for Windows 98 98SE Windows 2000 Windows ME or Windows XP to achieve better 3D performence Note For software MPEG support in Windows 98 98SE Windows 2000 Windows ME or Windows XP y...

Страница 11: ...Software Installation 11 English Then the DirectX 9 installation is completed 4 Click Finish item...

Страница 12: ...out a New Hardware Found message Please select Do not install a driver and press OK Step 2 Update Device Driver Wizard Standard PCI Graphics Adapter VGA Step 3 Update Device Driver Wizard Finish At t...

Страница 13: ...t the GV R96P128D driver CD disk into your CD ROM and then you can see the AUTORUN window If it does not show up please run D setup exe 3 Click No icon Step 5 Driver Setup Pictures below are shown in...

Страница 14: ...GV R96P128D Graphics Accelerator 14 English 3 Click Yes 4 Click Express or Custom icon 5 Click Finish to restart computer...

Страница 15: ...h z Install V Tuner 3 1 4 Utilities on driver CD The utilities include Display Driver and V Tuner utilities Please follow the steps 2 Click Next 3 Enter your name and company 4 Click Finish to restart...

Страница 16: ...GV R96P128D Graphics Accelerator 16 English z Install Hydravision 2 Click Next 3 Click Yes 4 Click Next 1 Click Hydravision Install item...

Страница 17: ...Software Installation 17 English 5 Click Next 6 Click Finish to restart computer...

Страница 18: ...control panel showing a menu composed of shortcute of the graphics card s enhanced and other functions You may click the Display Properties item and then click Settings Click Advanced after clickng S...

Страница 19: ...lay Core Clock Display Adjust Core Clock Link to the Websit of Gigabyte Help Description Close V Tuner To system Tray Display Adjust Memory Clock V Tuner Overclock Utility V Tuner lets you adjust the...

Страница 20: ...rator 20 English VGA Information VGA Info lists the relevant information about your card Color Adjust Color Adjust allows you to make color adjustments such as brightness contrast and gamma values for...

Страница 21: ...s software A GV R96P128D with only one display output can still take advantage of the many features of HYDRAVISION HYDRAVISION installation enables the Desktop Manager and creates a Windows program gr...

Страница 22: ...messages allows you to reactivate any disabled graphics warning messages Enable ATI taskbar icon applicationenables or disables the ATI taskbar icon However this feature must be enabled for ATI hotkey...

Страница 23: ...the most realistic 3D image z Anisotropic Filtering checkbox uses a texture filtering technique that blends multiple texture samples together SelectingApplication Preference will result in high quali...

Страница 24: ...te regardless of the monitor s refresh rate which is typically less than the frame rate at which the application will run TRUFORM makes the curved surfaces of 3D objects look smoother and more lifelik...

Страница 25: ...Moving this slider to the right increases sampling to provide the most realistic 3D image z Anisotropic Filtering checkbox uses a texture filtering technique that blends multiple tex ture samples tog...

Страница 26: ...kes the curved surfaces of 3D objects look smoother and more lifelike Compatibility Settings button This button allows you to access advanced settings that can solve compatibility issues for a few spe...

Страница 27: ...sktop increases or decreases the color brightness of your desktop The higher the gamma value the higher the brightness and contrast of your display All Colors checkbox adjust the RGB individually or a...

Страница 28: ...your television or VCR 2 Ensure your graphics card was installed correctly For information about placing the card in your computer and installing the enhanced graphics driver see the user s manual 3...

Страница 29: ...file type that supports overlay adjustments Overlay Adjustments z Brightness allows you to adjust the brightness of the video image z Contrast allows you to adjust the contrast in the video image z Sa...

Страница 30: ...sh SMARTGART Properties The SMARTGART Properties ensures system stability by automatically performing a variety of bus tests that determine your optimal graphics accelerator settings Changing these se...

Страница 31: ...GV R96P128D driver for Windows 2000 1 Insert the INSTALLATION CD into your CD ROM drive If Windows runs the CD automatically 2 Click Start 3 Select Run 4 Type the following D SETUP If D is not your C...

Страница 32: ...he secondary display Make sure you selected the appropriate display device and graphics card when you installed the graphics driver If you have problems during bootup start your computer in Safe Mode...

Страница 33: ...5 Appendix 5 1 How to reflash the BIOS We use GV AR64SH VGA card and Atiflash BIOS flash utility as example How to reflash the BIOS for your graphics card 1 Extract the Zip file to the drive C or A 2...

Страница 34: ...3 3 72 3 3 3 75 3 3 3 85 3 3 3 90 3 3 3 100 3 3 3 120 3 3 3 160 3 3 3 200 3 3 3 800 x 600 47 3 interlaced 3 interlaced 3 interlaced 56 3 3 3 60 3 3 3 70 3 3 3 72 3 3 3 75 3 3 3 85 3 3 3 90 3 3 3 100...

Страница 35: ...aced 3 interlaced 60 3 3 3 70 3 3 3 75 3 3 3 85 3 3 3 100 3 3 3 1280 x 768 56 3 3 3 60 3 3 3 75 3 3 3 85 3 3 3 1280 x 960 60 3 3 3 70 3 3 3 72 3 3 3 75 3 3 3 85 3 3 3 100 3 3 3 120 3 3 3 160 3 3 3 128...

Страница 36: ...de High mode True mode 1792 x 1344 60 3 3 3 75 3 3 3 85 3 3 3 1800 x 1440 60 3 3 3 70 3 3 3 1856 x 1392 60 3 3 3 72 3 3 3 75 3 3 3 1920 x 1080 60 3 3 3 75 3 3 3 1920 x 1200 60 3 3 3 75 3 3 3 85 3 3 3...

Страница 37: ...Appendix 37 English...

Страница 38: ...GV R96P128D Graphics Accelerator 38 English...

Отзывы: