background image

- 7 -

Hardware Installation

2.2. Hardware Installation

Now that you have prepared your computer, you are ready to install your graphics card.

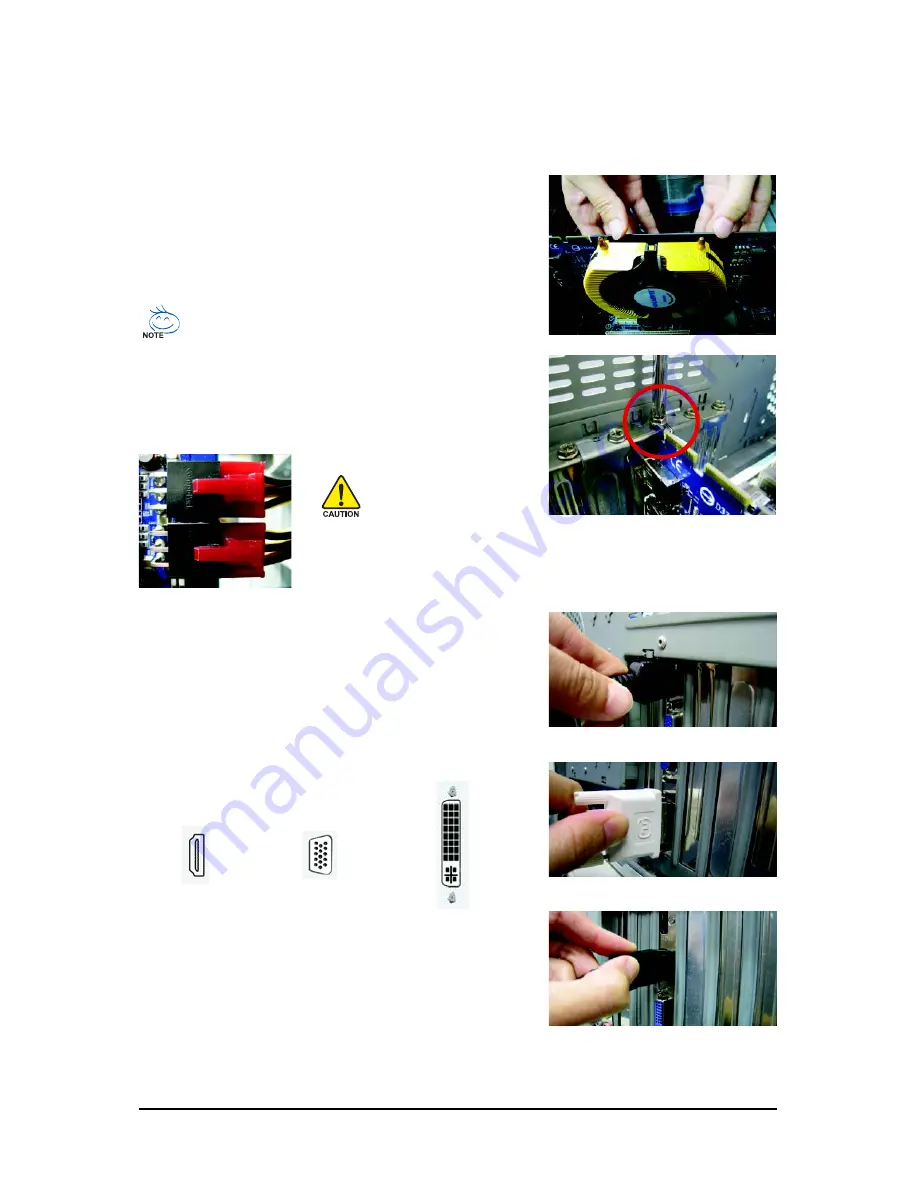
Step 1.
Locate the PCI Express x16 slot. If necessary, remove the
metal cover from this slot; then align your graphics card with
the PCI Express x16 slot, and press it in firmly until the card is
fully seated.

Step 2.
Replace the screw to fasten the card in place, and replace the
computer cover.

Make sure that the gold edge connector of the graphics card is securely
inserted.

Step 3.
Plug the display cable into your card; then turn on the computer
and monitor. To connect a flat panel display to your graphics
card, use the DVI-I connector. To connect an HDMI monitor to
your graphics card, use the HDMI connector. To connect a
DisplayPort monitor to your graphics card, use the DisplayPort
connector.

You are now ready to proceed with the installation of the graphics card driver. Please refer to next
chapter for detailed instructions.

Connect a flat panel display

Connect an HDMI monitor

To Flat Panel Display

Connect a DisplayPort monitor

After installation, remember to connect the power cable to your graphics
card, or the system will not boot. Do not touch the card when it's operating
to prevent system instability.

To D-Sub Monitor

To HDMI Monitor

Содержание GV-R575OC-1GI

Страница 1: ...o rapid change in technology some of the specifications might be out of date before publication of this this manual The author assumes no responsibility for any errors or omissions that may appear in...

Страница 2: ...Dec 10 2009 VGA Card GV R575OC 1GI VGA Card GV R575OC 1GI Dec 10 2009...

Страница 3: ...tion 5 2 1 Board Layout 5 2 2 Hardware Installation 7 3 SoftwareInstallation 8 3 1 Driver and Utility Installation 8 3 1 1 Driver Installation 8 3 2 TaskbarIcon 10 3 3 Display Properties Pages 12 4 Tr...

Страница 4: ...The power supply should be with a known brand and certified to conform to safety regulations For the list of certified power supplies go to http ati amd com certifiedpsu Operating System Windows 7 Wi...

Страница 5: ...llation 2 1 Board Layout HDMI Connector DVI I Connector CrossFire Connector D Sub monitor Connector 15 pin DVI I Connector Digital LCD Monitor DVI Output HDMI TV AnalogLCDMonitor AnalogMonitor or HDMI...

Страница 6: ...ion should be done on a grounded anti static mat The operator should be wearing an anti static wristband grounded at the same point as the anti static mat Inspect the card carton for obvious damage Sh...

Страница 7: ...ur card then turn on the computer and monitor To connect a flat panel display to your graphics card use the DVI I connector To connect an HDMI monitor to your graphics card use the HDMI connector To c...

Страница 8: ...g the operating system insert the driver disk into your optical drive The driver Autorun screen is automatically displayed which looks like that shown in the screen shot below If the driver Autorun sc...

Страница 9: ...etp 4 Click the Express or Custom icon and then click Next Step 5 Click the Accept button The system is installing the components Step 6 Click the Finish button to restart the computer Then the driver...

Страница 10: ...icon in the notification area Right click the icon to enter the ATI Catalyst Control Center The ATI Catalyst Control Center is used to configure all your graphics card settings Right click the ATI ico...

Страница 11: ...ware and Sound Manage audio devices Using the picture to the left as the example to set HDMI audio to be the default Sound Playback device select Digital Output Device HDMI Otherwise select Digital Ou...

Страница 12: ...settings 3 3 Display Properties Pages Display Settings Resolutions and Color Quality for Windows To access Display Settings page right click on desktop and select Personalize then the Personalization...

Страница 13: ...ew and Advanced View at any time To access more settings in Basic View click Basic and then click Next Easy Setup Wizards Choose a wizard from the central list and click Go for step by step assistance...

Страница 14: ...nter the new name in the Output File area Finally click Next to start file conversion The video file has been successfully converted Setup my display configuration This wizard allows you to configure...

Страница 15: ...Setup This option allows you to configure your desktop including changing desktop resolution and desk top mode setting up extended desktop requires more than one display and rotating desktop image to...

Страница 16: ...ics card View Properties The CATALYST Control Center dashboard supports three types of views Hotkeys Properties The Hotkeys Manager allows you to create shortcut key combinations to quickly perform ta...

Страница 17: ...to a specific graphics card If there is more than one graphics card installed in your computer you need to select the appropriate card before creating loading or activating a Profile Preferences Prope...

Страница 18: ...ature allows you to access the comprehensive online help register your product or generate a problem report should you require technical support The Catalyst Control Center Help feature offers the fol...

Страница 19: ...ay Color Adjust the overall richness of color by using the Gamma control To adjust the overall bright ness use the Brightness control and the over all contrast use the Contrast control Mode Use Mode t...

Страница 20: ...pixel s center anti aliasing samples multiple locations within each pixel and blends the results together to pro duce the final color Anti Aliasing can be set to favor either system pro cessing perfo...

Страница 21: ...e application s requirements CATALYST A I Catalyst A I makes use of ATI s new texture analyzer technology to optimize performance in 3D applications while maintaining or even im proving image quality...

Страница 22: ...gs page combines all of the princi pal 3D features onto a single page without any preview window allowing for quick access and adjustment This page is useful when it is not necessary to preview the ad...

Страница 23: ...ightness Contrast Saturation and Tint for video playback Note Certain video formats do not support these adjustments These settings will only affect ap plications with video overlay support Advanced C...

Страница 24: ...non interlaced form Note These settings will only affect applications with video overlay support ATI Overdrive Use Overdrive to maximize your viewing experience by dynamically and safely overclocking...

Страница 25: ...ted the appropriate display device and graphics card when you install the graphics driver For more troubleshooting information please right click the ATI icon in the notification area Restart your com...

Страница 26: ...True mode 640 x 480 200 3 3 3 800 x 600 200 3 3 3 1024 x 768 200 3 3 3 1152 x 864 100 3 3 3 1280 x 768 85 3 3 3 1280 x 960 160 3 3 3 1280 x 1024 120 3 3 3 1440 x 900 60 3 3 3 1600 x 1200 100 3 3 3 16...

Страница 27: ...IGABYTE are continuing our efforts to develop products that do not use internationally banned toxic chemicals Waste Electrical Electronic Equipment WEEE Directive Statement GIGABYTE will fulfill the n...

Страница 28: ...used batteries properly With your help we can reduce the amount of natural resources needed to produce electrical and electronic equipment minimize the use of landfills for the disposal of end of life...

Страница 29: ...29 Appendix...

Страница 30: ...30 GV R575 Series Graphics Accelerator...

Страница 31: ...31 Appendix...

Страница 32: ...32 GV R575 Series Graphics Accelerator...

Отзывы: