background image

Hardware Installation

- 7 -

English

5. Replace the screw to fasten the card in place,

and replace the computer cover.

You are now ready to proceed with the installation of the graphics card driver. Please
refer to next chapter for detailed instructions.

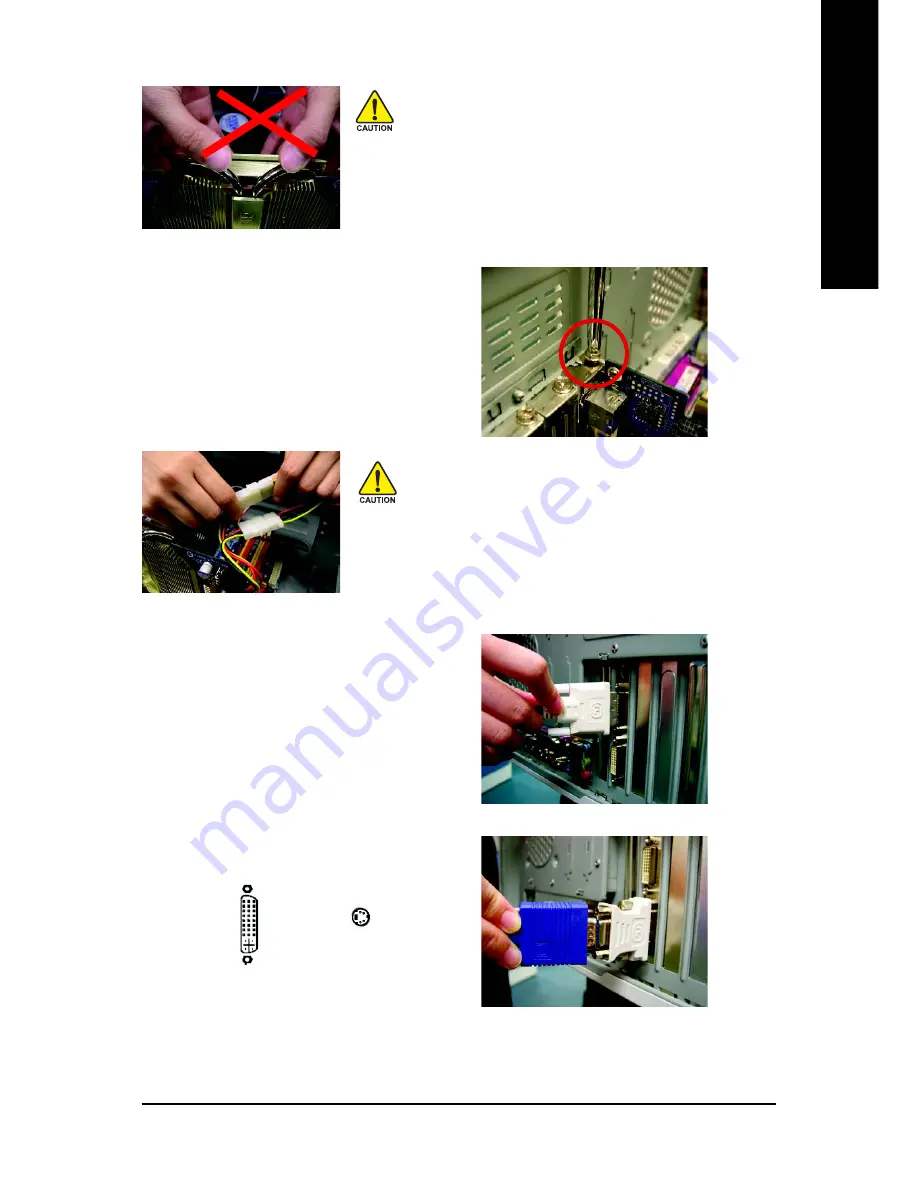
Warning!
When installing the graphics card, do not push down the
heat pipe. This may displace the heat pipe and cause
bad contact between the GPU and thermal pad as well
as affect the heat dissipation. Please do not touch the
graphics card when it is running to avoid the system
unstable problems.

After installing the GV-NX68T256DH to your computer,
please remember to connect at lease one power cable on
the graphics card to the power supply connector.
We suggest you to connect both of the two power cables
on the graphics card  to the power supply to achieve
optimcal graphics performance.

To TV or VCR

To Flat Panel Display

6. Plug the display cable into your graphics

card; then turn on the computer and monitor.
To connect a flat panel directly to your graphics
card, use the DVI-I connector. To connect a
VGA monitor to the DVI-I connector, plug
the DVI-I to D-sub adapter into the DVI-I
connector, then plug the monitor cable into
the adapter.

Connect a flat panel

Connect a VGA monitor via DVI-I to D-sub adapter

Содержание GV-NX68T256DH

Страница 1: ...s Notice Please do not remove any labels on VGA card this may void the warranty of this VGA card Due to rapid change in technology some of the specifications might be out of date before publication of...

Страница 2: ...llation 8 3 1 1 Operating system requirement 8 3 1 2 DirectX installation 9 3 1 3 Driver installation 11 3 1 4 Utilities on driver CD 13 3 1 5 Taskbar icon 15 3 1 6 Display properties pages 18 3 1 7 n...

Страница 3: ...DDR III memory Supports DirectX 9 0c Supports TV Out connector Supports 2 DVI I connectors 1 2 Minimum system requirement IBM or 100 PC compatible with Pentium III 650MHz or AMDAthlon 650MHz class pr...

Страница 4: ...ware Installation TV out DVI I Connector 2 DVI I Connector 1 NTSC PAL TV Projector AV Output S VideoOutput Analog LCD Monitor Digital LCD Monitor DVI Output VGA Output DVI I to D Sub Adapter TV Out DV...

Страница 5: ...parated from the system The card contains sensitive electric components which can be easily damaged by static electricity so the card should be left in its original packing until it is installed Unpac...

Страница 6: ...r computer 2 Remove the computer cover If necessary consult your computer s manual for help in removing the cover 3 Remove any existing graphics card from your computer Or if your computer has any on...

Страница 7: ...nstableproblems After installing the GV NX68T256DH to your computer please remember to connect at lease one power cable on the graphics card to the power supply connector We suggest you to connect bot...

Страница 8: ...tware Installation In this manual we assume that your CD ROM Drive letter to be Drive D The installation of Win 2000 Win XP drivers is very simple When you insert the driver CD into your CD ROM drive...

Страница 9: ...Windows 2000 or Windows XP to achieve better 3D performance 0 Note For software MPEG support in Windows 2000 or Windows XP you must install DirectX first Click Install DirectX 9 item Step 1 When auto...

Страница 10: ...GV NX68T256DH Graphics Accelerator 10 English Step 4 Click Finish to restart computer Then the DirectX 9 installation is completed Installing the components...

Страница 11: ...nstallation guide Step 1 Found new hardware wizard Video controller VGA Compatible Click Next button to install the driver There is a driver CD disk that came with your graphics accelerator please ins...

Страница 12: ...en you can see the AUTORUN window If it does not show up please run D setup exe Step 1 When autorun window show up click Install Display Driver item Click Install Display Driver item Step 2 Click Next...

Страница 13: ...see the AUTORUN window If it does not show up please run D setup exe Install Gigabyte Utilities V Tuner 2 PLUS Step 1 Click Utilities item Step 4 Enter your name and company Step 5 Click Finish butto...

Страница 14: ...by user when running 3D applications Displays core clock status Speed adjustment of Fan 1 to Quiet Turbo Normal Mode Enables dynamic adjust ment of fan speed based on GPU temperature Speed adjustment...

Страница 15: ...shortcut of the graphics card s enhanced and other functions You may click the Display Properties item and then click Settings Click Advanced after clicking Settings Click the appropriate tab to chan...

Страница 16: ...erator 16 English VGA Information VGA Info lists the relevant information about your card Color Adjust Color Adjust allows you to make color adjustments such as brightness contrast and gamma values fo...

Страница 17: ...h After installation of the display drivers you will find a NVIDIA icon on the taskbar s status area Click this icon to open the control panel You can adjust the properties of the graphics accelerator...

Страница 18: ...isplay Properties or right click on Desktop and then select Properties The Display Properties dialog box shows the information of display adapter color the range of display area and the refresh rate S...

Страница 19: ...and Quality Settings properties The sliders lets to decide whether your application should use quality or high performance texture Application profiles Select the application profile from the list of...

Страница 20: ...ay the NVIDIA Settings icon in the taskbar The Desktop Manager provides enhanced nView multi display functionality and helps you organize your applications for use with multiple displays and desktops...

Страница 21: ...just the screen resolution color quality and monitor settings screen refresh rates Or you can customize resolutions and refresh rates NV Rotate properties The NV Rotate Properties is used to rotate th...

Страница 22: ...to run your applications so you won t have to crowd several open application windows on one desktop Enable the nView Desktop Manager features Right clickondesktopandchooseProperties Settings Advanced...

Страница 23: ...cessed from this tab Click the item to start nView Properties Access nView properties page To access the nViewproperties page you can click the NVIDIA icon on the taskbar and select nView Properties u...

Страница 24: ...b allows you to create up to 32 unique desktops nView Applications properties This tab allows you to control nView settings depending on different applications nView Windows properties This tab allows...

Страница 25: ...lity on the desktop Also enables full screen video playback via the video mirroring control button nView Effects properties This tab provides special windows effects that you can apply to your applica...

Страница 26: ...This tab can modify and extend mouse behavior with kinematic actions nView Tools properties This tab can improve nView functionality for mobile and desktop users nView Hot Keys properties This tab let...

Страница 27: ...w will show up Click Install Display Driver item and follow the wizard to install the driver If Windows does not show the CD automatically please run following steps 1 Click the Start button on the co...

Страница 28: ...manufacturer NOTE Some manufacturers do not allow the built in graphics to be disabled or to become the secondary display Make sure you selected the appropriate display device and graphics card when...

Страница 29: ...computer 5 1 2 Reflash BIOS in Windows mode 1 After installing the display drivers you will find a GIGABYTE icon in the lower right corner of the Taskbar Right click to select the VGA utility 2 Update...

Страница 30: ...mode 320 x 200 75 3 3 3 320 x 240 75 3 3 3 400 x 300 75 3 3 3 480 x 360 75 3 3 3 512 x 384 75 3 3 3 640 x 400 75 3 3 3 640 x 480 240 3 3 3 720 x 480 60 3 3 3 720 x 576 60 3 3 3 800 x 600 240 3 3 3 848...

Отзывы: