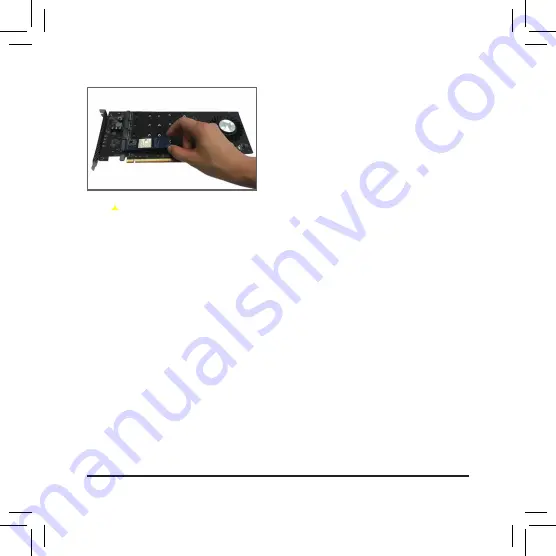
Gigabyte GC-4XM2G4 Скачать руководство пользователя страница 8

- 8 -

Step 2

Use a screw driver to unfasten the screw 

and standoff. Locate the proper mounting 

hole for the M.2 SSD to be installed and 

then screw the standoff first. Then slide it 

into the connector at an angle.

步驟二:
請用螺絲起子依序將螺絲和螺柱
拆下,依實際要安裝的

M.2  SSD

格找到適合螺絲孔位之後,先鎖
上螺柱,再將

M.2  SSD

以斜角方式

放入插座。

步骤二:

请用螺丝起子依序将螺丝和螺柱

拆下,依实际要安装的

M.2  SSD

格找到适合螺丝孔位之后,先锁

上螺柱,再将

M.2  SSD

以斜角方式

放入插槽。

ステップ

2:

ドライバーを使用して、ネジとネジ受け

を外します。


取り付ける

 M.2 SSD 

の適切

な取り付け穴を見つけ、最初にネジ受け

をねじ込みます。


次に、

M.2 SSD 

を斜めに

コネクタへ差し込みます。

단계

:

나사


드라이버를


사용하여


나사와


스탠드


오프를


풉니


. M.2 SSD


설치할


올바른


장착


구멍을


찾은


다음


먼저


스탠드


오프를


조입니다

그런


다음


커넥터에


비스듬히


밀어


넣으십시오

.

Содержание GC-4XM2G4

Страница 1: ...TTDA GC 4XM2G4 User s Manual Rev 1001 12WE6 4XM2G4 10AR To reduce the impacts on global warming the packaging materials of this product are recyclable and reusable GIGABYTE works with you to protect t...

Страница 2: ...80 42 M2_2 M2_3 M2_4 110 60 80 42 110 60 80 42 110 60 80 42 110 M2_LED1 2 3 4 SW3 Unfasten the six screws from the back of the adapter card with a screwdriver and then remove the backplate 6 6 Before...

Страница 3: ...the connectors M 2 PCIe SSD M 2 PCI E SSD M 2 PCIe SSD M 2 PCIe SSD M2_LED1 23 4 M 2 Activity Indicator LEDs M 2 The LED blinks when your M 2 PCIe SSD is being accessed M 2 PCle SSD M 2 PCI E SSD M 2...

Страница 4: ...CI Express x16 and x8 slots If the adpater card is installed in a x8 slot only the M2_1 and M2_2 connectors can be used LED 4 x M 2 activity LEDs Storage Interface 4 x M 2 connectors Socket 3 M key ty...

Страница 5: ...4 SSD RAID 0 RAID 1 RAID 10 M 2 4 M 2 2TB Gen4 SSD 26 2cm x 11 5cm RAID GP ASACNE6800TTTDA PCI Express x16 PCI Express x16 x8 x8 M2_1 M2_2 LED 4 x M 2 LED 4xM 2 3 M 2242 2260 2280 22110 PCIe x4 SSD RA...

Страница 6: ...CI Express x16 x8 PCI Express x16 Adpater x8 M2_1 M2_2 LED M 2 LED 4 4 M 2 3 M 2242 2260 2280 22110 PCIe x4 SSD RAID 0 RAID 1 RAID 10 1 M 2 M 2 2TB Gen4 SSD 4 2 26 2cm x 11 5cm 1 RAID 2 GP ASACNE6800T...

Страница 7: ...M 2 protective films from the heatsink cover and adapter card as indicated M 2 M 2 1 M 2 1 M 2 Note For the GC 4XM2G4 only GC 4XM2G4 GC 4XM2G4 GC 4XM2G4 GC 4XM2G4 Installing an M 2 SSD Note M 2 SSD M...

Страница 8: ...nfasten the screw and standoff Locate the proper mounting hole for the M 2 SSD to be installed and then screw the standoff first Then slide it into the connector at an angle M 2 SSD M 2 SSD M 2 SSD M...

Страница 9: ...9 Step 3 Press the M 2 SSD down and then secure it with the screw M 2 SSD M 2 SSD 3 M 2 SSD 3 M 2 SSD...

Страница 10: ...well as most major worldwide safety requirements To prevent releases of harmful substances into the environment and to maximize the use of our natural resources GIGABYTE provides the following inform...

Страница 11: ...sing in your end of life product you may contact us at the Customer Care number listed in your product s user s manual and we will be glad to help you with your effort Finally we suggest that you prac...

Страница 12: ...medy available in the event this Warranty covers a returned Product These warranties are valid only for the original owner of the product GIGABYTE will not extend their warranty to items that are purc...

Страница 13: ...tion that the product has been installed maintained and operated under conditions of normal use and in accordance with the installation guide provided herewith The provisions of this warranty shall no...

Страница 14: ...14...

Страница 15: ...15...

Страница 16: ...AORUS Gen4 AIC Adaptor GP ASACNE6800TTTDA GC 4XM2G4 Sept 12 2019 AORUS Gen4 AIC Adaptor GP ASACNE6800TTTDA GC 4XM2G4 Sept 12 2019...

Страница 17: ...ll rights reserved The trademarks mentioned in this manual are legally registered to their respective owners Disclaimer Information in this manual is protected by copyright laws and is the property of...

Отзывы: