


- 91 -
Appendix
Now, you may proceed to create the SATA driver diskette (for AHCI mode) and the installation of the SATA
driver and operating system.
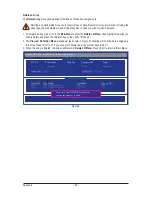
Delete the RAID Array:
To deleted the existing array, select the array on the main menu (example: VD 0: New_VD) and press <En-
ter> to display the
Delete
option. Press <Enter>. When prompted, press <Y> to confirm or <N> to cancel (Figure
8).
Figure 8
Marvell BIOS Setup (c) 2009 Marvell Technology Group Ltd.
Topology
Information
Help
Vendor ID
:
1B4B
Device ID
:
91A3
Revision ID
:
B1
BIOS Version
:
1.0.0.1006
Firmware Version :
2.1.0.1314
PCIe Speed rate
:
2.56Gbps
Configure SATA as :
IDE Mode
HBA 0 : Marvell 0
Virtual Disks
VD 0: New_VD
PD 0: WDC WD800JD-22L
PD 0: WDC WD800JD-22L
Free Physical Disks
Marvell RAID on chip controller.
ENTER: Operation F10: Exit/Save ESC: Return
Do you want to delete this virtual disk?
Y
es
N
o
Delete Virtual Disk
Use the Marvell RAID Utility in the Operating System:
With the Marvell RAID utility, you can set up an array or view the current array status in the operating system.
To install the utility, insert the motherboard driver disk, then go to
Application Software\Install GIGABYTE
Utilities
and select
Marvell Raid Utility
to install. Note: After the installation, you must login the utility with
the same account name and password that you use to login the operating system. If you did not set the
account password before, click
Login
to enter the Marvell RAID Utility directly.
Содержание GA-770TA-UD3
Страница 2: ...Motherboard GA 770TA UD3 Nov 25 2009 Nov 25 2009 Motherboard GA 770TA UD3 ...
Страница 32: ...Hardware Installation 32 ...
Страница 117: ... 117 Appendix ...
Страница 118: ...Appendix 118 ...