English
1
English
PB
Congratulations on your purchase of the GIGABYTE Notebook.
This manual will help you to get started with setting up your notebook. The final product
configuration depends on the model at the point of your purchase. GIGABYTE reserves the
right to amend without prior notice. For more detailed information, please visit our website at
www.gigabyte.com
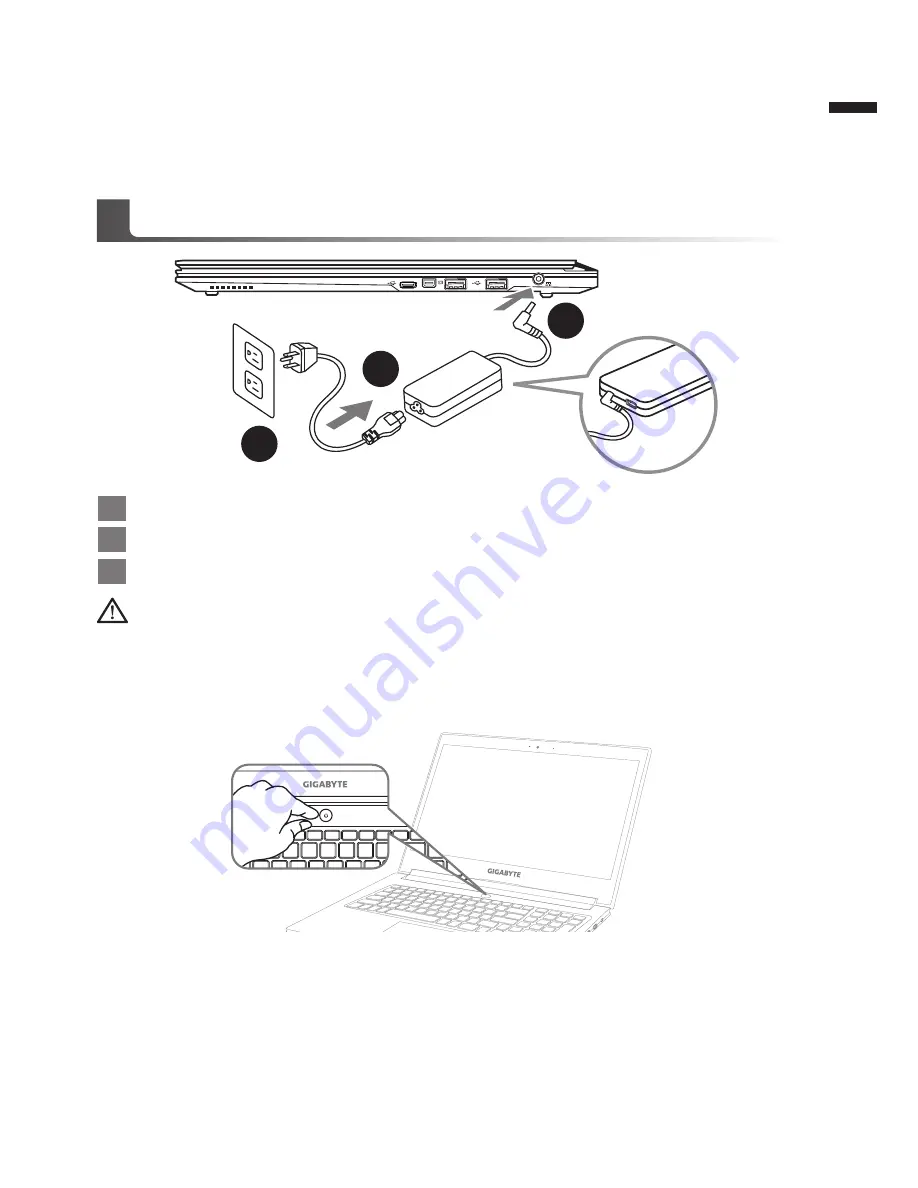
1
Connect the power cord to the AC adapter.
2
Connect the AC adapter to the DC-in jack on the right side of the notebook.
3
Connect the power cord to the power outlet.
Switching on the Power
After you turn on the Notebook for the very first time, do not turn it off until the operating system
has been configured. Please note that the volume for the audio will not function until Windows
®
Setup has completed.
Booting Up the Notebook for the First Time
Depending on your configuration, the Microsoft
®
Windows
®
Boot Screen will be the first screen that
you will see as the notebook starts up. Follow the on-screen prompts and instructions and enter
your personal information to complete the setup of the Windows
®
Operating System.
Using GIGABYTE Notebook for the First Time
1
2
3
USB
Charging
Port
IMPORTANT
•
Ensure that your Notebook PC is connected to a grounded power adapter before turning it on for the first time.
•
When using your Notebook PC on power adapter mode, the socket outlet must be near to the unit and easily accessible.
•
Locate the input/output rating label on your Notebook PC and ensure that it matches the input/output rating information on your
power adapter. Some Notebook PC models may have multiple rating output currents based on the available SKU.
•
Power adapter information: Input voltage: 100-240Vac ,- Input frequency: 50-60Hz ,- Rating output voltage: 19.5V,7.7A
Содержание Aero 14
Страница 1: ...Aero 14 Italiano Espa ol Fran ais Deutsch Indonesia...
Страница 16: ...1 www gigabyte tw 1 2 3 Windows GIGABYTE 1 2 3 USB Charging Port 100 240Vac 50 60Hz 19 5V 7 7A...
Страница 17: ...2 GIGABYTE 1 2 3 4 x2 5 6 7 8 LED 1 2 10 11 30 31 50 51 70 71 90 90 2 1 3 6 8 7 5 4 1 30 10 2 2 2 1...
Страница 19: ...4 Fn F1 F12 Fn F1 Fn F2 Fn F3 Fn F4 Fn F5 Fn F6 Fn F7 Fn F8 Fn F9 Fn F10 Fn F11 Fn F12 Fn Space Marco Hub...
Страница 21: ...6 3 Macro Hub 1 Macro Key a G Macro Key b Macro Key c d...
Страница 22: ...7 2 a 100 Macro Key 13 1 8 3 7 6 10 11 9 5 2 4 12 b 1 2 3 4 5 6 7 8 9 10...
Страница 23: ...8 11 12 13 c pause Save d...
Страница 24: ...9 3 Macro Hub 1 2 3 1 GIGABYTE Macro Hub 2 3...
Страница 30: ...1 www gigabyte cn 1 2 3 Windows GIGABYTE 1 2 3 USB Charging Port...
Страница 31: ...2 1 2 3 4 x2 5 6 7 8 LED 1 2 10 11 30 31 50 51 70 71 90 90 GIGABYTE 2 1 3 6 8 7 5 4...
Страница 33: ...4 Fn F1 F12 Fn F1 Fn F2 Fn F3 Fn F4 Fn F5 Fn F6 Fn F7 Fn F8 Fn F9 Fn F10 Fn F11 Fn F12 Fn Space Marco Hub...
Страница 35: ...6 3 Macro Hub 1 Macro Key a G Macro Key b Macro Key c d...
Страница 36: ...7 2 a 100 Macro Key 13 1 8 3 7 6 11 9 5 2 4 12 10 b 1 2 3 4 5 6 7 8 9 10...
Страница 37: ...8 11 12 13 c pause Save d...
Страница 38: ...9 3 Macro Hub 1 2 3 1 GIGABYTE Macro Hub 2 3...
Страница 41: ...12 2 1 3 F9 Reset this PC GIGABYTE Smart Recovery Troubleshoot Continue Windows 10 Windows 10 DOS Windows...
Страница 44: ...1 www gigabyte com 1 AC 2 AC DC In 3 1 2 3 USB Charging Port...
Страница 45: ...2 1 2 3 LED 4 x2 5 6 7 8 LED 1 2 10 11 30 31 50 51 70 71 90 90 LED HDD 2 1 3 6 8 7 5 4...
Страница 46: ...3 1 2 HDMI 3 USB 3 0 4 5 SD 1 USB 3 1 2 3 USB 3 0 USB 4 USB 3 0 5 DC in 3 4 1 2 5 1 3 2 4 5 112 F 45 C 22...
Страница 47: ...4 Fn Fn F1 Fn F2 Fn F3 Fn F4 Fn F5 Fn F6 Fn F7 Fn F8 Fn F9 Fn F10 Fn F11 Fn F12 Fn Space G 3 G1 G2 G3 G4 G5...
Страница 48: ...5 1 2 4 5 1 3 2 1 2 3 4 5 G1 G2...
Страница 49: ...6 3 1 a G b c d...
Страница 50: ...7 2 a 100 13 1 8 3 7 6 10 11 9 5 2 4 12...
Страница 51: ...8 b 1 2 3 4 5 6 7 8 9 10 11 12 13...
Страница 52: ...9 c d 3 1 2 3 1 2 3...
Страница 53: ...10...
Страница 55: ...12 10 2 1 3 F9 2 Reset this PC PC GIGABYTE Smart Recovery PC PC Troubleshot Continue 10 PC...


