Reassembly Instructions - P460A/P480/P414 PUMPS
Contact Giant Industries for service school information. Phone: (419) 531-4600
Inlet Valves
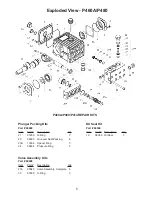
Remove inner hexagon screws (34) and pull off valve casing (26) to the front. Take out seal case (25) from valve
casing (26). Remove the exposed inlet valve with a pair of flat nose pliers and the valve seat (27) with a valve
puller. Disassemble parts and examine valve plate (28), valve seat (27), O-ring (31) and support ring (31A). Re
-
place worn parts. Tighten inner hexagon screws (34) again to 30 ft-lbs. (40Nm).
Discharge Valves:
With a socket 32mm wrench, screw out valve plugs (32) . Remove the exposed discharge
valves with a pair of flat nose pliers and the valve seat (27) with a valve seat puller. Disassemble parts and exam
-
ine valve plate (28), valve seat (27), and O-rings (31, 33). Replace worn parts. Take care to reassemble in correct
sequence. Tighten plugs (32) to 110 ft-lbs. (150Nm).
Seals
Screw out oil drain plug (5) and drain oil. Remove inner hexagon screws (34) and pull off valve casing (26) front
-
wise over the plungers (16).
Important!
if the seal casing (20A) does not separate from the valve casing (26), press both casings apart by
placing two flat screwdrivers in the side notches on the sal casing (20A). Be careful not to damage casing sur
-
faces.
Remove seal cases (25) situated either in valve casing (26) or seal casing (20A). Separate seal casing (20A) from
seal retainers (20). Remove grooved ring (23) and guide ring (24) from the seal casing (20A). Examine O-rings
(25B) and support rings (25A) attached to seal casing (26). Check seal ring (23A) situated between valve casing
and seal casing, and replace if necessary. Then remove seal retainers (20) from crankcase (1). Pull grooved ring
(23) out of seal retainer (20). Check O-ring (21). Grease new seals and O-rings before reinstallation.
Important!
Seal casing (20A) has a notched pin to ensure correct fitting. Reassemble parts in the proper se
-
quence.
Important!
The grooved seal (23) on the high-pressure side is to be fitted carefully into the seal casing (20A) us
-
ing a 22mm plastic rod. Under no circumstances must the surface in the seal casing or the seal lip of the grooved
seal be damaged.
Check surfaces of plunger (16). Damaged surfaces cause hard wear on seals. Deposits of all kinds must be
removed from the plungers.
Important!
The plunger surfaces are not to be damaged. If there are lime deposits in the pump, care must be
taken that the drip-return bore in parts (25) and (26) ensure trouble-free drip-return.
If the plunger (16) is worn, the complete plunger must be changed. The ceramic pipe alone cannot be changed
due to reasons of precision. When reassembling tighten inner hexagon screw (34) to 30 ft-lbs. (40 Nm).
If the plunger (16) is worn, the complete plunger must be changed. The ceramic pipe alone cannot be changed
due to reasons of precision. When reassembling tighten inner hexagon screw (34) to 30 ft-lbs (40Nm).
Gear and Plunger
If oil leaks where the plunger (16) protrudes out of the gear, gear seals (19) and plungers have to be examined
and replaced as necessary.
Gear Seal
Remove plug (5) and drain oil. Remove valve casing as described above. Take seal adapter (20) off plunger (16)
and replace gear seal (19).
Plungers
Drain oil and remove crankcase cover (3). Take off screws on con rods (15). Be careful not to mix up the con rod
halves. Push con rod shaft as far as possible into the crosshead guide. Loosen screws (10) and remove bearing
covers (7&8) with the help of a screw-driver.
Take crankshaft out carefully so as not to bend the con rods. Remove and dismantle con rods and plungers (18).
Replace worn parts.
To reinstall, insert con rods and plungers, put crankshaft in carefully and then push the bearing covers (7&8) onto
the ends of the crankshaft. Screw on bearing covers with screws (10). Mount con rod halves and tighten screws
(15) to 8 in-lbs. (11Nm). Mount crankcase cover (3) together with O-ring (4).
To rotate crankshaft to the opposite side.
The shaft end is on the left side of the pump looking at it from behind. If it should be on the other side, the valve
casing (26) and seal casing (20A) have to be removed, turned by 180
o
and then put on again. Turn seal adapt-
ers (20) 180
o
, so that the leakage holes are underneath. Oil dipstick (2) and oil drain plug (58) have to be inter
-
changed and crankcase cover turned by 180
o
.
6
Содержание P480
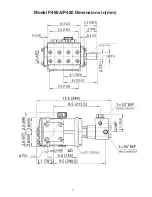
Страница 7: ...Model P460A P480 Dimensions in mm 7 ...


