


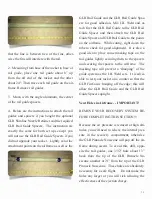


MOVING THE JUST PLACED GLR
HARD-POINT RECOVERY SYSTEM AN-
CHOR.
I M P O R TA N T:
O n c e t h e G L R
Hard-point Recov-
ery System Anchor
is in place, hold
the airframe upside
d o w n w i t h t h e
FORWARD end
pointing to the
ground and the
GLR FinCan (AFT
end) up. This pre-
vents J.B. Weld
from dripping down the motor tube section of
the airframe (which would prevent the insertion
of a motor casing). It is also a good idea to
check that the J.B. Weld is not running down
the FORWARD end of the airframe as well.
This could interfere with your recovery compo-
nents insertion. If J.B. Weld does drip forward
you can clean it as explained above.
If the
GLR Hard-point Recovery System Anchor
slides forward and is not stable in the air-
frame, place the airframe in a more horizon-
tal position.
Allow the J.B. Weld to fully cure.
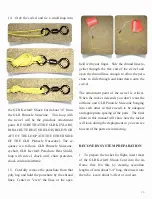
9. GLR provides a high quality Kevlar® Para-
chute Heat Shield to protect your parachute
from the heat generated that occurs as a result
of the ejection charge deploying your recovery
s y s t e m w h e n
y o u r r o c k e t
reaches apogee.
Slide the GLR
Kevlar® Para-
c h u t e H e a t
Shield onto the
free end of the
GLR Kevlar®
S h o c k C o r d .
Do not secure
GLR Kevlar®
Parachute Heat Shield to the GLR Kevlar®
Shock Cord; just let the GLR Kevlar® Para-
chute Heat Shield slide freely.
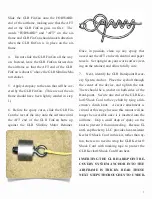
10. Slide the swivel on to the free end of the
GLR Kevlar® Shock Cord - it will be used in
step 13.
11. Screw the eyebolt into the base of the
GLR Pinnacle Nosecone.
12. Tie the free, unused end of the GLR Kev-
lar® Shock Cord to that eyebolt.
13. A dap of epoxy will prevent the knot from
unraveling.
9


