HD2307
- 11 -
V1.7
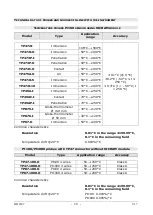
are checked for conformity with class A tolerance according to norm IEC751 -
BS1904 - DIN43760.
The instrument is provided with the FACT (factory) calibration.
The user is also able to perform a USER calibration of insprobe.
The calibration information is saved in the instrument memory and not in the probe.
The same correction is applied to any probe connected to the input: therefore, the
"USER calibration" should only be used with the probe used for calibration and not
with other probes.
To pass from the user to the factory calibration and back, proceed as follows:
•
press simultaneously UNIT/MENU and DATA/ENTER to open the menu:
•
press ENTER until the menu item "CAL_MODE" is selected.
•
use the
and
arrows (respectively located above the HOLD and REL keys) to
select the type of calibration;
•
confirm by pressing DATA/ENTER.
C
ALIBRATION SEQUENCE
–
I
NSTRUMENT ON LINE WITH THE PROBE
(
S
):
The calibration can be carried out on one or two points that should differ by at
least 10°C and be included in the probe functioning range.
1.
Insert the probe into a thermostatic bath, the temperature of which is precisely
known from a reading taken on a sample reference thermometer. Wait for the
measurement to stabilize.
2.
Press contemporarily UNIT/MENU and DATA/ENTER.
3.
Press DATA/ENTER.
4.
Use the
and
arrows (respectively located above the HOLD and REL keys) to
select the USER calibration;
5.
Confirm with DATA/ENTER.
6.
The "SEL_MEAS_1/2" message is displayed in the comment line.
7.
Use the
and
arrows to select "1" (first calibration point).
8.
Confirm with DATA/ENTER.
9.
The "UP DOWN 1st MEAS" message is displayed in the comment line: the
instrument display shows the measured temperature.
10.Use the
and
arrows to correct the indicated value until it coincides with the
value measured by the sample reference thermometer.
11.Confirm with DATA/ENTER.
12.To exit the procedure without performing the second point, select "0" and press
ENTER.
13.To calibrate the second point, select the point "2" using the
and
arrows.
14.Press DATA/ENTER.
15.The "UP DOWN 2nd MEAS" message is displayed in the comment line.
16.Move the probe to the second thermostatic bath and wait for the measurement to
stabilize.
17.The instrument display shows the measured temperature.
18.Use the
and
arrows to correct the indicated value until it coincides with the
value measured by the sample reference thermometer.
19.Confirm with DATA/ENTER.
20.To exit the procedure, select "0" using the
and
arrows and press ENTER.
The procedure is now complete.
Содержание Delta OHM HD2307.0
Страница 4: ...HD2307 4 V1 7 RTD Thermometer HD2307 0 ...
Страница 23: ......


