GALICIA WALL HANGING SIDEBOARD ASSEMBLY INSTRUCTIONS
F
C
R
2
Fittings required
Version 1 - 191022
Page
7
of
15
STEP 3
STEP 4
For this step:
Tools required
F x4
C x4
9
Страница 1: ...1 of 15 PLEASE READ this sheet prior to assembly to familiarise yourself with the various stages of construction Carefully open the pack supplied and check the contents against the parts and fittings...
Страница 2: ...DO NOT DO NOT DO NOT DO NOT use power tools to construct this product tighten screws until parts are assembled or as advised in this guide over tighten screws or bolts use this product if parts are mi...
Страница 3: ...76 x 3 mm Carton No 1 1 Carton No 1 1 Description Base Panel Description Back Panel Qty 1 Description Adjustable Shelf Qty 1 Size 768 x 364 x 15 mm Carton No 1 1 Qty 1 Carton No 1 1 Carton No 1 1 Cart...
Страница 4: ...and back panel 3 5x12mm 8 A 8 B 12 C E 48 4 F Item Quantity Code Fittings to scale Cam Lock Dowel 8x30mm Cam Bolt 10 20 30 40 50 60 70 80 35mm overall Carcass Screw for Fitting Centre Upright to Base...
Страница 5: ...Code Item Flap Hinge 1 6 1 N Flap Stay RH 1 Flap Stay LH Allen Key 4mm 2 L Wall Support Fixed to Carcass Wall Bracket 2 M Q R P Quantity Code Item 2 2 Cable Clip LED Clip 1 H Battery Box and LED Stri...
Страница 6: ...tep Tools required Version 1 191022 Page 6 of 15 STEP 1 STEP 2 For this step Tools required A x8 6 1 5 5 7 6 Tighten B Fittings required B x4 C x4 B B B C C C GALICIA WALL HANGING SIDEBOARD ASSEMBLY I...
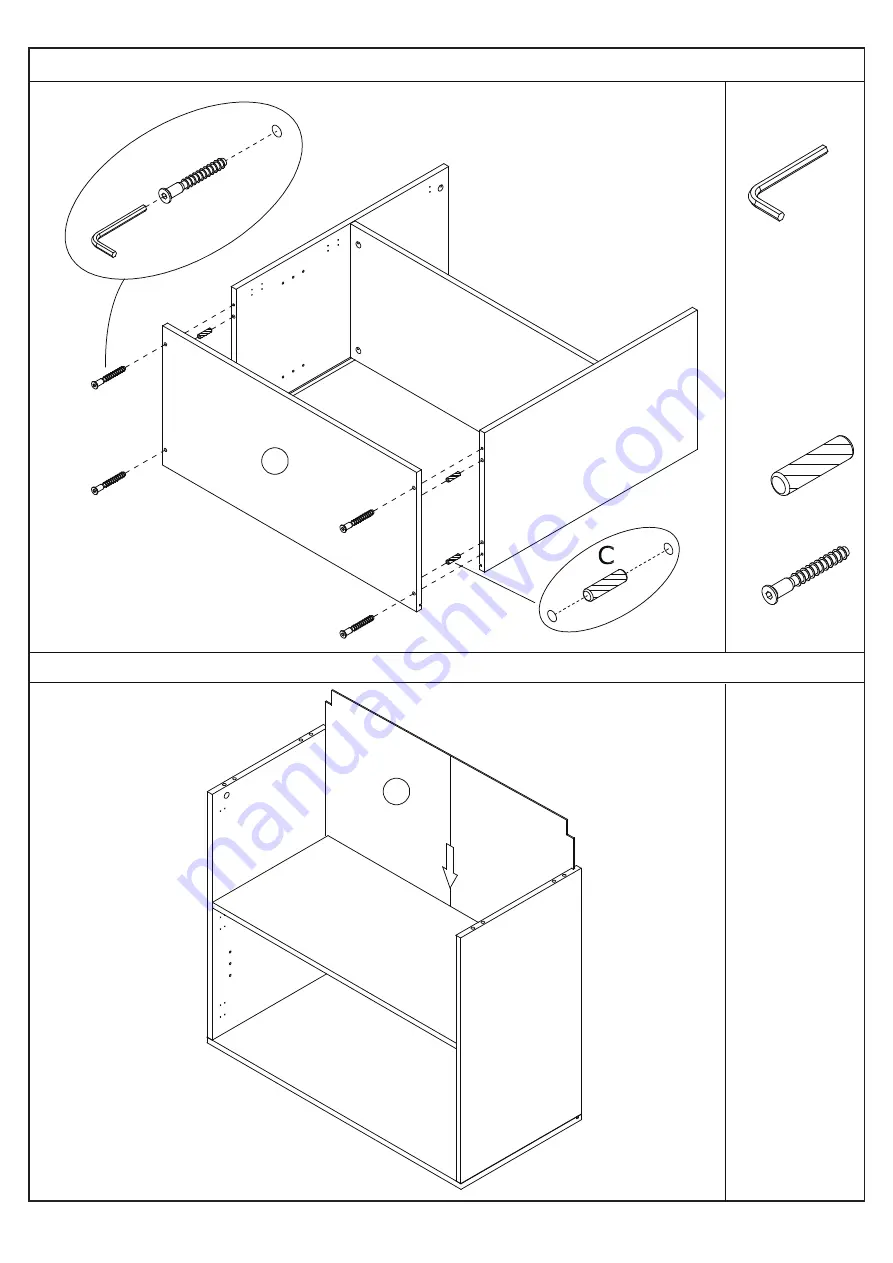
Страница 7: ...L HANGING SIDEBOARD ASSEMBLY INSTRUCTIONS F F F F C C F R 2 Fittings required Version 1 191022 Page 7 of 15 STEP 3 STEP 4 For this step Tools required Fittings required For this step Tools required F...
Страница 8: ...1 C x4 Tighten B C Version 1 190623 Page 8 of 15 STEP 5 STEP 6 For this step Tools required Fittings required For this step Tools required GALICIA WALL HANGING SIDEBOARD ASSEMBLY INSTRUCTIONS C C C B...
Страница 9: ...ge 9 of 15 STEP 7 Fittings required For this step Tools required G x6 J x2 K x2 H x2 T x1 i ii G G G J K H x2 x2 Position wires and fit LED Clip J and Cable Clip K using screws G Peel off cover from b...
Страница 10: ...n 1 191022 Page 10 of 15 STEP 8 STEP 9 For this step Tools required For this step Tools required GALICIA WALL HANGING SIDEBOARD ASSEMBLY INSTRUCTIONS Q x6 E x12 E E E E Q Q E E Q E E Q E E Q 4 3 x2 Fi...
Страница 11: ...Version 1 191022 Page 11 of 15 STEP 10 For this step Tools required Fittings required GALICIA WALL HANGING SIDEBOARD ASSEMBLY INSTRUCTIONS 1 2 E E E x12...
Страница 12: ...P Once flaps have been adjusted vertically Fit screws E to fix plates Q in their final position E x12 Version 1 191022 Page 12 of 15 STEP 12 For this step Tools required Fittings required E x8 N x1 P...
Страница 13: ...ree from hidden electrical wires water or gas pipes M same horizontal level 766mm M x2 USE x3 WALL FIXINGS PER BRACKET CAREFULLY FOLLOW THESE INSTALLATION INSTRUCTIONS STEP 14 For this step Tools requ...
Страница 14: ...nels so they just miss the ends of the brackets Turn upper screw s on either side until unit is horizontal iii When unit is hanging on the brackets tighten lower screws clockwise so clamping unit to w...
Страница 15: ...Sideboard is now completely assembled Periodically check to ensure that the components are in their proper position free from damage Also make sure the connectors are tight and secure Keep instruction...