background image

Assembly instructions 

METAL GARDEN SHED 

FLORIAN 1207

Thank you for choosing our product!

This manual is for the model ESD-1207E

Restrictions on the installation location:

- Do not mount on the roof of a building!

- Do not block any passageways or escape routes!

- Avoid installation in places where avalanches could fall on the tool shed or

where roof water falls directly onto the garden shed!

- Only set up where appropriate safety is guaranteed (not on cliffs or  

in extremely windy places!)

Assembly:

- Ensure that the garden shed is well anchored to its foundations!

- Wear protective gloves during assembly!

- Do not assemble the tool shed in strong winds!

- Where required, use a sturdy stepladder

- Make sure that all screws and metal parts are tightened securely and no parts are left over!

- Some holes and recesses may not be required for your model – therefore work exactly 

  according to these instructions!

For safety

- When locking it, make sure that no one is inside the tool shed!

- Always lock the tool shed when it is not in use!

- Make sure that children do not use the tool shed (as a toy)!

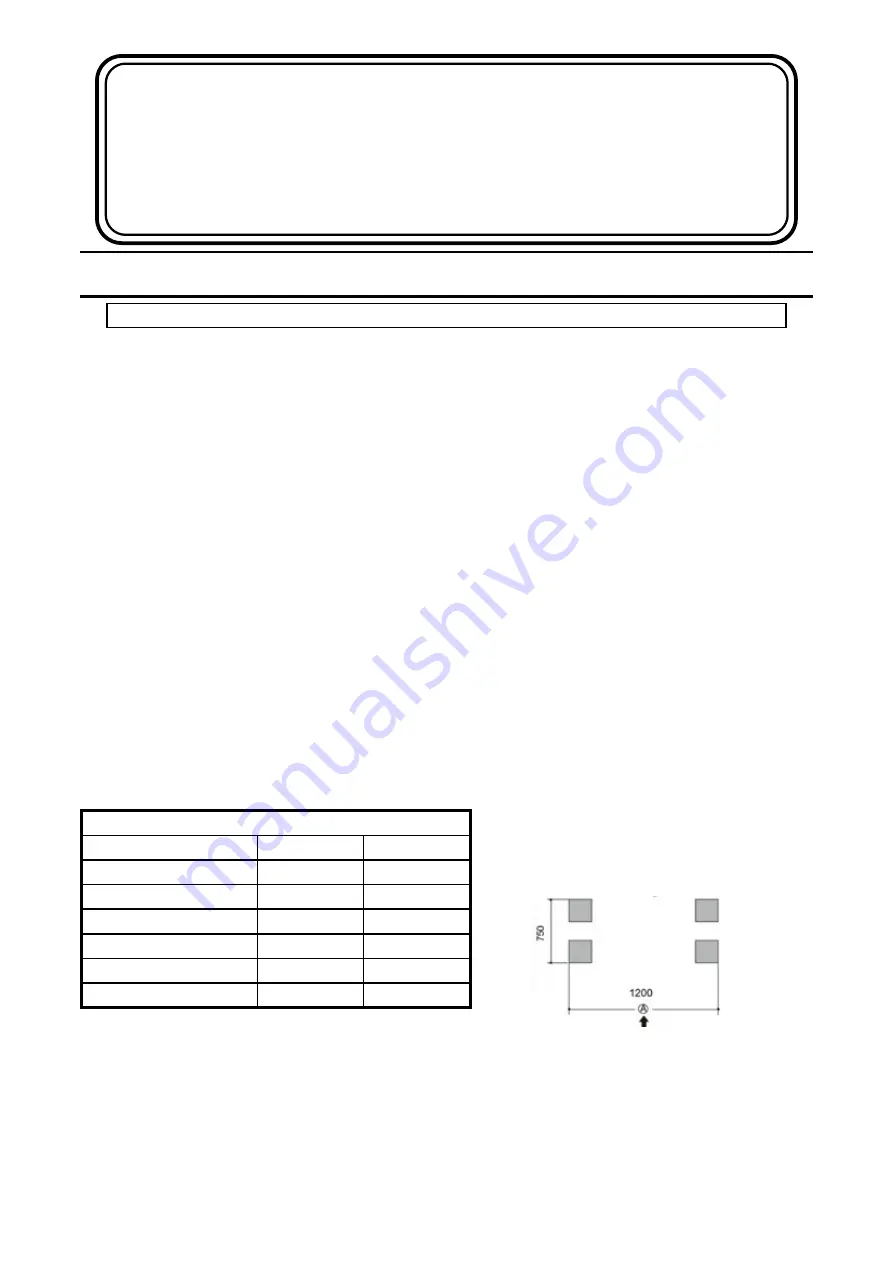
Foundation points

If you choose a point foundation, place the 

foundation points as follows

Make sure that the foundation points are 

balanced and that the points are aligned at right 

angles!

Make sure that you leave enough distance to 

adjacent walls etc. for installation, as you need 

this space!

Make sure that the roof overhangs do not collide 

with a wall, etc.!

The following packages are required:

Designation:

Package no.

Amount

Sidewall:

ES4-0425

1

Roof, floor:

ES4-0913

1

Rear wall:

ES4-1022

1

Door:

ES4-1722

1

Shelf (optional):

ES4-1917

1

Shelf (optional):

ES4-1918

1

Front

Содержание ESD-1207E

Страница 1: ...al parts are tightened securely and no parts are left over Some holes and recesses may not be required for your model therefore work exactly according to these instructions For safety When locking it make sure that no one is inside the tool shed Always lock the tool shed when it is not in use Make sure that children do not use the tool shed as a toy Foundation points If you choose a point foundati...

Страница 2: ...and within the scope of normal use The product is owned by the original purchaser and has not been disassembled and reassembled Guarantee coverage The guarantee covers parts which are demonstrably unusable or considerably impaired in their usability due to faulty design or defective workmanship Parts will be repaired or replaced free of charge at our discretion We do not cover the costs for remova...

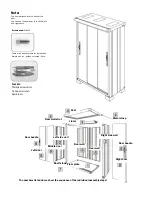
Страница 3: ...installation Stainless 1 pc golden coloured 2 pcs Tool kit Phillips screwdriver T shaped wrench Spirit level The numbers listed above show the sequence of the individual assembly steps Roof Metal clasp Rear wall strut Floor plate Rear wall Rear wall Right door Left door Door handle Door handle Right side wall Left side wall Shelf stand Middle door Lintel ...

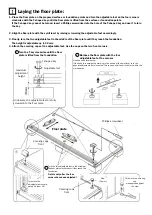
Страница 4: ...corners Laying the floor plate 1 Balance the floor plate with the four adjustable feet at the corners Turn the T key clockwise until the floor plate is lifted from the foundation 1 2 T shaped key Adjustable foot maximum adjustment height On delivery the adjustable feet are fully screwed into the floor plate How the spirit level works If the bubble is outside the marking in the centre of the spirit...

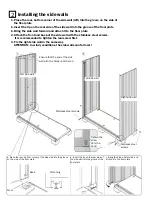
Страница 5: ...e of the floor plate c Bring the side wall forward and attach it to the floor plate Back Front Attaching 1 Place the rear bottom corner of the side wall left into the groove on the side of the floor plate b Insert the lip on the rear side of the side wall into the groove of the floor plate b Bring the side wall forward and attach it to the floor plate 2 Attach the front and back of the side wall w...

Страница 6: ...he inside of the door stop b Bring the metal connector for the lintel fitting to the side of the lintel and fasten it to the lintel with a golden screw 3 Fix the lintel with stainless steel screws from the front c Fix the metal fitting for the lintel right and left to the door stop with a golden screw Interior view Lintel Lintel Golden Right angled hole Door stop These pro tusions fit into L shape...

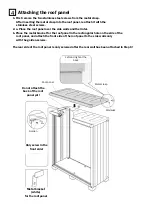
Страница 7: ...e the metal bracket for the roof panel in the rectangular hole on the side of the roof panel and attach the front side of the roof panel to the side walls only with the golden screws The rear side of the roof panel is only screwed after the rear wall has been attached in Step 6 Do not attach the back of the roof panel yet Left and right at the back Roof panel Golden Stainless Metal clasp Only scre...

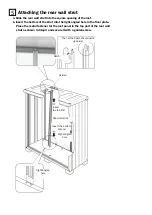
Страница 8: ...into the right angled hole in the floor plate Place the metal fastener for the roof panel in the top part of the rear wall strut as shown in Step 4 and secure it with a golden screw The notched part should point upwards Insert the top first Golden Right angled hole Notch Rear wall strut Insert the bottom second Right angled hole ...

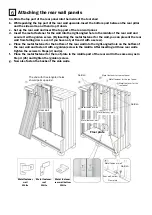
Страница 9: ...d the side walls and then drop it down c Set up the rear wall and insert the top part of the rear wall panel d Insert the metal fastener for the wall into the right angled hole in the middle of the rear wall and secure it with a golden screw By inserting the metal fastener for the wall you can prevent the rear wall from falling down even if you have not yet fixed it with a screw e Place the metal ...

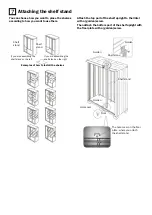
Страница 10: ...crew Then attach the bottom part of the shelf upright with the floor plate with a golden screw Golden Golden Shelf stand Shelf stand Golden Shelf stand Shelf stand If you are assembling the shelf stand on the right If you are assembling the shelf stand on the left Examples of how to install the shelves The hole cover on the floor plate where you attach the shelf stand Hole cover Front ...

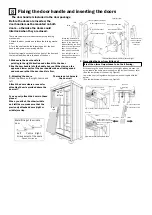
Страница 11: ...e previously attached doors right or middle overlap Left Right Centre Arrangement of the doors viewed from the top Door rollers Door right thick thin Outer side of the door Door right and Left Door handle recess Door handle large Interior view Door right and Left Door handle recess Door handle small Make sure that the door handle is positioned correctly The small door handle differs left and right...

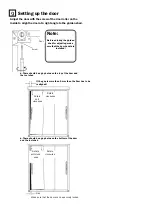
Страница 12: ... the garden shed Gap Make sure that the doors can be securely locked Door Screw Note a There should be a gap between the top of the door and the tool shed If the gap is more than 5 mm then the floor has to be realigned a There should be a gap between the bottom of the door and the tool shed Rotate anti clock wise Rotate clockwise Setting up the door 9 Rotate anti clockwise Rotate clockwise ...

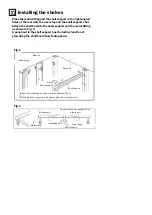
Страница 13: ... Fig 2 A punch out in the shelf support has the further function of preventing the shelf board from falling down Fig 1 Metal fitting Sidewall Rear wall Strut Shelf support Shelf support Fig 2 Shelf support Metal fitting Ascending part Shelf support Metal fitting No shelf support is required for the middle part Insert the shelf support deep into the shelf support strut Push the shelf support into t...

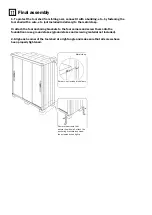
Страница 14: ...ring brackets to the four corners and screw them onto the foundation or use ground stakes ground stakes and screwing material not included 2 Align each corner of the tool shed at a right angle and make sure that all screws have been properly tightened Metal clasp Wire etc not included in delivery Remove the screws that secure the side wall attach the anchoring brackets and screw the screws back on...

Отзывы: