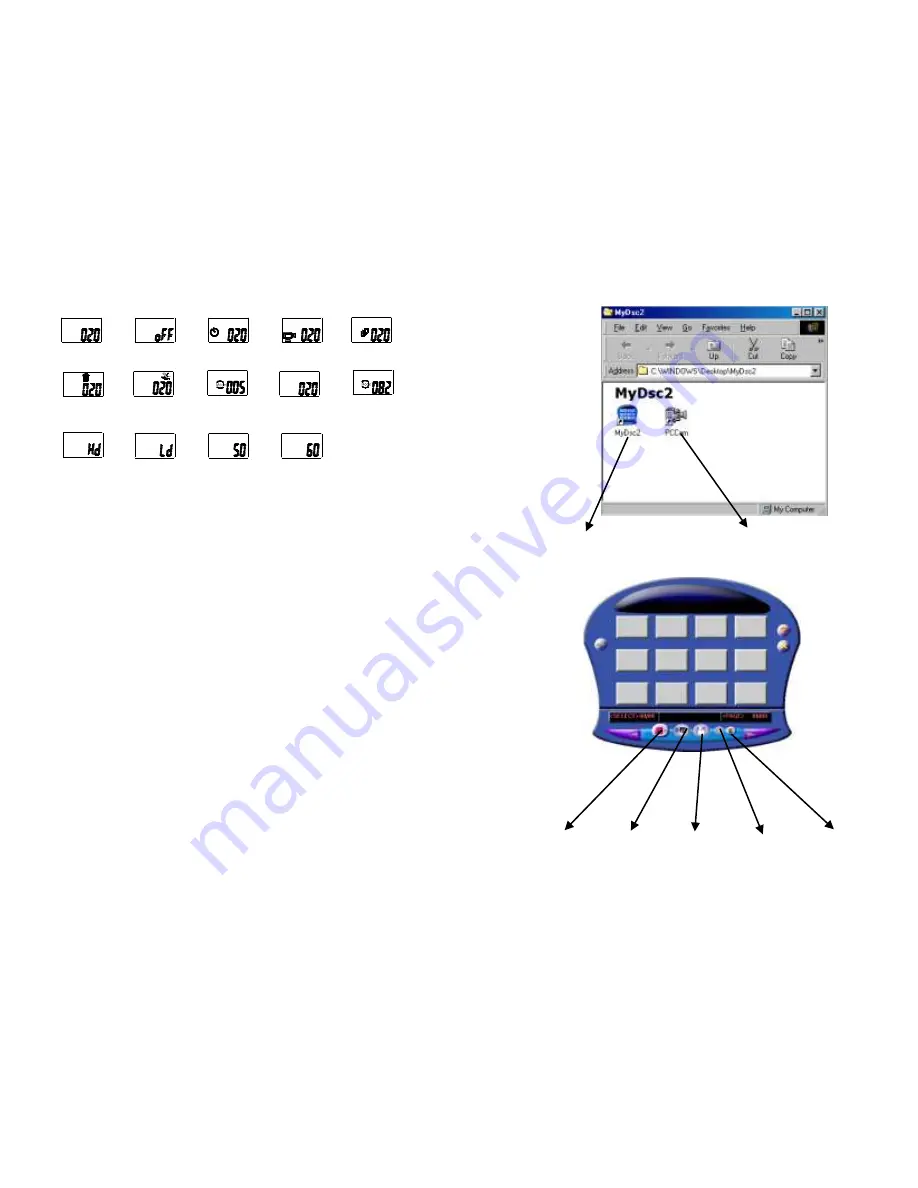
gfm TDC36 Скачать руководство пользователя страница 4

Lo

Change the 
frequency to 50Hz

Del the last 
picture

Change to non-
compression mode

Change to 
compression mode

Change the 
frequency to 60Hz

Ready to take


Low-

Resolution pictures

Turn into standby 
mode

Ready to take


Hi-

Resolution pictures

Hi

Del all pictures

Self timer

Continuous 
capture

Capture 3 photos 

Lo

Change to Low- 
Resolution mode

Change to Hi- 
Resolution mode

Hi


Take pictures 

1.

Press “mode” button to turn on the camera, the camera is 

repeatedly

 set to take 

high-resolution pictures. The number of images that have been taken will be shown 
on the LCD screen 

2.


Canter

 your subject by using the camera viewfinder. 

3.


Press  the  “Shutter”  button, 

and  the

  snapshot  is  finished  with  a  distinct  beeping 

sound 

as well as

 the number on the LCD display will 

increase

 by one.   

4.


When “CS” mode is 

chosen

, you can capture 3 photos successively.


ATTENTION:   

When  the 

lighting

  is  not  sufficient,  the  Auto  exposure  and  Gain  control  need 

more time to settle, you have to hold the camera steadily and wait longer for the 
beeping sound. If the environment is too dark to take 

pictures

, you will hear 

beeps

 sound and no picture can be taken. 


Download Picture 

1.


Connect  the  camera  to  the  computer  with  a  USB  cable.  The  computer  will 
automatically update new information to confirm the connection.   


Download pictures   


  PC Camera     


2.


Open the folder “My DSC2” on desktop and then double click “My DSC2” icon. 
The download interface will be

 displayed on

 the screen. 


Download    Transfer      Save      Select all        Edit image 


3.


Click the Edit image button, and then select the

 pixel up

 if you want interpolate 

the photo to 1.3M pixels. 


Delete all pictures 

Delete the last   
pictures 

Содержание TDC36

Страница 1: ...ures Compressed VGA 25 pictures VGA 640 x 480 240 410 pictures compressed QVGA 102 pictures QVGA 320 X 240 POWER 1 AAA Alkaline battery Computer Interface USB Note The quantity of compressed picture i...

Страница 2: ...05 pictures Compressed VGA 25 pictures VGA 640 x 480 240 410 pictures compressed QVGA 102 pictures QVGA 320 X 240 POWER 1 AAA Alkaline battery Computer Interface USB Note The quantity of compressed pi...

Страница 3: ...allation Attention Make sure you install all the necessary software in your computer before you connect the camera to a computer 1 Close all opened software applications on your computer before instal...

Страница 4: ...l as the number on the LCD display will increase by one 4 When CS mode is chosen you can capture 3 photos successively ATTENTION When the lighting is not sufficient the Auto exposure and Gain control...

Страница 5: ...activate the driver 3 You can click the video capture pin in the options menu to select the resolution the default is QVGA 320x240 IMPORTANT When the battery power is low the LCD display will blink c...

Страница 6: ...TILITIES CIVIL WAR REBELLION RIOT STRIKE LABOR DISTURBANCE LOCKOUT OR CIVIL COMMOTION INCIDENTAL CONSEQUENTIAL OR SECONDARY DAMAGES OR DELAY IN RENDERING SERVICE UNDER THIS LIMITED WARRANTY OR LOSS OF...

Страница 7: ...bitrators will select an umpire Each of us will pay the expenses of the arbitrator We select The expenses of the umpire will be shared equally Unless both of us agree otherwise arbitration will take p...

Страница 8: ...tically to save battery energy You may press mode button to restart the camera operations again 5 Software installation Attention Make sure you install all the necessary software in your computer befo...

Страница 9: ...en 2 Center your subject by using the camera viewfinder 3 Press the Shutter button and the snapshot is finished with a distinct beeping sound as well as the number on the LCD display will increase by...

Страница 10: ...of the camera and start taking pictures again 9 PC Camera 1 Double click the PC Cam icon you will open a PC camera frame 2 If no image is shown you may click Preview in the options menu to activate th...

Страница 11: ...designed to provide reasonable protection against harmful interference in a residential installation This equipment generates uses and can radiate radio frequency energy and if not installed and used...

Отзывы: