background image

Installation and commissioning 

15 

V 1.0 


The G-ST comes delivered with 

English as its language setting


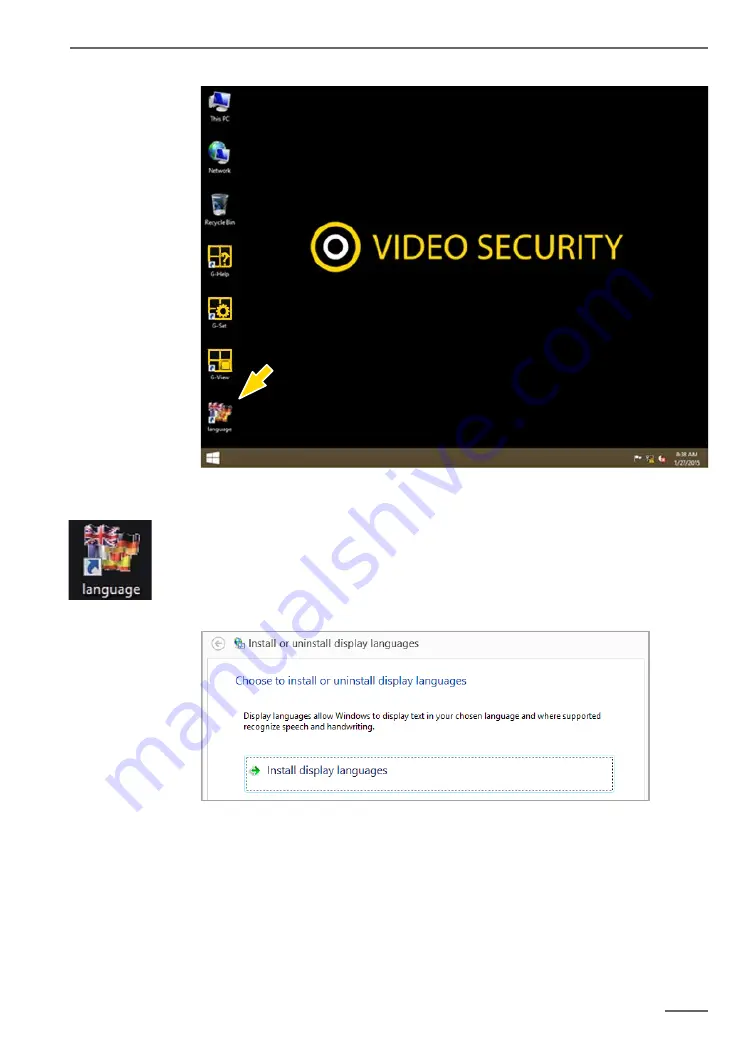
To change the language displayed in Windows, follow these steps:


Add the desired language. 


Define the language as the primary language. 


1. 

Double click on the Language icon and click on  

Install display languages

” to open the selection menu. 


2. 

Select a language and click “

Next

”.  The corresponding language pack is in-

stalled. 

3. 

Open the Region and Language options by clicking 

Start

 on the right, clicking 

on Control Panel and clicking on 

Language

.   

4. 

Clicking on “

Add a Language

” takes you to the selection menu. Select your 

language and click "

Add

". 

Содержание 0.60200

Страница 1: ...G ST 2000 Installation manual...

Страница 2: ...observe these operating instructions so that errors and danger can be avoided These operating instructions are for the G ST 2000 The operating in structions are only valid when the device corresponds...

Страница 3: ...on and commissioning 10 Requirements 10 Checking conditions 10 Tools for commissioning 10 Preparations 11 Instructions on installation of in house PC cards and external devices 11 Installation of a ha...

Страница 4: ...ger or particularly important information Warning Danger signs In order to avoid physical injury and material damage these alert you to danger instructions that must be followed and things that are pr...

Страница 5: ...gulations and standards must be observed In the interest of safety the operating company and supervisors are responsible for compliance Whenever performing any kind of work check for any possible dama...

Страница 6: ...PU accelerated 64 bit video engine G Core the system delivers excellent image processing per formance With its expanded temperature range it can also handle difficult condi tions With optional connect...

Страница 7: ...conditions Temperature range 25 C to 55 C Relative humidity 10 to 90 without condensation Installation instructions and initial commissioning The devices must only be installed by qualified personnel...

Страница 8: ...cator LED 2 Power button 3 Error Error LED Lights permanently in the event of a malfunction 4 Reset button 5 Record Recording LED Flashes or lights up permanently when images are passed on to the data...

Страница 9: ...onnection 2 Ethernet 10 100 1000 Base T RJ45 6 USB 3 0 interfaces 2x 7 Port for PS 2 keyboard 6 pin mini DIN socket 8 Connection for PS 2 mouse 6 pin mini DIN socket 9 10 Control inputs for connecting...

Страница 10: ...COM2 9 pin Sub D connector 5 Network connection 2 Ethernet 10 100 1000 Base T RJ45 6 USB 3 0 interfaces 2x 7 Port for PS 2 keyboard 6 pin mini DIN socket 8 Connection for PS 2 mouse 6 pin mini DIN so...

Страница 11: ...a tion or playback PCs must be confirmed You can also demonstrate functional name mapping using PING You start the command window by right clicking on Start Click on Command Prompt Enter PING IP addre...

Страница 12: ...tions on installation of in house PC cards and external devices Please observe the following instructions which will help you avoid time consuming installation work and ensure error free operation Whe...

Страница 13: ...ove the cover the marked screws on the front and back must be loos ened Six screws have to be loosened at the front When loosening the front panel make sure the LEDs and buttons protrude The front pan...

Страница 14: ...e LEDs and the button The front and rear pan els are screwed on again Connecting devices All connections are made on the back There is also a USB port on the front Please note the following precaution...

Страница 15: ...cisely pre configured for your device By pressing a key during powering up this configuration could be adversely affected Proceed as follows to switch on the device 1 Connect the device to the power s...

Страница 16: ...primary language 1 Double click on the Language icon and click on Install display languages to open the selection menu 2 Select a language and click Next The corresponding language pack is in stalled...

Страница 17: ...istrator 1 Assign the G ST the intended IP address in order to integrate it into the network Manual assignment of IP addresses is performed using the settings of the net work card of the device 2 Usin...

Страница 18: ...or in case of sabotage The events are created and set up accord ingly in the G Set configuration software To set up the tamper monitoring of contacts follow these steps 1 Define the foreseen contact...

Страница 19: ...D connectors is shown in the following figure Figure Assignment of the 25 pin Sub D socket solder side Connection Signal Socket 1 13 Normally open contact 25 Normally closed contact Relay 4 12 Change...

Страница 20: ...connections optional Connect FBAS cameras or other FBAS signal sources to the BNC input jacks of the video inputs VID1 VID2 etc Depending on the base unit you have 4 FBAS inputs for G ST 2000 with An...

Страница 21: ...be connected to the PS2 ports Figure PS2 ports USB 2 0 3 0 You can connect external devices to the 5 2 USB 2 0 2 USB 3 0 rear 1 front USB 2 0 available USB ports Figure USB 2 0 3 0 DisplayPort for mo...

Страница 22: ...lder side socket Pin Function Pin Function Pin Function 1 JDCD 4 DTR 7 RTS 2 RxD 5 Signal ground GND 8 CTS 3 TxD 6 DSR 9 RI Turning off the device Turn off your G ST in the following order 1 Close all...

Страница 23: ...t hardware changes such as CPU are not compatible with this recovery image If you cannot access the Windows desktop or programs due to system problems you can still start the recovery process To resto...

Страница 24: ...ecovery Solution restoring a drive 7 Select the size of the Windows partition and confirm by clicking on RECOVERY START 8 Confirm the disk partitioning by clicking on Yes System recovery will now star...

Страница 25: ...G ST 2000 _7 xxxxx_IA_EN 24 06 2020 Technical alterations reserved GEUTEBR CK GmbH Im Nassen 7 9 D 53578 Windhagen Tel 49 0 2645 137 0 F ax 999 E mail info geutebrueck com Web www geutebrueck com...

Отзывы: