Getinge GEV TS 121650 AR-2 Скачать руководство пользователя страница 38


38 


ZONE 1  

In case of production errors in zone 1 follow operations below to solve different situations.  

Control, No nest in tub Pos.106  

If tubs entering the system has a missing a nest or is damaged, an alarm notify the 
operator.  

To reset this alarm: Enter the zone, remove the tub in picking position 106. Go out of the 
robot zone, reset safety and reset alarm on HMI.  

ZONE 2  

In case of production errors in zone 2, please follow the steps below to resolve the issues.  

Timeout tub Pos. 225 

In case of this alarm, the tubs have not been successfully inserted into the system. Check 
if something is blocking any sensors or look downstream of system before restoring alarm 
from HMI.  

ZONE 3  

In case of production errors in zone 3 follow operations below to resolve the issues.  

Tub stack too close 

If tub stacks are too close to each other in leaving or picking position on the buffering 
conveyors an alarm will alert the operator. 
To reset this alarm, you have to enter the system and physically ordinate and separate the 
stacks, so that the sensors has a free sight. 


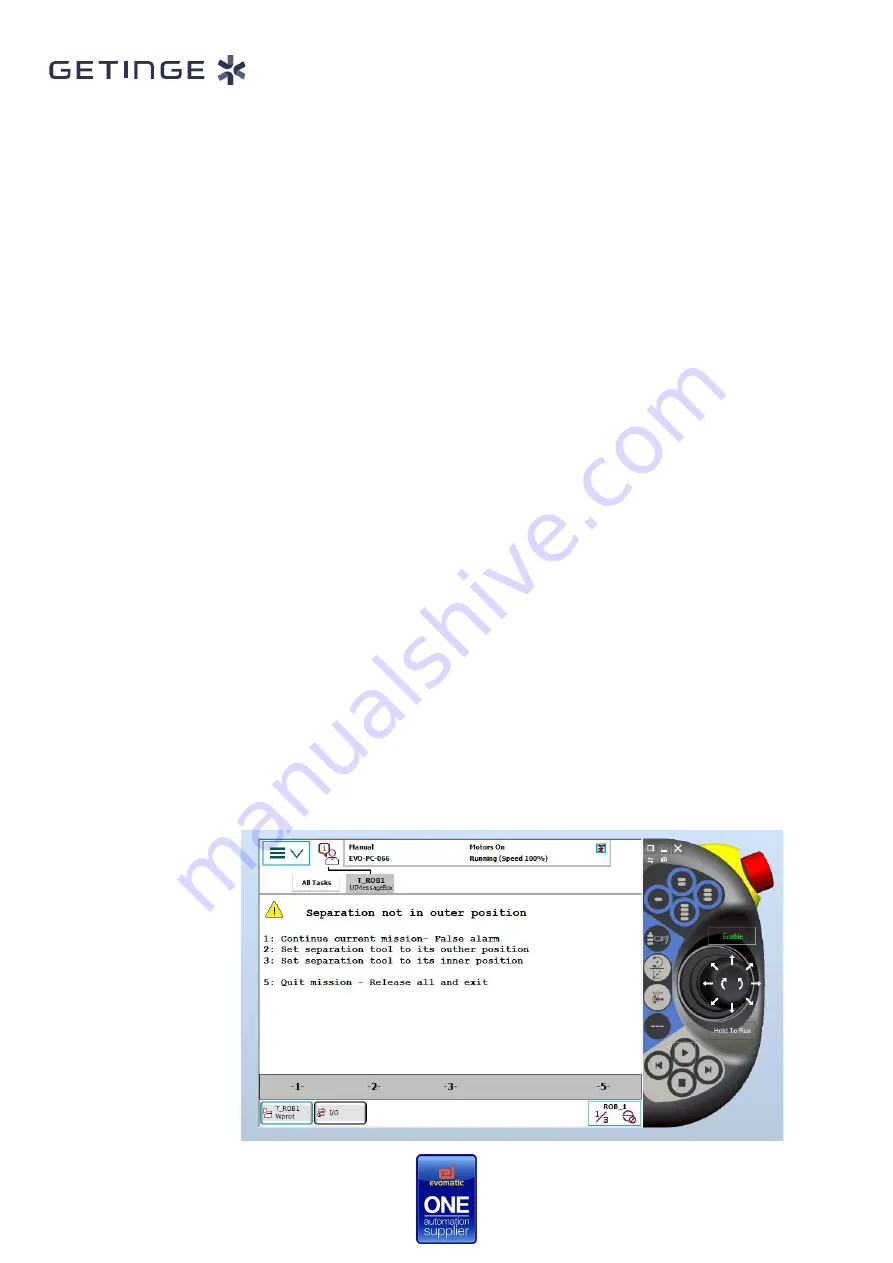
Robot 310 – Tub Handling – Buffer 

Select option 2/4 to move the separation arms up/down to make sure they are not stuck. 
Also check the sensors and adjust them if necessary. 

Select 1 to continue without action, the program continues as expected. 

Select 5 to exit ongoing mission, the robot will move to its home position. 

Sensors to check:  iSeparationIn & iSeparationOut


Содержание GEV TS 121650 AR-2

Страница 1: ...1 GEV TS 121650 AR 2 PFIZER ROBOTIC SYSTEMS 0011393179 010 USER MANUAL...

Страница 2: ...nes 14 Working methods in case of problems or breakdown 15 Removal of personnel 15 Restrictions 16 THE PROCESS 17 General function 17 Tub nest and rack handling 17 OPERATION INSTRUCTIONS 19 General 19...

Страница 3: ...26 Restart after an error 26 Restart after PLC stop 26 Alarms 27 Manual operations 28 Manual rack handling 28 Loading side manual loading 29 Unloading side manual loading 29 Autoclave cycle pharma al...

Страница 4: ...gram execution 50 Manual operation of robot Jog window or Quick selection 51 Home position 53 Picture illustrates robot in home position 53 Move the robot to home position 55 Gripper 57 Open close man...

Страница 5: ...ident you are obliged to report this Evomatic AB shall not be liable for any damages directly or indirectly due to actions which are not in accordance with this manual Should any unforeseen problems o...

Страница 6: ...down the line to inspection and packing Depending on process the system also store empty tubs in a separate buffer zone until the last sterilized nest comes to unloading side at the end of a batch fro...

Страница 7: ...rning in the manual It s a warning of a hazard that may lead to more or less severe injury and in certain cases mortal danger The symbol is also used to highlight safety components etc See Overview of...

Страница 8: ...8 Symbols on the unit Electrical hazards This symbol is a warning for electrical hazards Other hazards This warning symbol alerts the user to other hazards that may occur...

Страница 9: ...Robotic system information included in the type plate is required The CE mark ensures that the Robotic system complies with all relevant European directives of the European Economic Area EEA the Europ...

Страница 10: ...s be followed to reduce the risk of fire electric shock and personal injury Warning Observe and follow local safety precautions Unauthorized persons should never use the equipment Never leave the mach...

Страница 11: ...and support the robot arm General interventions Intervention in the cell may only take place via the facility s supervised gates entry into the cell through any other way is strictly prohibited When...

Страница 12: ...e stop the machine functions within the selected safety zone are quickly stopped The power supply is interrupted Electricity and pneumatics are stopped in cases where it is considered that continued m...

Страница 13: ...the emergency stop devices for the sterilizer and the robot zone with its robots There are two kinds of emergency stop labels are used depending on the purpose of emergency stop The T42205a are used...

Страница 14: ...tion Reset Description 1 Zon1 Gate 1 1F7SG1 Haake key back in original place Gate used for access robot cell 2 Zon1 Gate 2 1F7SG2 Haake key back in original place Gate used for access robot cell 3 Zon...

Страница 15: ...ns in case of problems and rectification troubleshooting Contact your local maintenance otherwise contact Evomatic AB Removal of personnel See security information from robot supplier ABB will be incl...

Страница 16: ...volved of staying within the danger zone and have sufficient instructions for the safe use of the equipment It is the responsibility of employers and supervisors to ensure that installation and mainte...

Страница 17: ...h sterilized syringes are ready for unload During filling tubs is stacked in zone 3 by robot 310 On each conveyor the robot stacks a predefined amount of tubs on it based on reachability and collision...

Страница 18: ...loading zone 2 to pos 508 4 Robot 210 unloads a sleeve to nest stand 1 or 2 by robot 220 If problem with transportation see section General errors Tub Nest unloading 1 Tubs start to pass by buffer and...

Страница 19: ...so that no visible defects can be identified Make sure that protection is in the correct position Otherwise see separate maintenance instructions Start Check that no persons are in the danger zone Mak...

Страница 20: ...tton on HMI cycle stop without Haake keys unlocked 2 Request Access Press the Request entry button for the zone 3 Manual Press the manual button in the HMI Operation mode Auto is no longer selected Th...

Страница 21: ...manual movements the interlock for the selected function is required In general the zone should be in manual mode and the security should be OK Some movements are dependent on the adjacent equipment b...

Страница 22: ...ks the time of the oldest ID is monitored until autoclave cycle is finished with OK The rack transport system is monitoring the holding time at two positions 1 At loading of racks into autoclave The h...

Страница 23: ...omparison with previous unloaded IDs 3 empty tubs are sent downstream the conveyor prior to unloading the rack in unloading position The empty tubs are taken from the dedicated empty tub stack in posi...

Страница 24: ...e number for which zone it belongs to as well as the letter for which function it has For handling and entrance refer to 0 Request access Haake locks on gates No Name Type Description 1 Request entry...

Страница 25: ...button which releases the A keys This prevents the system to be restarted without entering all A keys into the system System is now locked in Safe PLC nothing can restart 4 An A Key is used to unlock...

Страница 26: ...o the section Auto mode0 6 Auto mode Restart after safety stop The factory s additional safety procedures should be followed 1 Ensure that no one is in the safety area 2 Ensure that no person can get...

Страница 27: ...s the type of the alarm and how to handle it Summary 4 Groups 12 classes 1 Group A Messages 5 classes A alarms are used to describe the status of the machine 2 Group B Starting conditions 1 class B al...

Страница 28: ...ow chart over the robotic system When unloaded all data loaded in the shift register for the specific rack ID will be stored in the system The rack ID will be read in the unload position and system wi...

Страница 29: ...is not the case the operator should load it at the loading side of the autoclave If there is no pharma alarm on the rack the system will continue unloading without additional input However if there is...

Страница 30: ...tem to override the fact that there is a pharma alarm at automatic unloading This is also the boolean that will be adjusted as the pharma alarm or cycle status cannot be changed due to GMP reasons Fur...

Страница 31: ...y the operator Confirming this notification will send the rack to the manual unloading position at the loading side RACK EMPTY NOT EMPTY Status pharma alarm FALSE Processed conform Status pharma alarm...

Страница 32: ...r and tear To resolve this error gradually check the conveyor to find the reason why the goods did not arrive at the intended position and restore the alarm at HMI Sensor failure If a sensor on the co...

Страница 33: ...sensors are active Sensors to check iGripperOpened iGripperClosed As long as you press 2 or 4 this screen will appear and when you press 5 the program continues with the gripper in the same status as...

Страница 34: ...pears If you select 1 the program continues as expected If you select 2 3 the gripper will try to open or close If you press 5 The robot aborts its current program and moves to home its position Alway...

Страница 35: ...ss 1 if the nest is in the gripper If you press 2 The robot aborts its ongoing program and moves to its home position If you for some reason move the program pointer to Main you must also empty the ne...

Страница 36: ...son a sleeve is missing from its position Check the current position in this example pos 14 and make sure there is a valid sleeve in that position Check the sensor and the status it is sending It migh...

Страница 37: ...t the current program Remove the sleeve if there is one in the gripper before selecting option No 2 If you move the program pointer to main and the gripper is not open you will receive this error mess...

Страница 38: ...ors or look downstream of system before restoring alarm from HMI ZONE 3 In case of production errors in zone 3 follow operations below to resolve the issues Tub stack too close If tub stacks are too c...

Страница 39: ...cabling and clean the detection area of the sensors Sensors to check iSearchEdge If the search cylinder does not reach its inner or outer position this screen will appear Select option 1 or 2 to move...

Страница 40: ...ect 5 to exit ongoing program the robot will move to its home position Sensors to check iArmsIn and iArmsOut If an error occurs when searching for tubs this message appears Check the sensor cabling Ad...

Страница 41: ...e system will not be able to function properly Using the log can help you find errors faults For every error created there is an error log which is being saved with additional information These logs m...

Страница 42: ...42 Tap here first and then select User Tap on the log If the specific part is supported you might find suggestions on what to check or replace...

Страница 43: ...tic has a function to prevent the customer operator from loading the wrong program into the systems controller The system will refuse to start if there is a mismatch between the program and the contro...

Страница 44: ...ame Type Description Main Switch Turn switch Cuts all power to robot handling equipment including UPS for PLC supply Emergency stop Pushbutton turn to restore Stops all safety related functions in the...

Страница 45: ...ode not used here Red light indicates that the machine is stopped due to an alarm Blue light indicates that the machine is set to a deviating state of normal operation Robot cabinets No Type Descripti...

Страница 46: ...46 Robots basic functions ABB menu ABB menu Status field Close button Quick menu Programable function buttons Safety switch...

Страница 47: ...are located under jogging the most common functions are also located under quick menu Production window shows the code which are being executed while the program is running In Program Editor you can...

Страница 48: ...ed before starting to work change the system Calibration is used to calibrate mechanical units on the system Control panel is used to setup various function and settings of the system Shows a summatio...

Страница 49: ...49 Robot pendant Manual Auto mode Auto Manual mode Quick menu Key selector...

Страница 50: ...Robot starting program execution Step mode forward Robot performs one instruction at a time forward Step mode backward Robot performs one instruction at a time backwards Stop Stops program execution...

Страница 51: ...51 Manual operation of robot Jog window or Quick selection Choose unit Choose motion type Choose tool Choose work object Actual coordinates Directions of the joystick To Jogging window To Quick select...

Страница 52: ...52 Quick select Jogging Increments Motion mode Step mode...

Страница 53: ...53 Home position Please note All the pictures below are taken from a virtual environment Picture illustrates robot in home position Robot 110 Home position Robot 120 Home position...

Страница 54: ...54 Robot 210 Home position Robot 220 Home position...

Страница 55: ...Move the robot to home position WARNING The robot takes the shortest possible route back to the home position This could lead to a dangerous situation if the shortest possible path is blocked Press on...

Страница 56: ...56 Message is shown before robot starts to move Press Ok Once again please note that the robot takes the shortest possible route back to its home position Don t forget to reset the PLC sequence...

Страница 57: ...ning The parts currently held by the gripper will fall if the gripper is manually opened The manual opening of the gripper can also be performed through the I O list see steps below Press on FK1 Closi...

Страница 58: ...e of an I O Reset oOpenGrip Press oOpenGrip see image below and modify the output to 0 This is just one example of an I O Press the button Inputs and Outputs pointed at in this image Press the view bu...

Страница 59: ...bot s speed in percent For example pressing the button showing 25 would result in the robot moving 25 the speed of its top speed Press on the symbol pointed at by the arrow This button is called Quick...

Отзывы: