background image


60


Appendix A


  Specifications 

NOTE:

 Specifications are subject to change without any prior notice. 


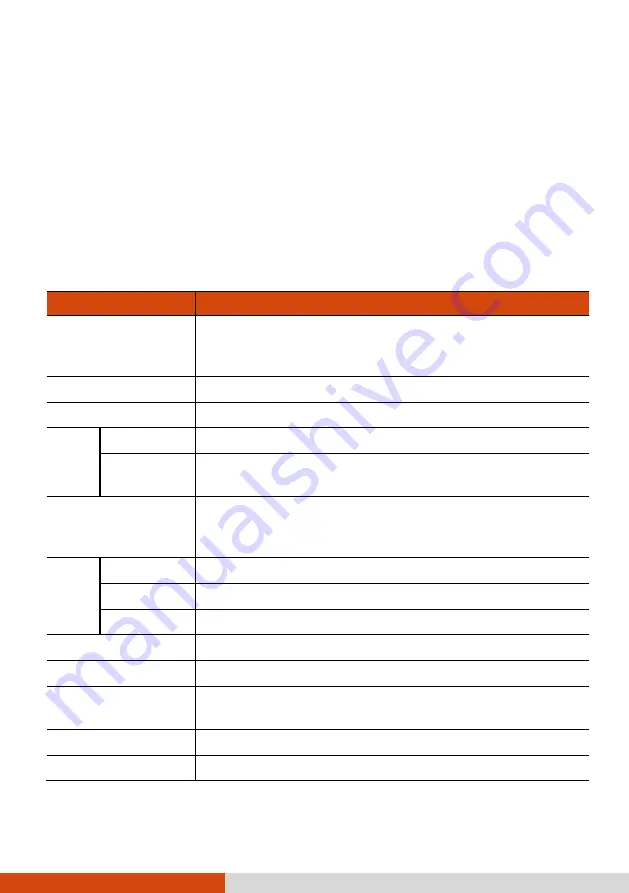
Parts 

Specifications 

CPU 

Intel®


Atom™


x5-Z8350


Processor, 4 core, base 

frequency 1.44 GHz, burst frequency 1.92 GHz, 2MB 
cache 

BIOS 

Insyde, Flash EEPROM, supporting UEFI 

RAM  

4GB LPDDR3 

Video  Controller 

UMA - Intel® HD Graphics 

Display 

Panel 

8-inch TFT LCD, 1280 x 800 WXGA, sunlight readable, 

600 Nits 

Touchscreen 

Capacitive multi-touch screen - 10 point, glove enabled 

touch, palm rejection, water rejection (large area of 
spilled water will not be registered as input) 

Audio  Features 

Azalia, High Definition audio 

Speaker 

Integrated 

Microphone  Integrated  

Storage Device 

eMMC, 128GB 

I/O port 

Docking 

Wireless LAN + 

Bluetooth 

Wi-Fi 802.11 a/b/g/n, Bluetooth 4.0+ EDR 

WWAN (option) 

3G/4G LTE 

GPS 

USB 

Содержание EX80

Страница 1: ...Rugged Mobile Computing Solution EX80 USER MANUAL...

Страница 2: ...owned by Bluetooth SIG Inc All brand and product names are trademarks or registered trademarks of their respective companies NOTE The information in this manual is subject to change without notice Fo...

Страница 3: ...Holder 11 Using the Hand Strap 12 Chapter 2 Operating Your Tablet PC 15 Using the Touchscreen 16 Using Network and Wireless Connections 19 Using the LAN 19 Using the WLAN 20 Using the Bluetooth Featur...

Страница 4: ...s 43 General Guidelines 44 Cleaning Guidelines 44 Battery Pack Guidelines 44 Touchscreen Guidelines 45 When Traveling 47 Chapter 7 Troubleshooting 48 Preliminary Checklist 49 Solving Common Problems 5...

Страница 5: ...62 On the Use of the System 63 Class B Regulations 63 Safety Notices 64 On the Use of the RF Device 67 USA and Canada Safety Requirements and Notices 67 European Union CE Marking and Compliance Notice...

Страница 6: ...d Congratulations on purchasing this rugged Tablet PC This chapter first tells you step by step how to get the Tablet PC up and running Then you will find a section briefly introducing the external co...

Страница 7: ...different items After unpacking the shipping carton you should find these standard items EX80 Tablet PC Hand strap Charging cradle Stylus holder Stylus AC adapter Tether Power plugs Cleaning cloth Doc...

Страница 8: ...on insert the SIM card all the way into the slot NOTE To remove the SIM card just push in the card to release it and then pull it out 3 Close the cover and tighten the screws CAUTION To ensure sealing...

Страница 9: ...will get out of the mode to be ready for use when you connect AC power to the Tablet PC for the very first time You must use AC power when starting up the Tablet PC for the very first time 1 Align the...

Страница 10: ...If the menu appears simply select Continue Turning Off When you finish a working session you can stop the system by turning off the power or leaving it in Sleep or Hibernation mode To Do this Power of...

Страница 11: ...6 Identifying Hardware Components NOTE Depending on the model you purchased the appearance of your Tablet PC may not be exactly the same as those shown in this manual EX80...

Страница 12: ...tery s capacity is below 10 Blinks red rapidly once per 0 5 second when there is a thermal protection problem Ask for repair service in case this happens Blinks amber when the battery charging is in a...

Страница 13: ...Tablet PC NFC RFID reader Reads data from NFC RFID tags Camera lens Allows you to use the camera function Flash Provides extra light when taking pictures NOTE The hardware buttons except the power but...

Страница 14: ...ector Connects to EX80 Power connector Connects the AC adapter USB 2 0 port Connects a USB device Power indicator Lights green when the AC adapter is connected and EX80 is docked Blinks green during U...

Страница 15: ...r s loop ends through the hole of the stylus as indicated by below Then insert the other end through the first loop as indicated by below and pull it tight 2 Insert the other loop end to the tether ho...

Страница 16: ...11 Using the Stylus Holder NOTE You cannot install the stylus holder if the hand strap is installed 1 Slide the piece through the slot fold the piece and button up 2 Store the stylus in the holder...

Страница 17: ...stallation 1 Insert the end belts of the hand strap through the two slots 2 To fasten each belt Fold the belt over and insert it through the slide adjuster going from underneath the inner side of the...

Страница 18: ...grip to hold your Tablet PC This imprint indicates the surface on which you put your hand The hand grip is rotatable The tightness can be adjusted Kickstand 1 Rotate the hand grip sideways as shown b...

Страница 19: ...to form a triangle NOTE When closing the hand grip be sure to fold up the flexible band properly Keep the folded band inside the hand grip in a flat and smooth condition Stylus Holder Use the stylus h...

Страница 20: ...ly the parts containing information unique to your Tablet PC CAUTION Do not expose your skin to the Tablet PC when operating it in a very hot or cold environment The Tablet PC can get uncomfortably wa...

Страница 21: ...the options as shown below NOTE If liquid is spilled on the touchscreen causing a wet area the area will stop responding to any inputs For the area to function again you must dry it The following tabl...

Страница 22: ...en The movement of the fingers across the screen creates gestures which send commands to the Tablet PC Here are the multi touch gestures that you can use Gestures Actions finger down finger up Descrip...

Страница 23: ...specific gesture Press and Tap Press on target and tap using a second finger Use press and tap to access the shortcut menu Two finger Tap Tap two fingers at the same time where the target is in the mi...

Страница 24: ...sing the LAN NOTE The charging cradle is required 1 Place your Tablet PC in the charging cradle 2 Connect the AC adapter to the cradle 3 Connect one end of the LAN cable to the RJ 45 connector on the...

Страница 25: ...n position To turn off the WLAN radio You can turn off the WLAN radio the same way you turn it on If you want to quickly turn off all wireless radio simply switch on Airplane mode Tap Settings Network...

Страница 26: ...ons between devices without requiring a cable connection Data can be transmitted through walls pockets and briefcases as long as two devices are within range NOTE Do not block the antenna area Turning...

Страница 27: ...e and within close range See the documentation that came with the Bluetooth device 3 Tap Settings Devices Bluetooth 4 Select the device you want to connect from the search results 5 Depending on the t...

Страница 28: ...he SIM card see Installing the SIM Card Optional in Chapter 1 Do not block the antenna area Turning On Off the WWAN Radio To turn on the WWAN radio Tap Settings Network Internet Airplane mode Slide th...

Страница 29: ...24 Setting up a WWAN Connection Tap Settings Network Internet Cellular For detailed information on cellular settings in Windows 10 see Microsoft Support website...

Страница 30: ...hnology allows you to pinpoint the geographic location of the computer and use the data for navigational and other purposes NOTE You need to install third party software to take full advantage of the...

Страница 31: ...e same orientation as indicated by the icon on the exterior of the Tablet PC The icon indicates where the RFID antenna is located NOTE When not using an NFC RFID card do not leave it within or near th...

Страница 32: ...ices NOTE The charging cradle is required The charging cradle has three USB 2 0 ports 1 Place your Tablet PC in the charging cradle 2 Connect the AC adapter to the cradle 3 Connect the cable to the US...

Страница 33: ...ablet PC operates either on external AC power or on internal battery power This chapter tells you how you can effectively manage power To maintain optimal battery performance it is important that you...

Страница 34: ...When you disconnect the AC adapter disconnect from the electrical outlet first and then from the Tablet PC A reverse procedure may damage the AC adapter or Tablet PC When unplugging the connector alw...

Страница 35: ...ttery to 80 of its total capacity in the event of high temperature conditions In such conditions the battery will be regarded as fully charged at 80 capacity The battery level may automatically lessen...

Страница 36: ...rging discharging and then charging It can take several hours A software tool called Gauge Reset is provided for the purpose Use the G Manager program and select the Battery tab to find the tool Check...

Страница 37: ...tery level Low The battery charge has reached the low battery level Critically low The battery charge has reached the critical battery level By default Windows will display a notification and put your...

Страница 38: ...gestions Do not disable Power Management Decrease the LCD brightness to the lowest comfortable level Shorten the length of time before Windows turn off the display When not using a connected device di...

Страница 39: ...IOS is a layer of software called firmware that translates instructions from other layers of software into instructions that the computer hardware can understand The BIOS settings are needed by your T...

Страница 40: ...Tablet PC In the pre boot menu that appears select Setup Utility Tap with your finger Stylus is not supported here If you don t want any accidental tapping to invoke the pre boot menu you can disable...

Страница 41: ...Virtualization Technology enables or disables Intel VT Intel Virtualization Technology feature which provides hardware support for processor virtualization When enabled a VMM Virtual Machine Monitor...

Страница 42: ...m and or entering BIOS Setup Power on Password allows you to enable or disable the entering of password for booting up your system Secure Boot Configuration This item appears only when the password ha...

Страница 43: ...set the device to Off Exit Menu The Exit menu displays ways of exiting BIOS Setup Utility After finishing with your settings you must save and exit so that the changes can take effect Exit Saving Cha...

Страница 44: ...39 Chapter 5 Using Getac Software Getac software includes application programs for specific computer components and utility programs for overall management This chapter briefly describes the programs...

Страница 45: ...ure the battery Enable disable ECO mode Set the touchscreen sensitivity mode Change the function of the hardware button To start the program select G Manager The G Manager window appears containing se...

Страница 46: ...files as EXIF 2 2 metadata NOTE G Camera uses the standard location service of Windows To start the G Camera application select G Camera In the middle is the preview window with status display At the...

Страница 47: ...tenance Taking good care of your Tablet PC will ensure a trouble free operation and reduce the risk of damage to your Tablet PC This chapter gives you guidelines covering areas such as protecting stor...

Страница 48: ...let PC on its side or store it in an upside down position A strong impact by dropping or hitting may damage the Tablet PC Do not cover or block any ventilation openings on the Tablet PC For example do...

Страница 49: ...elines Never clean the Tablet PC with its power on Use a soft cloth moistened with water or a non alkaline detergent to wipe the exterior of the Tablet PC Gently wipe the display with a soft lint free...

Страница 50: ...e the battery pack with the Tablet PC s power off When using battery power in an extremely low temperature environment you may experience shortened operating time and incorrect battery level reading T...

Страница 51: ...erature less than 5 o C 41 F may cause a slower response time this is normal A normal response time may be restored upon returning to room temperature When there is noticeable discrepancy in the opera...

Страница 52: ...the AC adapter as the power source and as a battery charger Hand carry the Tablet PC Do not check it in as luggage If you need to leave the Tablet PC in the car put it in the trunk of the car to avoi...

Страница 53: ...Computer problems can be caused by hardware software or both When you encounter any problem it might be a typical problem that can easily be solved This chapter tells you what actions to take when sol...

Страница 54: ...he cable connections are correct and secure Make sure that the configuration information is properly set in the BIOS Setup program Make sure that all the device drivers are correctly installed Make no...

Страница 55: ...n partially recharge and discharge the battery might not be charged to its full potential Initialize the battery to solve the problem The battery operating time indicated by the battery meter does not...

Страница 56: ...gh or too low It is not a malfunction in this situation Bad dots appear on the display at all times A small number of missing discolored or bright dots on the screen are an intrinsic characteristic of...

Страница 57: ...C is performing an operation it normally waits for the operation to finish The Tablet PC does not resume from Sleep or Hibernation mode The Tablet PC automatically enters Sleep or Hibernation mode whe...

Страница 58: ...low Software Problems An application program does not work correctly Make sure that the software is correctly installed If an error message appears on the screen consult the software program s documen...

Страница 59: ...a high setting can cause the audio electronics to distort the sound Startup Problems When you turn on the Tablet PC it does not respond and the Power Indicator does not light green If you are using a...

Страница 60: ...sure that the WLAN feature is turned on Make sure that the SSID setting is the same for every WLAN device in the network Your Tablet PC is not recognizing changes Restart the Tablet PC Make sure that...

Страница 61: ...r password is correct You have moved out of range of the network Turn off power management Other Problems The date time is incorrect Correct the date and time via the operating system or BIOS Setup pr...

Страница 62: ...opped and you cannot use the restart function of the operating system reset the Tablet PC Reset the Tablet PC by any one of these methods Press and hold the power button for more than 10 seconds to fo...

Страница 63: ...e created a restore point Recover from a drive If you have created a recovery drive on Windows 10 you can use the recovery drive to reinstall Windows Reset this PC This option allows you to reinstall...

Страница 64: ...s and utilities one by one after installing Windows To manually install drivers and utilities 1 Start up the Tablet PC 2 Prepare an external CD DVD drive with USB connection Connect the drive to your...

Страница 65: ...roller UMA Intel HD Graphics Display Panel 8 inch TFT LCD 1280 x 800 WXGA sunlight readable 600 Nits Touchscreen Capacitive multi touch screen 10 point glove enabled touch palm rejection water rejecti...

Страница 66: ...240VAC 50 60Hz 12V 2A 24Watts Battery pack Lithium ion 2100mAh x 4 Dimension LxW D 239 5 x 155 x 29 mm 9 4 x 6 1 x 1 14 inch Weight 1500 g 3 3 lb Charging cradle USB 2 0 x 3 RJ45 10 100 Mbps Ethernet...

Страница 67: ...safety notices on your Tablet PC NOTE Marking labels located on the exterior of your Tablet PC indicate the regulations that your model complies with Please check the marking labels and refer to the...

Страница 68: ...tee that interference will not occur in a particular installation If this equipment does cause harmful interference to radio or television reception which can be determined by turning the equipment of...

Страница 69: ...aux appareils num riques de la classe B prescrites dans le R glement sur le brouillage radio lectrique dict par le minist re des Communications du Canada Safety Notices About the Battery Caution Texts...

Страница 70: ...valent recommand par le constructeur Mettre au rebut les batteries usag es conform ment aux instructions du fabricant Attention for USA Users The product that you have purchased contains a rechargeabl...

Страница 71: ...ltage requirements are found on the product case and or packaging Do not use the adapter if the cord becomes damaged Do not attempt to service the unit There are no serviceable parts inside Replace th...

Страница 72: ...he Federal Communications Commission FCC This device complies with the limits for a Class B digital device pursuant to Part 15 subpart C of the FCC Rules and Regulations Operation is subject to the fo...

Страница 73: ...with other devices operating at this frequency Any changes or modification to said product not expressly approved by the manufacturer could void the user s authority to operate this device Canada Rad...

Страница 74: ...2014 53 EU Finnish T m tuote noudattaa EU direktiivin 2014 53 EU m r yksi French Ce produit est conforme aux exigences de la Directive Europ enne 2014 53 EU German Dieses Produkt entspricht den Besti...

Страница 75: ...is restricted to indoor use only when operating in the 5150 to 5350 MHz frequency range AT BE BG HR CY CZ DK EE FI FR DE EL HU IE IT LV LT LU MT NL PL PT RO SK SI ES SE UK Waste Electrical and Electro...

Страница 76: ...in countries that follow the United States FCC limit and 2 0 W kg averaged over 10 grams of tissue in countries that follow the Council of the European Union limit Tests for SAR are conducted using s...

Страница 77: ...hazardous materials While they pose no risk to you during normal use they should never be disposed with other wastes Getac provides a free take back service for recycling your Getac products Our elect...

Страница 78: ...without enabled power management features Earning the ENERGY STAR When every home office is powered by equipment that has earned the ENERGY STAR the change will keep over 289 billion pounds of greenh...

Страница 79: ...s emissions Getac Product Compliance All Getac products with ENERGY STAR logo comply with the ENERGY STAR standard and the power management feature is enabled by default As recommended by the ENERGY S...

Отзывы: