background image


7


SAFETY ADVICE   


100-240V AC 


AC100-125V    AC200-240V AC240 (TYPE SAA) 

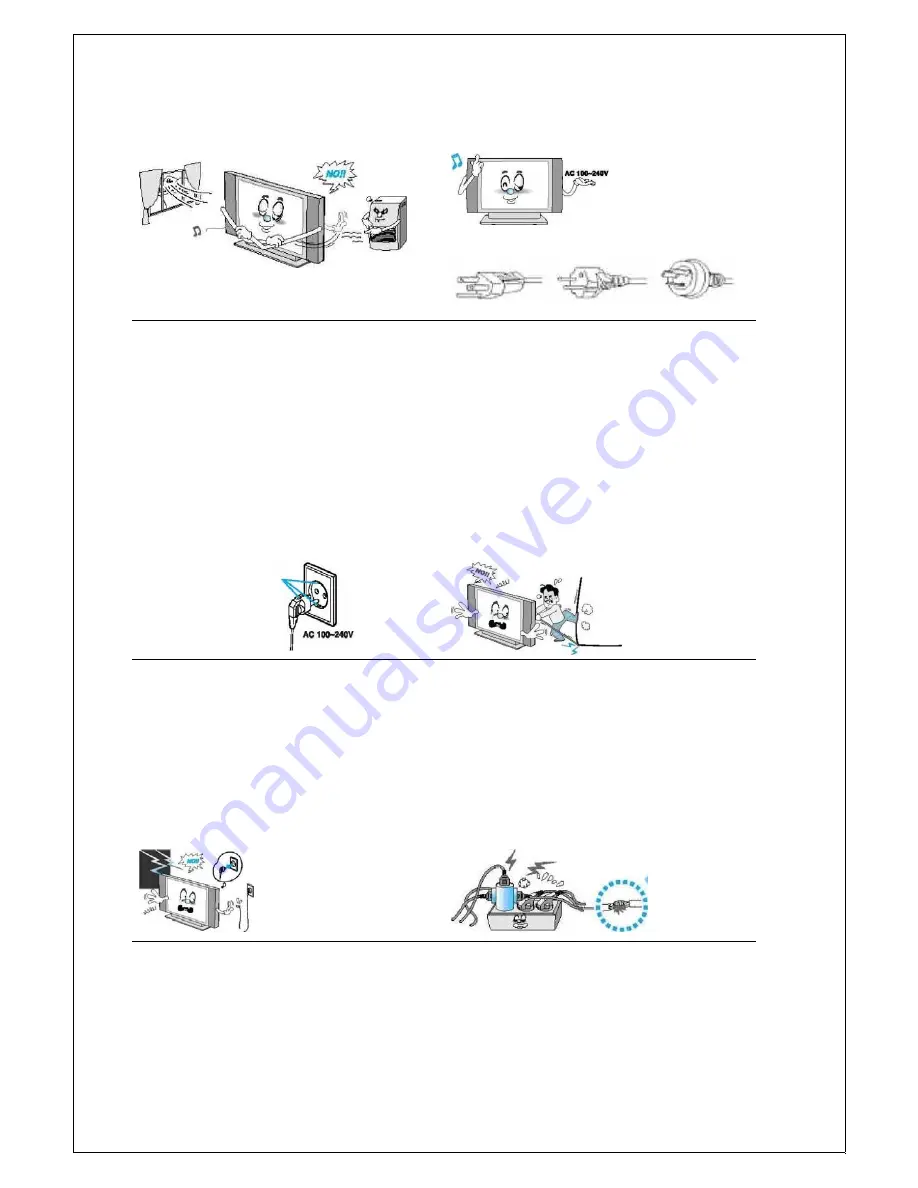
Ensure that there is good ventilation. Ventilation 
slots can be found in the monitor housing to prevent 
over-heating. Under no circumstances should these 
slots be blocked by objects, additionally the monitor 
should not be placed on a bed, sofa, rug or similar 
surface.    Do not place the appliance in close 
proximity to radiators or any heat source.    Should 
the monitor be placed on a shelf or in a cupboard, 
ensure that there is suitable air-circulation and that a 
gap of at least 30cm exists between the ventilation 
slots and the shelf above as well as to the left and 
right of the appliance.   The manufacturer accepts 
no liability for potential damage caused by the lack 
of suitable ventilation.       

In order to avoid electric shocks, only use the 
electricity cable recommended for this appliance.   
The monitor is supplied with a mains voltage of 
100-240V AC and the enclosed mains cable is 
equivalent to this exact voltage.    To guarantee 
safety and the EMV regulations, only use the mains 
cable recommended by our retailers.    If the 
appliance is used with another supply voltage, the 
mains cable must also be changed.  Please contact 
your retailer.      Ensure that the plug socket is 
within easy reach when assembling the appliance so 
that it can be quickly disconnected from the mains 
in the event of an emergency.     

Earth connectors 


AC 100-240V 


Only use earthed or polarised plug sockets.    This 
monitor is equipped with a polarised AC power 
capacity plug for your safety, of which one 
connector is wider than the other.    This plug only 
fits into the socket one way.    Should you not be 
able to fully insert the plug, try inserting it the other 
way up.    An electrician should be contacted if the 
plug can still not be inserted into the socket, so that 
the plug socket can be changed. 

Avoid overhead wires.    An external antenna 
should never be attached in the direct vicinity of 
overhead cables, electric lights or power lines, or in 
places where such mains or overhead power lines 
can fall onto it.    Proceed very carefully when 
installing an external antenna, ensure that you do 
not touch any power lines or electric circuits.    The 
touching of such lines can result in fatalities.       


Un-plug the monitor from the mains and disconnect 
the antenna or antenna cable during thunderstorms 
or when the appliance is not being used for a long 
period of time.    This protects the appliance from 
damage in the event of lightening strike or power 
surges.       

Protect the electricity cable.    The electricity cable 
should be placed in such a way that it cannot be 
walked on or pinched by objects laid on top of it.   
Pay particular attention near the plug and the plug 
socket as well as at the point where the cable exits 
the appliance. 


Содержание GTW3208 Picasso

Страница 1: ...Users Manual MODEL Picasso PAL...

Страница 2: ...ey Operations 18 Basic Operation 20 Turning PDP LCD TV On And Off 20 Select Source 20 Volume Control 21 OSD Menu Structure 22 Example of OSD Menu 22 PICTURE 23 Picture Mode 23 Custom 24 Color Tone 26...

Страница 3: ...uto Volume 46 Sound Mode 47 SETUP 48 Reset 48 Time Clock 49 Time On Timer 50 Time Off Timer 51 Time On Time Channel 52 Time On Time Volume 53 Language 54 OSD Tone 55 Blue Screen 56 TTX Group 57 PICTUR...

Страница 4: ...hold as well as in commercial industrial or business environments This appliance may produce use and emit high frequency energy and improper installation can in exceptional cases cause damage to the r...

Страница 5: ...in mind If the delivered plug does not fit in your plug socket ask an electrician to change the old plug socket 10 The electricity cable should be placed in such a way that it cannot be walked on or p...

Страница 6: ...table or floor where it may tip over A fallen monitor can cause serious injury to a child or adult as well as damaging the material itself Only use trolleys stands tripods frames or tables which are...

Страница 7: ...ppliance so that it can be quickly disconnected from the mains in the event of an emergency Earth connectors AC 100 240V Only use earthed or polarised plug sockets This monitor is equipped with a pola...

Страница 8: ...iring of an antenna loading unit the size of earth wires the installation location of an antenna loading unit and the connection to an earth electrode Do not install an external antenna in the vicinit...

Страница 9: ...tion could lead to damage to the monitor or electric shock Do not place any objects containing liquid on top of the appliance The non adherence to this instruction could lead to damage to the monitor...

Страница 10: ...ls have no effect on the performance of the appliance Avoid using the television in temperatures below 5 C 41 F A still image left on the screen for too long can lead to permanent damage to the Plasma...

Страница 11: ...11 ACCESSORIES 1 x Electricity cable 1x Instruction manual 1 x Remote control 2 x Alkaline batteries for the remote control 1 x Foot stand 1 x Service guarantee card...

Страница 12: ...s Guide 1 If not assembled screw the bar into the foot stand see Diagram 2 Use screw type A 8x18 for this A screw Bar Stand base Stand Bar 3 Attach the foot stand to the appliance 4 B Screw in 4X30 5...

Страница 13: ...13 Fully insert the stand in the stand opening Tighten the screws SCREW...

Страница 14: ...1 Half SCART CVBS only input 3 SCART Euro connector Box 2 SCART2 Full SCART connector CVBS RGB input output Connection of a SCART Signal Euro cable from a video recorder or a DVD player 4 Optical digi...

Страница 15: ...s always activated depends on the select source So you can connect an external music amplifier to send stereo sound over bigger loudspeaker 8 Audio Input RCA red white Audio Input for Component source...

Страница 16: ...Executes function by OSD help commands when main OSD activated Decreases values of user menu when main OSD activated Volume Down Key Increases speaker headphone sound volume when no OSD activated Exe...

Страница 17: ...17 REMOTE CONTROL Remote Control Picture Works only if the TV supports DVB T Tuner...

Страница 18: ...when picture standard OSD is not activated Changes picture standard when picture standard OSD is activated 13 SSM Sound Standard Mode Displays sound standard when sound standard OSD is not activated C...

Страница 19: ...page 31 TTX REVEAL Reveals concealed information 32 TTX LIST FLOF Toggles LIST and FLOF mode 33 TTX Store Stores ROW24 page to non volatile memory in LIST mode 34 TTX Update Updates pages 35 TTX Time...

Страница 20: ...the Power key on the front panel Sometimes there is also a Power key on the back panel to switch the device completely OFF or into the standby mode Select Source Press Source button on the remote cont...

Страница 21: ...21 Volume Control Press VOL VOL button on the remote control to adjust the volume level Press MUTE button on the remote control when you need to cut the sound temporarily...

Страница 22: ...he main OSD menu First select Main menu item you need with CH CH button To select a main menu items just press VOL or ENTER button on the Remote Control 2 Sub Menu Each menu item has its own sub menu...

Страница 23: ...ENU button to display the main OSD menu 2 Select the picture main menu 3 Press ENTER to enter the sub menu 4 Select a favorite Picture mode with VOL VOL button Standard Movie Mild Custom Dynamic Stand...

Страница 24: ...Press ENTER to enter the sub menu 4 Select Custom and press ENTER button to enter the sub menu Then the custom sub mode appears 5 You will see the picture setting bars You can adjust each values of t...

Страница 25: ...25...

Страница 26: ...main OSD menu 2 Select the picture main menu 3 Press ENTER to enter the sub menu 4 Select the Colour Tone with CH CH button 5 Select a favorite colour Tone with VOL VOL buton WARM 1 2 Screen seems war...

Страница 27: ...y the main OSD menu 2 Select the picture main menu 3 Press ENTER to enter the sub menu 4 Select the Size with CH CH button 5 Select a favorite Size with VOL VOL button Auto Wide Wide Panorama Zoom 4 3...

Страница 28: ...ton to display the main OSD menu 2 Select the picture main menu 3 Press ENTER to enter the sub menu 4 Select the NR with CH CH button 5 Select a favorite NR with VOL VOL botton Low Middle High Off Low...

Страница 29: ...Press MENU button to display the main OSD menu 2 Select the Channel main menu 3 Press ENTER to enter the sub menu 4 Select the Country with CH CH button 5 Select your Country with VOL VOL button 6 Pre...

Страница 30: ...on on the remote control 3 Press ENTER to enter the sub menu 4 Select Auto Store with CH CH button and press ENTER button 5 Then you can start the tuning bar PDP LCD will execute auto program searchin...

Страница 31: ...Store 1 Press MENU button to display the main OSD menu 2 Select the Channel main menu with CH CH button on the remote control 3 Press ENTER to enter the sub menu 4 Select Manual Store and Press ENTER...

Страница 32: ...main OSD menu 2 Select the Channel main menu with CH CH button and press ENTER button 3 Select the Manual Store menu with CH CH button on the remote control 4 Select the Prog menu with CH CH button on...

Страница 33: ...ay the main OSD menu 2 Select the Channel main menu with CH CH button 3 Select the Manual Store menu with CH CH button and press ENTER button 4 Select the Colour System menu with CH CH button on the r...

Страница 34: ...n OSD menu 2 Select the Channel main menu with CH CH button on the remote control 3 Select the Manual Store menu with CH CH buttonand press ENTER button 4 Select the Sound System menu with CH CH butto...

Страница 35: ...Channel main menu with CH CH button and press ENTER button 3 Select the Manual Store menu with CH CH button on the remote control 4 Select the channel menu with CH CH button on the remote control 5 Yo...

Страница 36: ...lect the Channel main menu with CH CH button on the remote control 3 Select the Manual Store menu with CH CH button and press ENTER button 4 Select the Search menu with CH CH button on the remote cont...

Страница 37: ...nu 2 Select the Channel main menu with CH CH button on the remote control 3 Select the Manual Store menu with CH CH button on the remote control 4 Select the Store menu with CH CH button on the remote...

Страница 38: ...on the remote control 4 Press ENTER to enter the sub menu Then you can see the favorite program list 5 You can select a program with CH CH button on the remote control TO EDIT THE LIST You can INSERT...

Страница 39: ...ee the sort program list notice You can t see the sort program list on this picture since this picture isn t a real operating mode but a design mode 5 You can select a program with CH CH button on the...

Страница 40: ...n on the remote control 4 Press ENTER to enter the sub menu Then you can see the sort program list 5 You can change a program Name if you want to change the name of the program TO CHANGE THE PROGRAM N...

Страница 41: ...ning analog Channels 1 Press MENU button to display the main OSD menu 2 Select the Channel main menu with CH CH button on the remote control 3 Press ENTER to enter the sub menu 4 Select Fine Tune with...

Страница 42: ...SOUND on the remote control or by making a selection from the menu or you can select Custom which automatically recalls your personalized sound settings 1 Press MENU button to display the main OSD me...

Страница 43: ...main OSD menu 2 Select the Sound main menu with CH CH button on the remote control 3 Press ENTER to enter the sub menu 4 Select Volume and press ENTER button to enter the sub menu Then you can see the...

Страница 44: ...tput 1 Press MENU button to display the main OSD menu 2 Select the Sound main menu with CH CH button on the remote control 3 Press ENTER to enter the sub menu 4 Select Balance and press ENTER button t...

Страница 45: ...ain menu with CH CH button on the remote control 3 Press ENTER to enter the sub menu 4 Select Equalizer and press ENTER button to enter the sub menu Then you will see the Equalizer menu bars 5 Select...

Страница 46: ...1 Press MENU button to display the main OSD menu 2 Select the Sound main menu with CH CH button on the remote control 3 Press ENTER to enter the sub menu 4 Select Auto Volume 5 You can select On Off...

Страница 47: ...1 Press MENU button to display the main OSD menu 2 Select the Sound main menu with CH CH button on the remote control 3 Press ENTER to enter the sub menu 4 Select the Sound Mode 5 Select the Sound Mo...

Страница 48: ...n OSD menu 2 Select the Setup main menu with CH CH button on the remote control 3 Press ENTER to enter the sub menu 4 Select Reset and press ENTER button to enter the sub menu 5 If you want to reset y...

Страница 49: ...Setup main menu with CH CH button on the remote control 3 Press ENTER to enter the sub menu 4 Select Time and press ENTER button to enter the sub menu Then you will see the time menu 5 Select Clock b...

Страница 50: ...the main OSD menu 2 Select the TIME main menu with CH CH button on the remote control 3 Press ENTER to enter the sub menu 4 Selet On Timer by pressing VOL button 5 Move the cursor by pressing VOL VOL...

Страница 51: ...the main OSD menu 2 Select the TIME main menu with CH CH button on the remote control 3 Press ENTER to enter the sub menu 4 Select Off Timer by pressing VOL button 5 Move the cursor by pressing VOL VO...

Страница 52: ...tically Available only when the Time is set and On Time is ON 1 Press MENU button to display the main OSD menu 2 Select the TIME main menu with CH CH button on the remote control 3 Press ENTER to ente...

Страница 53: ...ally Available only when the Time is set and On Time is ON 1 Press MENU button to display the main OSD menu 2 Select the TIME main menu with CH CH button on the remote control 3 Press ENTER to enter t...

Страница 54: ...rman Italian Spanish Portuguese Netherlandish Slovene 1 Press MENU button to display the main OSD menu 2 Select the Setup main menu with CH CH button on the remote control 3 Press ENTER to enter the s...

Страница 55: ...1 Press MENU button to display the main OSD menu 2 Select the Setup main menu with CH CH button on the remote control 3 Press ENTER to enter the sub menu 4 Select OSD Tone 5 Adjust OSD Tone level wit...

Страница 56: ...en 1 Press MENU button to display the main OSD menu 2 Select the Setup main menu with CH CH button on the remote control 3 Press ENTER to enter the sub menu 4 Select Blue 5 You can select On Off with...

Страница 57: ...play the main OSD menu 2 Select the Setup main menu with CH CH button on the remote control 3 Press ENTER to enter the sub menu 4 Select TTX Group 5 Chice the TTX Group with VOL VOL butten West Europe...

Страница 58: ...58 PICTURE PC Picture 1 Press MENU button to display the main OSD menu 2 Select the picture main menu 3 Press ENTER to enter the sub menu 4 Select a favorite VOL VOL button...

Страница 59: ...ture main menu 3 Press ENTER to enter the sub menu 4 Select Custom and press ENTER button to enter the sub menu Then the custom sub mode appears 5 You will see the picture setting bars You can adjust...

Страница 60: ...r Tone 1 Press MENU button to display the main OSD menu 2 Select the picture main menu 3 Press ENTER to enter the sub menu 4 Select the Colour Tone with CH CH button 5 Select a favorite Colour Tone wi...

Страница 61: ...utton to display the main OSD menu 2 Select the picture main menu 3 Press ENTER to enter the sub menu 4 Select Colour Tone and press ENTER button to enter the sub menu Then the Colour Tone sub mode ap...

Страница 62: ...ess MENU button to display the main OSD menu 2 Select the picture main menu 3 Press ENTER to enter the sub menu 4 Select the Size with CH CH button 5 Select a favorite Size with VOL VOL button 6 Press...

Страница 63: ...y the main OSD menu 2 Select the picture main menu 3 Press ENTER to enter the sub menu 4 Select PC and press ENTER button to enter the sub menu Then you will see the sub menu of PC 5 Select the Auto A...

Страница 64: ...OSD menu 2 Select the picture main menu 3 Press ENTER to enter the sub menu 4 Select PC and press Enter button to enter the sub menu Then PC sub mode appears 5 You can adjust each values of the PC se...

Страница 65: ...65...

Отзывы: