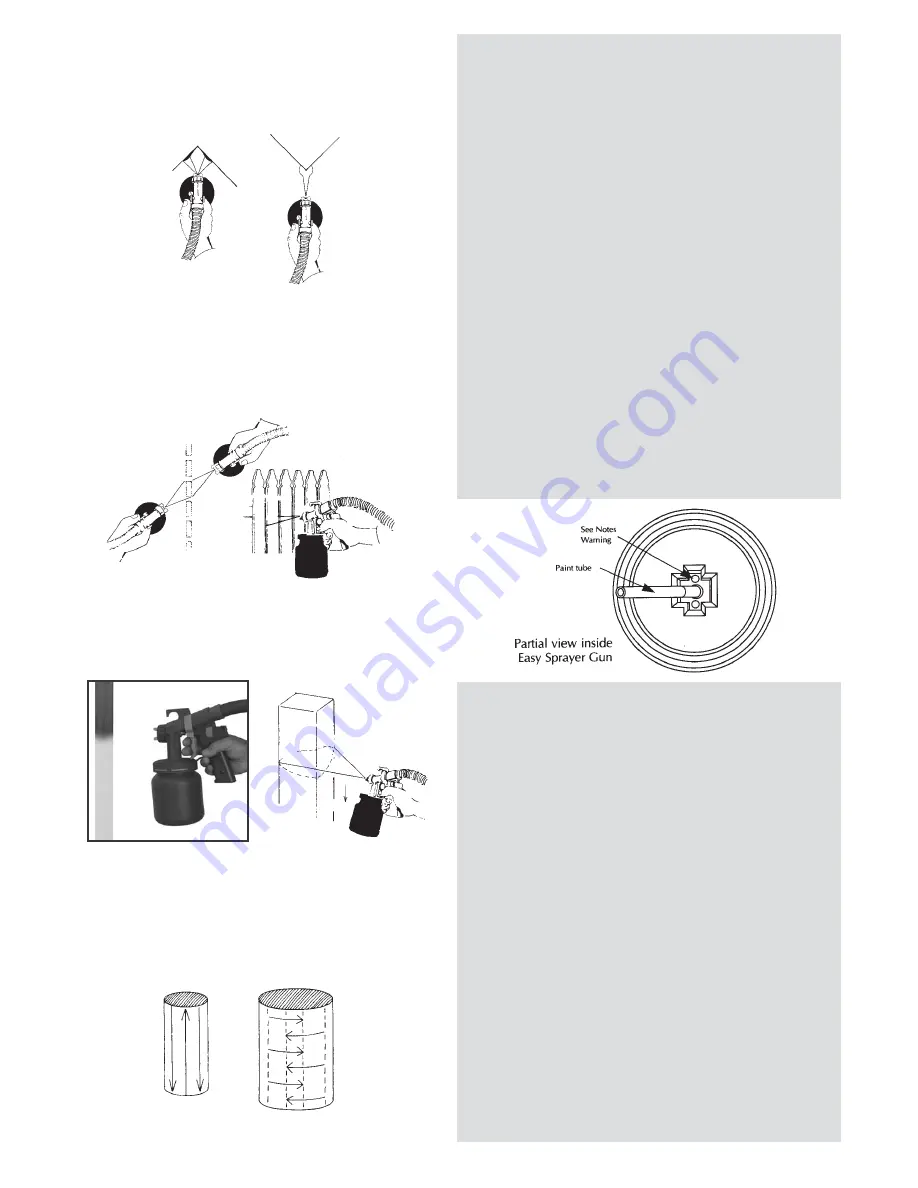
Spraying Corners
Holding the gun pointed at the corner, spray both
surfaces at once. This reduces overspray falling on
adjacent surfaces.
Spraying picket fences and open work
Place a large piece of cardboard behind the fence to
catch any spray passing through. Spray each picket at an
angle to cover the front and one edge, then from the
other side spray the back plus the other edge.
Spraying slender work
Screw in the paint control to achieve the narrow spray
pattern and spray two adjacent surfaces at once.
Spraying round work
For cylinders up to about a metre high and wide, spray up
and down using a horizontal spray pattern. For larger
cylinders spay around the cylinder in sections using a
vertical spray pattern. (See "Spraying long work").
CARE OF EQUIPMENT
- Paint tube should always be pressed firmly into place.
- Ensure that lid washer is in place when replacing paint
container. Then twist paint container firmly into main gun body.
- Do not force paint adjustment screw. Forced adjustment is not
necessary and may damage the gun voiding the warranty.
Before attaching or detaching the paint container ensure that the
air supply and power are turned off. Keep the threads on the container
and spray gun clean to allow an airtight seal when the container is
screwed into place.
IMPORTANT:
Clean the gun immediately after use as follows:
Turn off the air supply, remove and empty the paint container.
Hold the gun with paint tube over a paint container and
squeeze the trigger, this will allow paint in paint tube to run out.
Use the appropriate solvent for the paint and a rag or brush, clean the
paint tube, inside surfaces of the lid, the paint container, the air cap and
the nozzle. Remove the retaining nut being careful not to damage any
of the holes in the air cap or nozzle. If holes have become clogged,
never use a wire or other metallic instrument to clear them: they are
drilled to precision tolerance and any enlargement or distortion by the
abrasive action of an instrument will permanently affect the spray
pattern and void the warranty.
Replace the air cap and retaining unit. Place a small quantity of
solvent in the container, and spray through until clean. Wipe all
excess paint from the gun and wipe over the blower unit.
A further requirement may be to clean the hole situated inside the
gun (see below).
This hole, through prolonged periods of intermittent use may clog
up with dry paint making spraying very difficult. Ideally use solvent
or long piece of timber dowel, being careful not to damage or enlarge
the hole.
Note:
Periodic inspection for efficient and problem free work is
required in this area.
Before putting the spray gun away, place a drop of oil on the
shank of the needle between the trigger and the front of the gun.
Inspect the lid washer to ensure that it is in place and undamaged.
Replace, if it becomes perished or distorted.
The spraygun needle assembly must always be clean. Paint allowed to
dry will block the flow of paint and produce a poor or no spray pattern
at all. To Clean the needle assembly remove the air cap and screw, the
fluid tip is now visable (brass tapered nut with central hole), using a
18mm ring spanner or socket unscrew anticlockwise, the needle tip
and fluid tip can now be throughly cleaned.
Note:
Paint left to dry in the spraygun is not covered under warranty.
This is the responsibility of the operator.
CAUTION
Always use a respirator when spraying toxic paint
If in doubt contact the paint manufacturer to ascertain if a respirator is required.
DON'T
1.
Dismantle the rest of the gun more than is necessary.
This only causes excessive wear on threads and other parts.
2.
Immerse the whole gun in solvent or thinners. This removes oil,
causes packing glands to dry out and the lid washer as well.
3.
Drop the gun and expect it to be unaffected. If you do have such an
accident, carefully check the spray pattern to see that the
nozzle assembly had not been damaged.
The power unit is sealed at the factory. for safety reasons, electrical repairs should
only be performed by qualified technicians. Defective units should be returned to
GEPRO Approved Repair Agent.
6


