3
1.3 Front View & Rear View
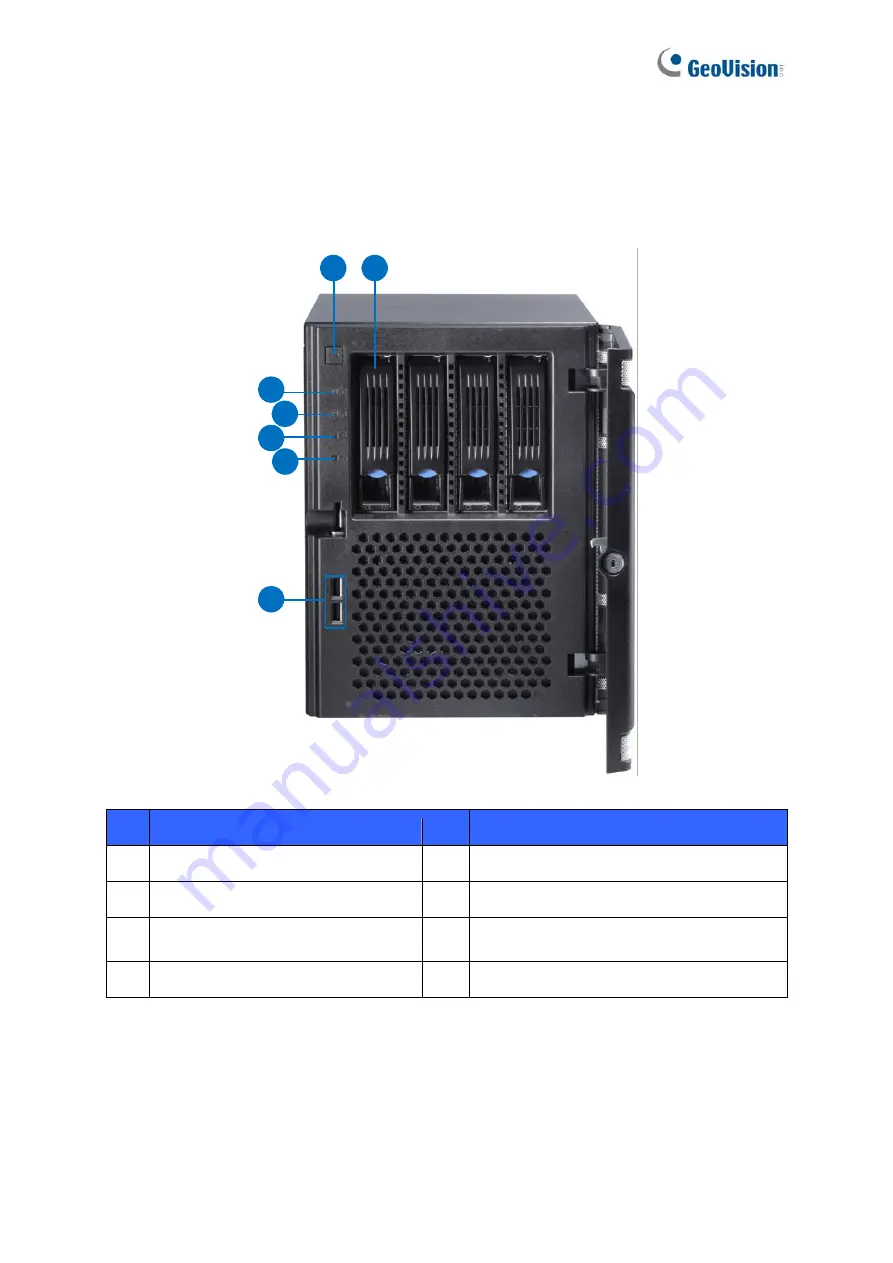
Front View
1
2
4
5
6
7
No. Name
No.
Name
1.
3.5” HDD Tray x 4
5.
Not Functional
2.
Power Button
6.
Reset Button
3.
Power LED (Blue)
7.
USB (3.2 Gen 1) Port x 2
4.
HDD Activity LED (Red)
Страница 1: ...tem V2 Rev D This guide is designed to assist the new user in getting immediate results from the GV Tower System V2 Rev D For advanced information on how to use the GV Tower System V2 Rev D please ref...
Страница 2: ...ons No liability is assumed for incidental or consequential damages arising from the use of the information or products contained herein Features and specifications are subject to change without notic...
Страница 3: ...Path 12 4 1 2 Adding IP Video Devices 14 4 1 3 Renaming the Camera 16 4 1 4 Choosing Recording Mode 17 4 1 5 Changing Recording Resolution 18 4 2 Setting Up a Recording Schedule 19 4 3 Playing Back V...
Страница 4: ...VMS System V2 Rev D x 1 Key for Hard Disk Safety Lock x 2 Hard Disk Drive Screw x 16 AC Power Cord x 1 Documents Download Guide x 1 1 2 Recommend Hard Drive For system efficiency we recommend the foll...
Страница 5: ...3 1 3 Front View Rear View Front View 1 2 3 4 5 6 7 No Name No Name 1 3 5 HDD Tray x 4 5 Not Functional 2 Power Button 6 Reset Button 3 Power LED Blue 7 USB 3 2 Gen 1 Port x 2 4 HDD Activity LED Red...
Страница 6: ...Name No Name 1 Power Connector 6 USB 3 2 Port x 2 2 Audio Jack x 3 Line In Blue Line Out Front Speaker Out Green Mic In Pink 7 PS 2 keyboard mouse port 3 Not functional 8 DisplayPort x 1 4 USB 2 0 Po...
Страница 7: ...twork 3 Connect speakers to the Audio Line Out port 4 Connect the mouse and keyboard to the USB port either USB 2 0 or USB 3 2 port or the PS 2 mouse keyboard port 5 Using the supplied power cord conn...
Страница 8: ...trol The optional GV IR Remote Control provides easy control of GV Tower NVR VMS System V2 Rev D Its receiver should be plugged into any USB ports of the system For details see GV IR Remote Control Us...
Страница 9: ...ves for video and audio data storage Before recording ensure to install your hard drives Follow the below steps to install the hard drive 1 Press the release latch The drawer handle pops up 2 Pull out...
Страница 10: ...ystem V2 Rev D and push the latch until it locks 7 When the Power LED on the drawer shines blue the hard drive is now ready to use To format the hard drive see 3 4 Formatting the Hard Drive in GV Towe...
Страница 11: ...tallation The Windows setup is preparing your computer for first use 1 After the Windows starts this setup screen appears Select your language and click Next to continue 2 Select your regional setting...
Страница 12: ...hen the above setup process is complete Windows will finalize your settings automatically in the background and restart IMPORTANT In case that you cannot access Windows operating system and restore it...
Страница 13: ...screen divisions 9 Access remote applications 3 Select a camera for full screen mode 10 Camera Name 4 Start stop recording 11 Date Time Storage Space 5 Set up recording schedules 12 Status indicators...
Страница 14: ...art button click GV NVR and select Hot Swap HDD Tool The MediaMan Tools window appears 2 If a hard drive is already inserted right click it in the MediaMan Tools window select Add for recording and th...
Страница 15: ...4 Click OK to automatically configure the hard drive to the recording path 5 In the MediaMan Tools window if the hard drive is successfully added to store data its Status field should display Standby...
Страница 16: ...g an IP camera in the system 1 On the main screen click the Configure button select System Configure and click IP Camera Install 2 To automatically add an IP camera on the LAN click Scan Camera To man...
Страница 17: ...lution setting on GV IP camera Camera list Select a camera number Port Keep or modify the default video streaming port 10000 Stream Type You may have the option of single or dual streaming depending o...
Страница 18: ...should display Connected Click OK For details refer to Hybrid and NVR Solution Chapter 2 GV DVR User s Manual on Software DVD C UserManual 4 1 3 Renaming the Camera 1 Click on the main screen click Sy...
Страница 19: ...ure 2 From the Camera Name drop down list select one camera 3 In the Rec Control field select Rec Video and use the drop down list to select Motion Detect Round the Clock or Day Night 4 If you select...
Страница 20: ...vidually 1 Click on the main screen click System Configure and select IP Camera Install 2 Right click the camera and select Change Resolution 3 Select the desired video resolution from the drop down l...
Страница 21: ...reen and select Schedule Edit 2 Select or enter the Start and End time of the schedule 3 Select day s 4 Select Rec and use the drop down list to select Round the Clock or Motion Detect for recording m...
Страница 22: ...me 1 Click on the main screen and select Video Audio Log 2 Select the camera you wish to view 3 Select a date folder from the date tree 4 Select a time from the Video Events list 5 Click to begin play...
Страница 23: ...top 11 Frame by Frame Real Time Playback 5 Play 12 Playback Scroll 6 Frame by Frame Forward 13 Audio on off 7 Forward to End Using the Zoom Zoom in Click the Zoom in button and then click on the area...
Страница 24: ...er the Start Time and End Time for backup 7 Select the desired camera s for backup The number of video and audio files of each camera is indicated respectively e g Camera 3 39 0 means the camera 3 has...
Страница 25: ...23 Playback Controls Open the backup folder run EZViewLog500 exe and then follow the instructions in the Play Back Video section...
Страница 26: ...hide volume indicator and set up Object Index Configure Set up camera recording system schedule video processing and I O devices Content List Access live view layout camera list I O device list and P...
Страница 27: ...A To add a new folder in the first storage group click the Add button on the right pane and select a folder Each partition can only contain 1 storage folder e g only 1 folder in D drive B To add a ne...
Страница 28: ...ears automatically after you launch the system 1 Click Automatic Setup to see the list of IP cameras detected on the LAN 2 The default login information for cameras is admin admin Double click the cam...
Страница 29: ...nactive Camera The camera is inactive Click the checkbox to connect Started Monitoring The camera is under monitoring Pre Rec Enabled Pre recording is enabled 4 To adjust camera settings click the Set...
Страница 30: ...ttings Click the Setup button of an active camera in the IP Device List Home Toolbar Configure Camera Install In the Video Setting you can change the camera name the display ration and resolution of t...
Страница 31: ...bar and selecting Content List 3 Click Layout in the Content List click the Add button and select Add Layout to create a new layout or select Import from Live to import existing layouts from live view...
Страница 32: ...s You can scroll the mouse to zoom in and out on the timeline 7 Use the playback control buttons to play back recordings Place the cursor on the buttons to see the name of the function For details ref...
Страница 33: ...iles using Hard Disk CD DVD BD or OS Burning The supported software for burning to CD DVD BD is Nero Burning Rom version 9 or before 4 To include the ViewLog player to the backup files select Include...
Страница 34: ...rding files saved on the GV Tower NVR VMS System V2 Rev D since it only reformats the partition C and all your files are still stored on other partitions 1 Remove or turn off the power of any connecte...
Страница 35: ...tition you want to recover click Start Restore and click Yes when the following message appears to start restoring 8 Once the restoration is complete click Finish to leave the recovery system and rest...