Overview
15
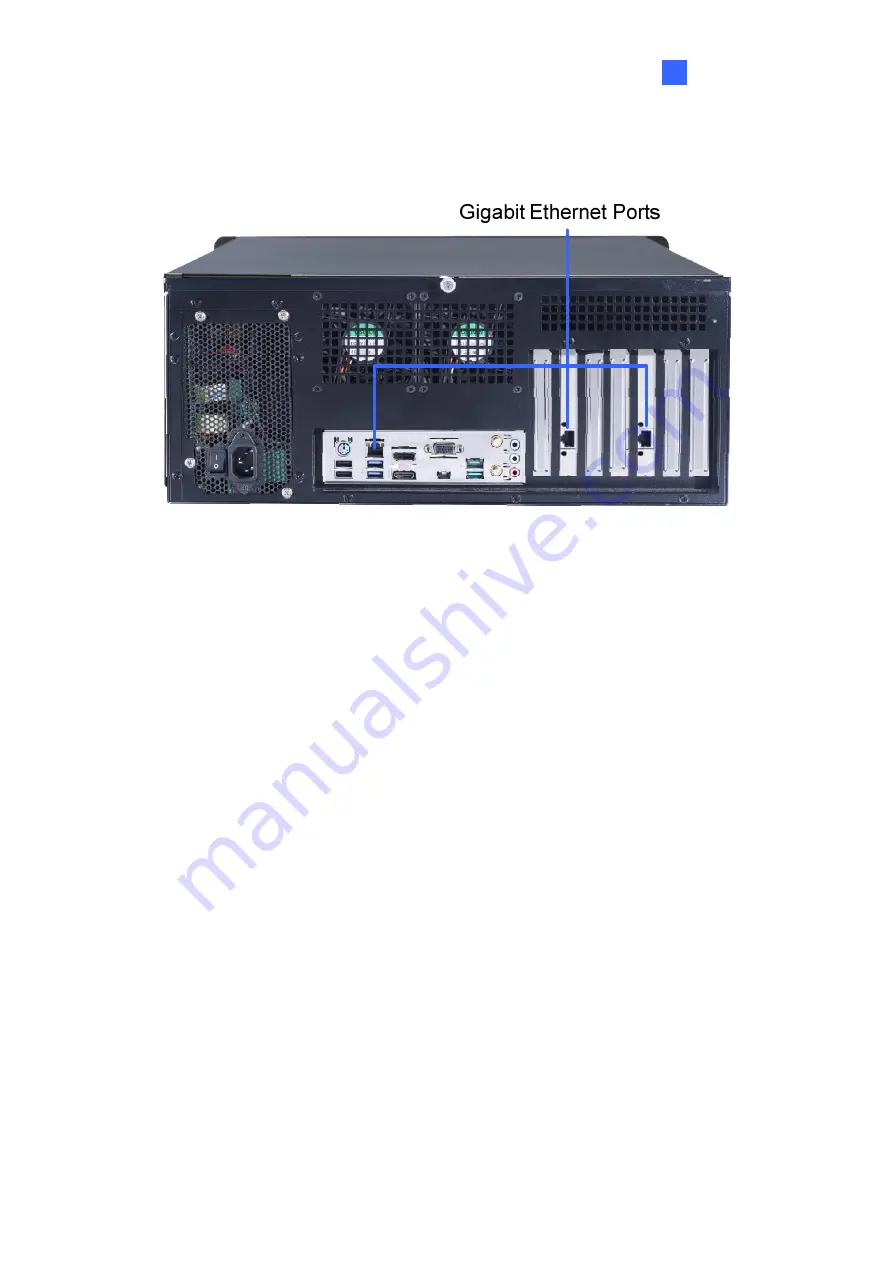
2
2.3.1.2
GV-Hot Swap Recording Server System
Figure
2-7
For details on the other features of the motherboard and power supply on the rear panel, see Figure 2-6.
Страница 1: ...GV Hot Swap Surveillance System V5 Rev E DVRHV5E UM AA User s Manual...
Страница 2: ...assumes no responsibility for errors or omissions No liability is assumed for incidental or consequential damages arising from the use of the information or products contained herein Features and spec...
Страница 3: ...V5 Chapter 1 Introduction Identifies the GV Hot Swap Surveillance System V5 s accessories and options Chapter 2 Overview Identifies the GV Hot Swap Surveillance System V5 s components Chapter 3 Getti...
Страница 4: ...iew 7 2 1 Front View 7 2 1 1 4U 20 Bay Models 7 2 1 2 3U 16 8 Bay Models 8 2 2 LED Panel View 9 2 2 1 4U 20 Bay 3U 16 Bay Models 9 2 2 2 3U 8 Bay Models 10 2 3 Rear View 11 2 3 1 4U 20 Bay Models 11 2...
Страница 5: ...1 5 Setting Pop up Positions 48 3 11 6 Setting Live View with Pop up Alert 49 3 12 Extended Installation 50 3 12 1 GV Keyboard V3 50 3 12 2 GV IR Remote Control 51 3 12 3 I O Devices 52 3 12 4 Gigabit...
Страница 6: ...l for the hardware introduction and installation and see the GV DVR NVR User s Manual and GV VMS User s Manual from C User Manual for the software operation 3 For the users of GV Hot Swap Recording Se...
Страница 7: ...I Disk J Disk K Disk L Disk M Disk N Disk O Disk P Disk Q Disk R Disk S Disk T Disk U Disk V Disk W 20 Bay Models 2 Before recording you need to divide your hard disks into 4 8 storage groups and each...
Страница 8: ...type plug A grounding plug has two blades and a third grounding prong The third prong is provided for your safety If the provided plug does not fit into your outlet consult an electrician for replacem...
Страница 9: ...5 GV VMSH Pro GV VMSH V5 GV 32 channel digital video recorder Has the options of 4U 20 bay and 3U 16 8 bay hot swap SATA drive bays Extends compatibility to GeoVision IP Devices only GV VMSH V5 up to...
Страница 10: ...GV Hot Swap Recording Server System 1 2 Packing List The GV Hot Swap Surveillance System V5 package includes the following items If any of the items are missing or damaged contact your dealer to arra...
Страница 11: ...ls from GV IP Devices Maximum License 64 channels from third party IP devices GV IP Devices Only GV VMS Pro license required 32 ch per license Increment for Each License GV 3rd Party IP Devices 2 lice...
Страница 12: ...rd Disks For system efficiency we recommend the following enterprise level hard disk drives Avoid using desktop level or green HDD which may affect system efficiency Seagate Enterprise Series WD Gold...
Страница 13: ...12 point relay outputs this card can expand the GV Hot Swap NVR V5 up to 16 alarm outputs This device is not supported by Recording Server GV Data Capture V3 Box GV Data Capture V3 Box can integrate t...
Страница 14: ...k Card can support a single gigabit port The number of gigabit ports supported varies based on models and combination of optional cards Up to 3 gigabit ports can be supported For details see 3 14 5 Gi...
Страница 15: ...2 1 Front View 2 1 1 4U 20 Bay Models Figure 2 1 No Name No Name 1 USB 3 1 Gen 1 Port x 2 5 HDD Group A 2 Power Button 6 HDD Group B 3 Reset Button 7 HDD Group C 4 LED Panel See 2 2 LED Panel View for...
Страница 16: ...o Name No Name 1 USB 3 1 Gen 1 Port x 2 5 HDD Group A 2 Power Button 6 HDD Group B 3 Reset Button 7 HDD Group C 4 LED Panel See 2 2 LED Panel View for details 8 HDD Group D 2 1 2 2 8 Bay Models Figure...
Страница 17: ...ilure Alert LED The LED shines when damages occur to any HDD in the RAID set 5 HDD Group C LED The LED does not have any function 6 HDD Group D LED The LED does not have any function 7 System Alert LE...
Страница 18: ...ed 4 System Alert LED The LED shines and the system sounds on if one fan stops or the GV Hot Swap Surveillance System V5 is overheated 5 Alarm Mute Button Press this button to silence the alarm when t...
Страница 19: ...Input Full Range 12 RJ 11 Port 3 USB 2 0 Port x 2 13 I O Terminal Block 4 USB 3 1 Gen 1 x 2 14 Audio Line In Port 5 HDMI Port 15 VGA Port 6 USB Type C Port 16 DisplayPort 7 USB 3 1 Gen 2 x 2 17 Gigabi...
Страница 20: ...Overview 15 2 2 3 1 2 GV Hot Swap Recording Server System Figure 2 7 For details on the other features of the motherboard and power supply on the rear panel see Figure 2 6...
Страница 21: ...RJ 11 Port 3 USB 3 1 Gen 1 x 2 12 I O Terminal Block 4 HDMI Port 13 Audio Line In Port 5 USB Type C Port 14 VGA Port 6 USB 3 1 Gen 2 x 2 15 DisplayPort 7 Not Functional 16 Gigabit Ethernet Port 8 Aud...
Страница 22: ...ap Recording Server System Only 16 Bay Model Figure 2 9 For details on the other features of the motherboard and power supply on the rear panel see Figure 2 8 Note There is no 3U 8 bay model for GV Ho...
Страница 23: ...onitor using the HDMI VGA DisplayPort cable supplied by the monitor manufacturer 2 Connect one end to the AC input and the other end to the power outlet using the supplied power cord 3 Connect the key...
Страница 24: ...ted 19 3 Connecting to 3 Monitors You can connect up to 3 monitors to the ports labeled below on the back panel of the GV Hot Swap Surveillance System V5 Here we use the 3U 16 bay model as the example...
Страница 25: ...urn on the GV Hot Swap Surveillance System V5 To turn on the power follow these steps 1 Turn on the monitor Power On Figure 3 3 2 For 4U 20 bay models turn on the AC power switch on the rear panel fir...
Страница 26: ...the Quick Start Guide GV Hot Swap VMS System pops up the Automatic Setup dialog box To add an IP camera to the system see Adding IP Cameras to GV VMS Chapter 6 in the Quick Start Guide GV Hot Swap Rec...
Страница 27: ...ng the Hard Drive for details 1 Slide the release latch to the right The drawer handle pops up Figure 3 6 2 Pull out the drive drawer 3 Insert the hard drive in the drawer 4 Secure the hard drive with...
Страница 28: ...he Windows setup is preparing your computer for first use 1 After the Windows starts this setup screen appears Select your language and click Next to continue Figure 3 8 2 Select your regional setting...
Страница 29: ...Use Express settings for your Windows 10 installation 5 Type your account name It is recommended that you create a password for your account and click Next Figure 3 10 When the above setup process is...
Страница 30: ...sure to install each of your hard drives separately for formatting Do not install and format more than one hard drive at a time Depending on the model of your choices install and format the hard drive...
Страница 31: ...nt window appears 2 On the main page of Disk Management the Initialize Disk dialog box appears for the new drive Click the created disk and select a partition style Figure 3 12 3 Click OK The created...
Страница 32: ...rted 27 3 5 The New Simple Volume Wizard appears Click Next to continue Figure 3 14 6 The default partition size is the same as the maximum disk space Make changes if necessary Click Next to continue...
Страница 33: ...drive path that is not in use by other devices and click Next to continue Figure 3 16 Note The default drive path starts from D 8 Type a name in the Volume label box ex HDD1 and click Next to continu...
Страница 34: ...29 3 9 When the formatting is complete click Finish to close the wizard Figure 3 18 10 When the drive is successfully initialized partitioned and formatted its status description should display Healt...
Страница 35: ...U Disk V Disk W 20 Bay Models Figure 3 20 For the users of GV Hot Swap NVR VMS System create 4 storage groups and assign the specified hard drives and camera channels in the storage group according to...
Страница 36: ...he storage group according to the tables below Take the 4U 20 bay model as an example you should assign hard drive D F H to Storage Group 1 and then assign camera 01 16 to be recorded in Storage Group...
Страница 37: ...oup click the Add button in the top left corner The first storage group is created by default 4 To assign hard drives to a storage group click the Add button above Path and select folders to be assign...
Страница 38: ...e a storage group click the Add Storage Group icon The first storage group is created by default 3 To assign hard drives to a storage group click the Add New Path icon and select folders to be assigne...
Страница 39: ...reated by default 3 To assign hard drives to a storage group click the Add button above Storage Path and select folders to be assigned to the storage group 4 To assign cameras to a storage group type...
Страница 40: ...reen provides a quick indication of the activity status of hard disk drives Figure 3 25 LED Color Description Gray No HDD is assigned to this LED GV System is not started Green A HDD is assigned to th...
Страница 41: ...m 3 By default only the hard disk drive F will be assigned to LED If you want to re assign the hard disk drive or assign other drives to LEDs freely drag and drop the hard disk drive to the desired LE...
Страница 42: ...y LED No 2 Figure 2 5 is off 2 Slide the release latch to the right The drawer handle pops up 3 Pull out the drawer slightly and wait until the hard drive spins down 4 Pull out the drawer completely r...
Страница 43: ...ly be assigned 192 168 0 200 All models 192 168 0 201 Only available for GV Hot Swap NVR VMS Recording Server System 192 168 0 202 Only available for GV Hot Swap Recording Server System The system sup...
Страница 44: ...otification area and select Open Network and Sharing Center Figure 3 29 2 Click Change Adapter Settings from the left hand side menu of the Network and Sharing Centre window 3 Under Network Connection...
Страница 45: ...an IP address automatically to enable dynamic IP address Figure 3 32 6 Click OK to finish the setting Note For models with multiple Ethernet ports it is recommended to assign IP channels received and...
Страница 46: ...key to open Control Panel 2 In the Control Panel window click Adjust Screen Resolution under the Appearance and Personalization section This dialogue box appears Figure 3 33 3 Click the Display list...
Страница 47: ...e live view monitor in the MultiCam tab select Monitor 1 from the Select Monitor drop down list 12 Click the desired application tab to move the application to the monitor For example select the ViewL...
Страница 48: ...lect Monitor If you have multiple monitors connected select the monitor you want to configure from the drop down list Position Offsets the position of the GV VMS window relative to the upper left corn...
Страница 49: ...ned pages with different screen divisions and channels for each monitor Pop up Alert You can be alerted by pop up live videos when motion is detected or I O devices are triggered 3 11 1 Activating Mul...
Страница 50: ...t Digital Matrix Setting This dialog box appears Figure 3 38 2 Use the Display list to select the monitor to be configured 3 Select Screen Division 4 Drag and drop the camera numbers to the desired po...
Страница 51: ...n 4 Select Screen Division 5 Drag and drop the camera numbers to the desired positions on the divisions To clear the assignment drag and drop the C icon to that position 6 Specify Dwell Time for how l...
Страница 52: ...Popup Dwell Time Specify the amount of time that a pop up live video remains in the foreground Popup Interruption Interval Specify the interval between camera pop ups This option is useful when severa...
Страница 53: ...e monitors are placed close to each other Example Camera 1 Camera 2 Camera 3 Camera 4 and Camera 5 are assigned for pop up alert on both Monitor 1 and Monitor 2 Monitor 1 is set at 4 screen divisions...
Страница 54: ...n 3 11 2 Setting Live View 2 To configure pop up alert in the upper left column click Event Popup Figure 3 40 appears 3 Configure Motion Trigger I O Trigger Popup Dwell Time and Popup Interruption Int...
Страница 55: ...r Supply 3 12 1 GV Keyboard V3 Note that this function is not supported by GV Hot Swap Recording Server System The optional GV Keyboard V3 is designed to operate the GV Hot Swap NVR VMS System exclusi...
Страница 56: ...closing the dialog box will cause GV Keyboard V3 to disconnect Figure 3 42 3 12 2 GV IR Remote Control Note that this function is not supported by GV Hot Swap Recording Server System The optional GV...
Страница 57: ...on is not supported by GV Hot Swap Recording Server System The GV Hot Swap NVR VMS System with built in GV NET IO Card provides 4 alarm outputs and 4 sensor inputs Relay Output 1 4 Com Sensor Input 1...
Страница 58: ...optional Network Cards supported varies with different models Refer to the table below 4U 20 bay and 3U 16 bay Models Maximum Optional Network Cards Total Gigabit Ports Supported GV NVRH V5 GV VMSH V...
Страница 59: ...mes with 2 modules for 3U models for 4U models Each module shares the loading of the power supply When one of the modules is down the other module can still support full power for the GV Hot Swap Surv...
Страница 60: ...y Access LED Glow green on both modules when the Redundant Power Supply is functioning Alarm LED Glow red on one module and green on the other accompanying the audio alarm s sound when the Redundant P...
Страница 61: ...ED Orange Glows when the power input is properly connected to the power supply Access LED Green Glows when the Redundant Power Supply is functioning Alarm LED Red Glows when the Redundant Power Supply...
Страница 62: ...If the modules are properly installed but the audio alarm continues to ring the module may be damaged and you may need to contact your distributor for a replacement To stop the ringing alarm sound pr...
Страница 63: ...files saved on the GV Hot Swap Surveillance System V5 since it only reformats the partition C and all of your files are still stored on other partitions 1 Remove or turn off the power of any connected...
Страница 64: ...ick Start Restore and click Yes when the following message appears to start restoring Figure 3 52 8 Once the restoration is complete click Finish to leave the recovery system and restart the Windows a...
Страница 65: ...ision will periodically update the GV System Software Multicam Surveillance System If you like to update your GV Hot Swap Surveillance System V5 contact your dealer for more information or check softw...
Страница 66: ...n help determine the cause A portable 2 5 HDD connected to the front panel cannot be detected When the portable 2 5 HDD connected to a GV Hot Swap Surveillance System V5 cannot be detected try this st...
Страница 67: ...3 If the problem persists consult your dealer GV Hot Swap Surveillance System V5 stops responding aka crashed or froze If your GV Hot Swap Surveillance System V5 is not responding to your clicking typ...
Страница 68: ...s linked files or invalid files or directories try these steps 1 Use the HD Tune utility to scan the hard disk for errors Follow these steps A Download and install HD Tune from http www hdtune com B C...
Страница 69: ...Management when the Computer Management window appears B Right click the desired hard disk and select Properties from the file menu to display the Properties window Figure 4 5 C Click the Tools tab in...
Страница 70: ...ttack GV Hot Swap Surveillance System V5 is designed and optimized for Windows 7 platform It may be vulnerable to newly created worms and exploits that attack any of the underlying operating system s...
Страница 71: ...HDD 8 2 5 3 5 HDD Internal Storage 64 GB SSD 64 GB SSD 64 GB SSD Ethernet NVR VMS RJ 45 10 100 1000 Mbps x 2 Video Output 3 displays VGA HDMI DisplayPort USB 2 0 Rear 2 ports USB 3 1 Gen 1 Front 2 Po...
Страница 72: ...iOS and Android WebCam Live View Max 32 channel Multi Views Max 200 channels connecting to GV Hot Swap NVR V5 System Monitoring and Recovery Power Restoration Automatic restart after power outage Mon...
Страница 73: ...5 x 580 mm 19 x 5 2 x 22 8 in 4U 20 bay 24 kg 52 8 lb 1 kg 2 2 lb 16 bay 19 kg 41 8 lb 1 kg 2 2 lb Net Weight 3U 8 bay 18 kg 39 6 lb 1 kg 2 2 lb Language GV NVRH V5 Type Arabic Bulgarian Czech Danish...
Страница 74: ...Note 1 The data for GV VMSH NVRH V5 was determined using the bit rate listed above and hard disks with average R W speed above 110 MB s 2 The H 265 codec is only supported by GV VMS V15 11 0 0 or late...
Страница 75: ...3 MP 2048 x 1536 640 x 480 30 fps 32 960 fps 4 MP 2560 x 1440 640 x 360 25 fps 32 800 fps 5 MP 2592 x 1944 640 x 480 30 fps 32 960 fps GV VMSH V5 Dual stream Resolution Video Resolution Stream 1 H 26...
Страница 76: ...x 1944 15 fps 27 405 fps 5 MP 2560 x 1920 10 fps 32 320 fps 8 MP 2896 x 2768 25 fps 12 300 fps 12 MP 4000 x 3000 15 fps 13 195 fps GV VMSH V5 Video Resolution Single Stream Resolution H 264 Max Frame...
Страница 77: ...15 fps 32 480 fps 5 MP 2560 x 1920 10 fps 32 320 fps 8 MP 3840 x 2160 30 fps 10 300 fps 12 MP 4000 x 3000 15 fps 14 210 fps GV VMSH V5 Video Resolution Single Stream Resolution H 264 Max Frame Rate Ca...
Страница 78: ...USB 3 1 Gen 1 Front 2 Ports Rear 2 Ports Connector USB 3 1 Gen 2 Rear 2 Ports 12 cm 4 3 4 3 units Fan 8 cm 3 1 8 2 units 4 units Power Output 1000 W Input 100 240 V AC 47 63 Hz 12 6 A Output 550 W Inp...
Страница 79: ...recorded video start keep days operation motion detection disk full disk error I O trigger recording failure disk removed SMS Notification No 2 Way Audio Yes only for GV IP Devices through active conn...
Страница 80: ...0 fps 5 7 Mbps 7 9 TB per 24 hr 20 bay 200 TB 200 TB 7 9 TB 25 days 16 bay 160 TB 160 TB 15 6 TB 10 days 4 MP 15 fps 11 75 Mbps 15 6 TB per 24 hr 20 bay 200 TB 200 TB 15 6 TB 12 days 16 bay 160 TB 160...
Страница 81: ...ailed information on the supported IP devices refer to Supported IP Camera List on GeoVision s Website http www geovision com tw GeoVision ACTi Arecont Vision AXIS Bosch Canon CNB D Link Etrovision Hi...
Страница 82: ...fferent networks 1 To set up multiple networks you need to install multiple network cards Each network card is assigned a different IP address and subnet mask 2 Organize IP channels and clients into g...
Страница 83: ...ution The second network card can transmit up to 64 channels in 2 M resolution For GV Hot Swap Recording Server System the recommended network allocation is illustrated as below The first network card...
Страница 84: ...an option if there is a Yes listed under the Network Cards columns GV NVRH V5 GV VMSH V5 has 2 gigabit ports by default and you can optionally add one more network card to have 3 gigabit ports in tota...
Страница 85: ...t try the following 1 Review troubleshooting sections in the documentation for software and peripheral devices 2 Try rebuilding the operating system and GV System Refer to 3 13 System Restoration 3 Co...
Страница 86: ...riginal carton using the original packing material or in equivalent packaging 3 The product shall be returned to GeoVision Taiwan at your expense for shipping and insurance costs BEFORE YOU DELIVER YO...
Страница 87: ...Company Name only if the product is owned by company Mailing Address City Town Province State Country Postal Code Telephone O H Fax E Mail Date of Purchase e g 16 APR 2012 Product Please check the mo...
Страница 88: ...3 Bar Code Shipment Date GeoVision Inc 9F No 246 Sec 1 Neihu Rd Neihu District Taipei Taiwan Tel 886 2 8797 8377 Fax 886 2 8797 8335 Email sales geovision com tw dvrsystem geovision com tw http www ge...