background image

Programming and Operation 


15

6

6.  Programming and Operation 

Function 

Procedure 

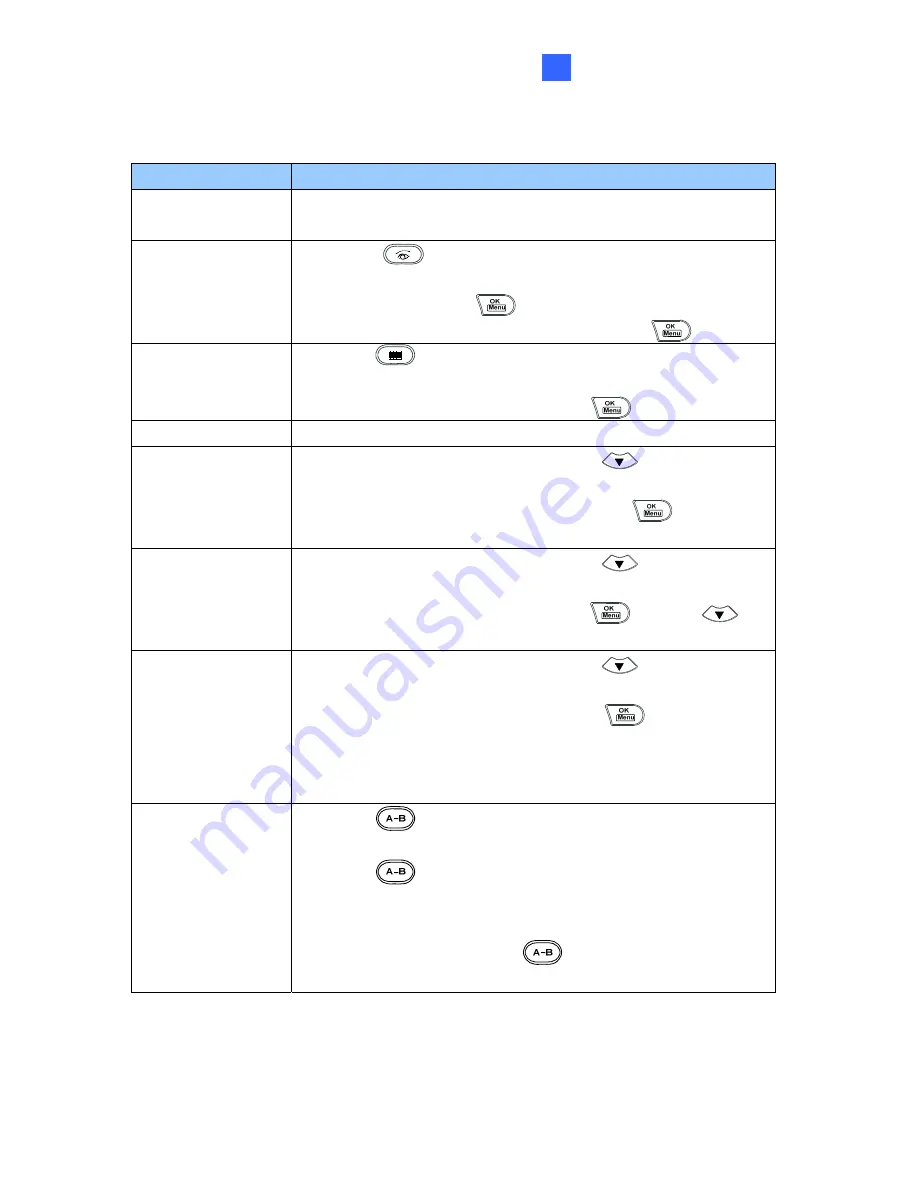
Getting started 

Press any key, and enter a password.   
(The default password is 

0000

.) 

Launching Main 
System  

1. Press 

.  

2.  When the message "Multicam System-Please Login!" appears 

on the screen, press

to open the Login dialog box. 

3.  Select a valid ID, enter a password, and press

Launching ViewLog 

1. Press

2.  When the Privilege Confirmation dialog box appears, select a 

valid ID, enter a password, and press

Changing DVR ID 

Press 

P1

, and enter a two-digit DVR ID. 

Changing password 

1. Press 

P2

, enter a password, and press

to browse LCD 

displays. 

2.  When "Password Change" appears, press 

and enter a 

four-digit password. 

Disabling/Enabling 
key beep 

1. Press 

P2

, enter a password, and press

to browse LCD 

displays. 

2.  When "Audio Setting" appears, press

and press


to enable/disable the key beep. 

Setting auto-lock 
period 

1. Press 

P2

, enter a password, and press

to browse LCD 

displays. 

2.  When "Auto Time Lock" appears, press

and enter an idle 

period after which the Keyboard is automatically locked.     

* The Keyboard can be used only if the correct password is 

entered. 

Setting A to B frame 
for auto-playing 

1. Press

. The message "A To B Mode (Set A)" appears on 

the screen. 

2. Press

again. The message "A To B Mode (Set B)" 

appears. ViewLog starts playing the set frames A to B 

repeatedly. 

* To stop the playing, press

. The message "A To B     

Mode (Cancelled)” will appear. 


Содержание GV-Keyboard

Страница 1: ...User s Manual V2 0 GV Keyboard Before attempting to connect or operate this product please read these instructions carefully and save this manual for future use...

Страница 2: ...this manual is accurate GeoVision is not responsible for printing or clerical errors GeoVision Inc 9F No 246 Sec 1 Neihu Rd Neihu District Taipei Taiwan Tel 886 2 8797 8377 Fax 886 2 8797 8335 http ww...

Страница 3: ...iple GV Systems 5 2 4 Wall Terminal Block 6 3 Installation 7 3 1 USB Driver 7 3 2 GV Keyboard Application 9 3 2 1 Defining Eight Function Keys 10 3 2 2 Printing Function Key Labels 10 4 ID Password Se...

Страница 4: ......

Страница 5: ...mmunications Operation of this equipment in a residential area is likely to cause harmful interference in which case the user will be required to correct the interference at their own expense CE Notic...

Страница 6: ...TOP F1 F2 F3 F4 F5 F6 F7 F8 Zoom In Zoom Out Focus In Focus Out Auto Focus Auto Preset Home OK Cancel Menu Speed Speed RX TX P1 P2 P3 P4 P5 1 1 Packing List GV Keyboard x 1 Power Adaptor AC Input 110...

Страница 7: ...the power adaptor 3 USB Port Connects to GV System 4 RJ 11 Port RS 485 The RJ 11 port carries RS 485 signals Through the wall terminal block it can connect up to 16 additional GV Systems 5 Terminal R...

Страница 8: ...em There are three ways to connect the Keyboard to one GV System by 1 USB Port 2 RJ 11 Port DC power required or 3 RS 232 Port DC power required GV System GV Keyboard Figure 2 USB cable and RJ 11 RS 4...

Страница 9: ...RS 485 RS 485 Connects to PC s Power Supply RS 232 COM port GV NET Card RS 485 RS 485 Connects to PC s Power Supply RS 232 COM port GV NET Card Wall Terminal Block RJ 11 Cable GV System 1 GV System 16...

Страница 10: ...2 4 Wall Terminal Block 1 6 Figure 4 Note When you are using the wall terminal block for connection the RS 485 and RS 485 cables should be attached to the terminal screws Pin 4 and Pin 3 respectively...

Страница 11: ...to connect the Keyboard to the GV System the Found New Hardware Wizard will automatically detect the device Ignore the Wizard and follow these steps to install the driver 1 Insert the Software CD It...

Страница 12: ...lose the dialog box 5 To verify that the driver is installed correctly go to Windows Device Manager In the Ports COM LPT field you should see the entry for Prolific USB to Serial Bridge Figure 7 Note...

Страница 13: ...lects the desired DVR ID for connection DVR Name Gives the login DVR a descriptive name Startup type Selects Manual or Automatic to run the controller at next startup PTZ Speed Adjusts PTZ speed Port...

Страница 14: ...p the PTZ camera first in Main System Figure 10 3 2 2 Printing Function Key Labels The Print Memo option allows you to print out the labels for the eight function keys F1 F8 so that you can paste them...

Страница 15: ...LY composed of digits 1 Click the Configure button and select Password Setup This displays the Password Setup dialog box Figure 12 2 Select a user from the user list and then check Export this ID for...

Страница 16: ...ED RX Red RX LED Receive TX Green TX LED Transmit P1 Changes DVR ID P2 Configures the Keyboard parameters including password key beep and auto lock period P3 Displays the firmwave version P4 5 Reserve...

Страница 17: ...Plays next events automatically Starts Stops recording Starts Stops the scheduled recording Goes to previous event Goes to next event Plays Pauses a video event Rewinds Pauses a video event Moves one...

Страница 18: ...e in ViewLog Increases the focus of PTZ camera in Main System Decreases the focus of PTZ camera in Main System Auto Focus Sets the PTZ camera for auto mode Moves the PTZ camera to the default position...

Страница 19: ...CD displays 2 When Password Change appears press and enter a four digit password Disabling Enabling key beep 1 Press P2 enter a password and press to browse LCD displays 2 When Audio Setting appears p...

Страница 20: ...module panels Output Device Forces output devices PTZ Camera Enables Disables PTZ camera Preset Go Auto Auto Pan AF Auto Focus and Hide PTZ Panel Monitor Starts Stops all or several cameras for monito...

Страница 21: ...vent 1 Press the and buttons to move back and forward on an OSD time Month Date Year Hr Min Sec 2 Use the numeric buttons to enter a desired time or press and to change the display time 3 Press the OK...

Страница 22: ...certain shortcut keys of other applications 1 Execute GvKeyTest exe from the GV System folder This dialog box appears Figure 16 2 Click the Test button If there are shortcut key conflicts a similar me...

Страница 23: ...Controller is consistent with the DVR ID See Changing DVR ID 6 Programming and Operation on page 15 Check that the COM port setting in Mulitcam Controller is correct See Step 5 of 3 1 USB Driver on p...

Страница 24: ...485 Connects to GV NET GV NET card RS 485 GV Hub or GV COM RS 232 9 600 bps Communication RS 485 9 600 bps DC IN DC 12V 1A Power RS 485 DC 12V Operation temperature 0 50 C Environmental Conditions Hum...

Отзывы: