background image


© 2022 GeoSLAM Ltd                                                  5                                     ZEB Vision User Guide v1.0 


3. 

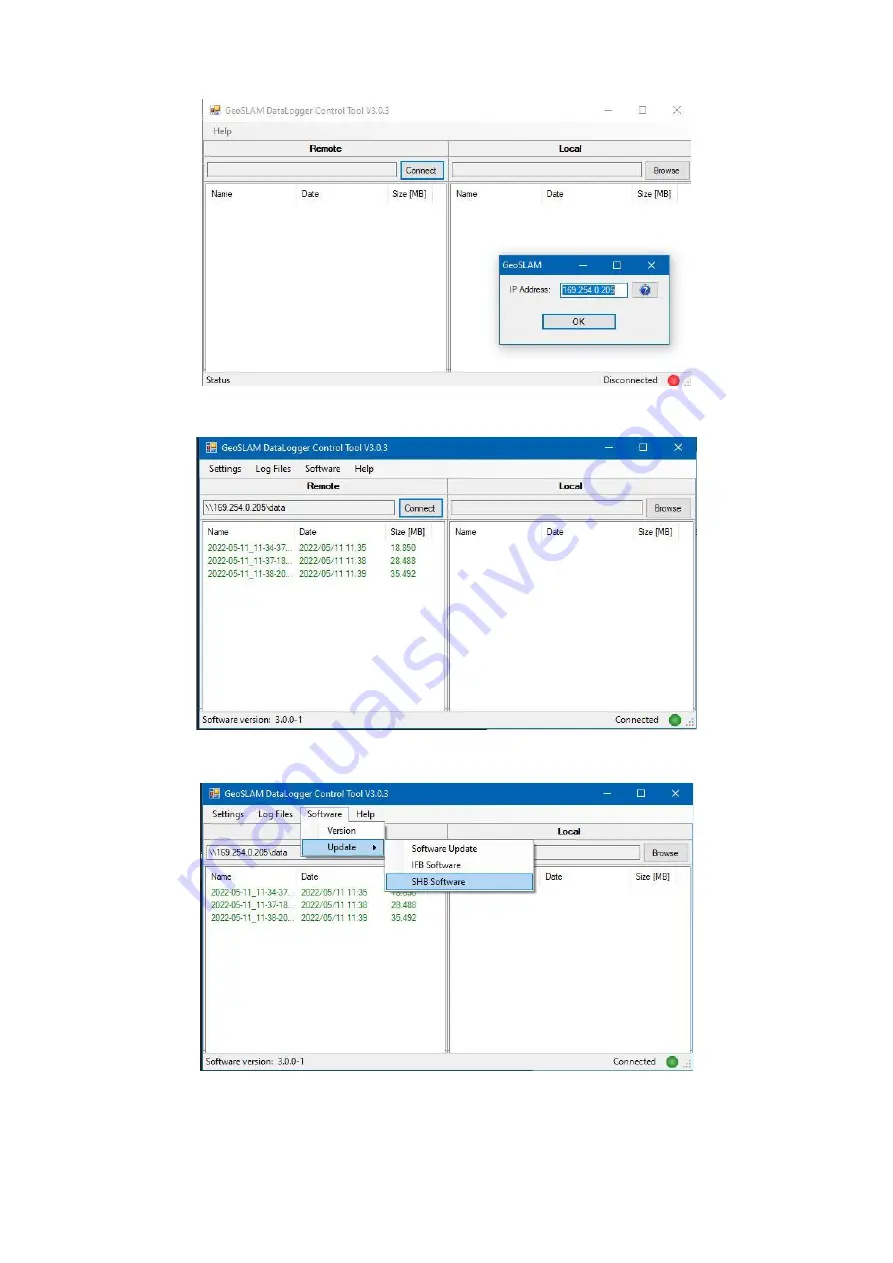
Click “Connect”, and then click on the “?” icon. The Datalogger’s IP address will be detected. 


4. 

Click “OK”. The Datalogger is now connected. 


5. 

Click on “Software, Update, SHB” 


6.  Choose the relevant update file. 


Содержание ZEB Vision

Страница 1: ... 2018 GeoSLAM Ltd 0 ZEB REVO RT User s Manual v1 0 3 Hardware User Guide ...

Страница 2: ...guide may cause harmful interference to radio communications Operation of this equipment in a residential area is likely to cause harmful interference in which case the user will be required to correct the interference at their own expense SOFTWARE IS PROVIDED AS IS To the maximum extent permitted by law the manufacturer GeoSLAM Ltd and its suppliers disclaim all warranties either express or impli...

Страница 3: ...2 List of Parts 3 3 SHB Firmware Update 4 3 1 ZEB Horizon Generation 1 Datalogger 4 3 2 ZEB Horizon Generation 2 Datalogger 4 4 Data Capture 7 4 1 Mounting and Installation 7 4 2 Collecting Data 9 4 3 Downloading Photos 9 4 3 1 Establishing a Connection 9 4 3 2 Downloading Images 11 ...

Страница 4: ...ly and accurately position panoramic photos on a point cloud for an interactive viewing experience Provided the simple guidelines set out in this manual are adhered to accurate 3D point clouds can be generated in a fraction of the time taken with traditional terrestrial laser scanning methods 2 List of Parts Along with the components in a standard ZEB Horizon system the ZEB Vision also includes th...

Страница 5: ...remove the USB from your machine 5 Power on your ZEB Horizon datalogger and wait for the status LED light to pulse red 6 Insert the USB into the datalogger The data LED will illuminate green to show the transfer of the firmware upgrade files 7 Once the data LED light has switched off remove the USB and power off the datalogger 8 Connect the ZEB Horizon scanner to the datalogger using the main cabl...

Страница 6: ...ZEB Vision User Guide v1 0 3 Click Connect and then click on the icon The Datalogger s IP address will be detected 4 Click OK The Datalogger is now connected 5 Click on Software Update SHB 6 Choose the relevant update file ...

Страница 7: ... 2022 GeoSLAM Ltd 6 ZEB Vision User Guide v1 0 7 Click Yes to continue 8 Click OK to begin the update process After the update has finished restart the Datalogger and the process is complete ...

Страница 8: ...o ensure the system is set up correctly for use Step 1 Remove the four rubber dampers from the back of the ZEB Horizon scanner Step 2 Attach the ZEB Vision camera to the back of the ZEB Horizon scanner using the captive screws provided in the mount The 3mm HEX key found in the screw accessory kit can be used to tighten these screws and secure the camera in place ...

Страница 9: ...EB Horizon scanner head Ensure the red dots are aligned before insert the cables Step 4 Insert one end of the main cable into the port on the side of the ZEB Horizon scanner head Insert the other end of the cable into the port on the ZEB Horizon datalogger Ensure the red dots are aligned before inserting the cables into the ports ...

Страница 10: ...ill be illuminated green when powered on For best practices on capturing data for colourisation please consult the guidance outlined on GeoSLAM Academy 4 3 Downloading Photos Insert one end of the ethernet cable into the back of the ZEB Vision camera and secure by tightening the screw Insert the other end of the cable into a PC which has the GeoSLAM Connect software downloaded 4 3 1 Establishing a...

Страница 11: ... 2022 GeoSLAM Ltd 10 ZEB Vision User Guide v1 0 Next select Internet Protocol Version 4 TCP IPv4 and click on Properties Set a fixed IP address of 192 168 0 100 ...

Страница 12: ...ork manager 4 3 2 Downloading Images Data from the ZEB Vision is stored on the internal data drive in the camera Images are stored in the format nnn_F_xxxxxx jpg and nnn_R_xxxxxx jpg where nnn is the image number F or R is the lens type either front or rear lens xxxxxx is the internal camera timestamp PTS ...

Страница 13: ...his to enable easier download of data in future Once connected you will be taken to the folder where all images are stored in the right hand panel In the left hand panel is the location on your PC where the data will be downloaded to Select the appropriate location on the left screen In the right hand panel select all of the images taken right click and choose to download and delete The images wil...

Отзывы: