background image

Zoom90 Series


- 4 -


Installation Guide 


© 2015 GeoMax AG, Widnau, Switzerland


2


B

ATTERY CHARGING


2.1


Z

OOM

90

 INSTRUMENT


Before  using the  instrument,  the  included  ZBA400  battery  should  be  charged.  Insert  the 

battery  into  the  ZCH201  charger  and  plug  the  adapter  into  an  AC  power  supply.  Do  not 

disconnect from power until the green FULL indicator flashes, indicating that the battery is 

fully  charged.  Once  charged,  insert  the  battery  into  the  side  cover  slot  of  the  Zoom90 

instrument and switch on. 


2.2


G

ETAC HANDHELD


The  Getac  handheld  is  supplied  in  a  cardboard  box  which  includes  the  handheld  device, 

battery  and  charging  adapter.  Insert  the  supplied  battery  into  the  handheld’s  battery 

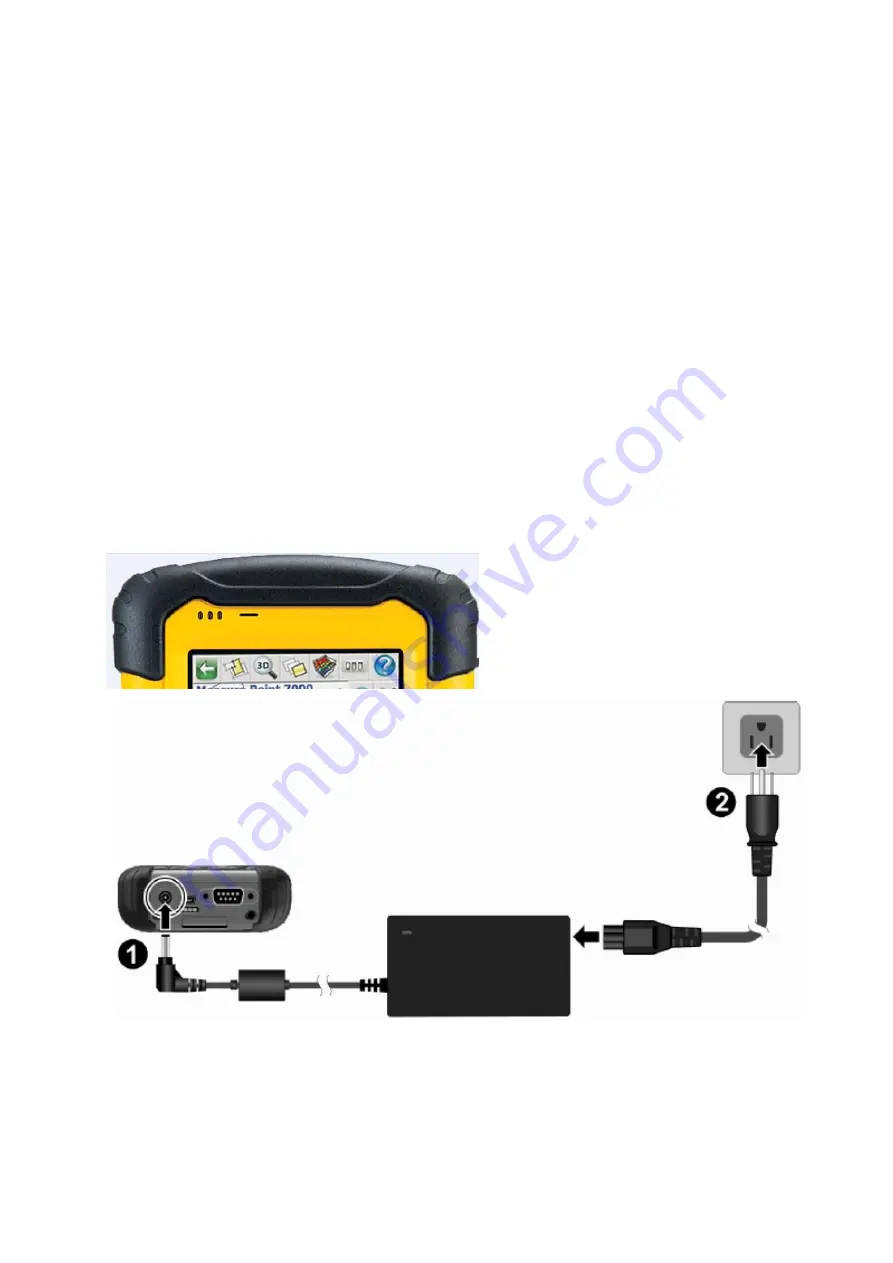
compartment. Charge the internal battery with the supplied adapter as shown  below. While 

charging, the circled indicator on the front of the GETAC glows amber. Do not disconnect from 

power until the indicator glows green, indicating that the battery is fully charged. 


www.rusgeocom.ru

Содержание Zoom90

Страница 1: ...Zoom90 Series 1 Installation Guide 2015 GeoMax AG Widnau Switzerland GeoMax TPS Zoom90 Series Installation Guide Version 1 3 English www rusgeocom ru ...

Страница 2: ...3 2 Uploading to the Instrument 3 3 Loading Licence Keys 3 4 Configuration of Long Range Bluetooth Handle 3 5 Installing USB drivers for the Zoom90 3 6 Installing 3rd Party Software onboard the instrument 4 PREPARATION OF THE HANDHELD 4 1 SETTING UP THE HANDHELD 4 2 Connecting to the PC 4 3 Installation of FieldGenius Layout Pro 4 4 Registration of FieldGenius Layout Pro 4 5 Connection to the inst...

Страница 3: ... this document For further information regarding the operation of the Zoom90 components please refer to the respective manuals The Zoom90 Quick Guide is included with the container set The comprehensive User Manual for the TPS instrument is available from the included Zoom90 CD and also from GeoMax Partner Area in the Zoom90 folder at www geomax positioning com The appropriate uses of the included...

Страница 4: ...lly charged Once charged insert the battery into the side cover slot of the Zoom90 instrument and switch on 2 2 GETAC HANDHELD The Getac handheld is supplied in a cardboard box which includes the handheld device battery and charging adapter Insert the supplied battery into the handheld s battery compartment Charge the internal battery with the supplied adapter as shown below While charging the cir...

Страница 5: ... page to see the version information If this version does not match the one available from GeoMax Partner Area then the instrument should be updated To customize the instrument for personel requirements the respective languages can be installed The required files can be obtained from GeoMax Partner Area in the Zoom90 Firmware folder and are in the following format Zoom90_EN fw The main OS and appl...

Страница 6: ...upgrading then install this first by selecting F1 Firmware Then install the language file by selecting F2 Language Note Ensure that fully charged batteries are inserted when uploading firmware This process can take some time and the power supply must NOT be interrupted during the loading process During the update process it could be that the instrument will automatically reboot a couple of times 3...

Страница 7: ...this component needs to be configured before use Replace the standard instrument handle with the ZRT82 Swing the antenna into the upright position To configure the handle choose MAIN MENU SETTINGS COMM If the handle is recognized then the option Bluetooth Handle ZRT82 should be enabled Now highlight this option and press the F6 OK button Your Zoom90 instrument is now ready to be used www rusgeocom...

Страница 8: ...ers will be needed if you want to make an ActiveSync or Window Mobile Device Center connection to install 3rd party software onto the unit To install the drivers do the following 1 With your Internet browser navigate to the GeoMax download page 2 Download the Zoom90 USB drivers 3 Make sure the Zoom90 is not connected to the PC 4 Run the SetupZoom90_USB_xx EXE 5 Follow the instructions on the scree...

Страница 9: ...ter If the instrument is properly connected run the EXE file and follow the instructions on the screen Note At the present time the most common applications working with the GeoMax Zoom90 instruments are MicroSurvey FieldGenius EXE file Start from Desktop PC LSE X Pad CAB file Start from Zoom90 Carlson Software SurvCE EXE file Start from Desktop PC 4 PREPARATION OF THE HANDHELD 4 1 SETTING UP THE ...

Страница 10: ...ersion of GeoMax Field Genius Layout Pro from from GeoMax Website at http www geomax positioning com Downloads htm cid 15613 Here the latest installation version and Release Notes of FieldGenius Layout Pro is available Download the Devices Installation and save onto your PC With the handheld connected to your PC run the installer file fieldgenius devices v v v v xxu exe where v v v v is the versio...

Страница 11: ...rted a registration window with the Device ID is displayed as shown below It is possible to use Field Genius Layout Pro without registration by tapping Run Demo Mode This provides full functionality but is limited to the storage of 30 points To register your version of FieldGenius an activation key needs to be entered The displayed Device ID together with the GUID global unique identity is used to...

Страница 12: ...eenshot below At the blank serial number field enter your GUID and click Submit At the next screen enter the Device ID shown on the handheld The activation key will then be displayed in the password field Enter this key into the handheld at the provided fields and click Apply Key Note Please make certain that the Device ID is entered correctly the first time since an activation key cannot be gener...

Страница 13: ...FieldGenius the Project Manager screen is displayed each time Create a new project by tapping the appropriate icon and enter a project name The onscreen keyboard can always be accessed by double tapping on the editable field The screens that follow are used to set the default settings for this project www rusgeocom ru ...

Страница 14: ...rument Save the name and then tap Edit to configure the profile At Model Communication select the Make as GeoMax Model as Zoom90 and Port as Radio In Radio Settings make sure to set the Connection Method to Long Range Bluetooth When everything has been configured correctly tap Connect The map view will then be shown and you are ready to measure For further information on using Field Genius Layout ...

Отзывы: