14
3.2 GK-405 Readout Box
The GK-405 Vibrating Wire Readout is made up of two components: The Readout Unit,
consisting of a Windows Mobile handheld PC running the GK-405 Vibrating Wire Readout
Application; and the GK-405 Remote Module, which is housed in a weatherproof enclosure and
connects via a cable to the vibrating wire gage to be measured. The two components
communicate wirelessly using Bluetooth
®
, a reliable digital communications protocol. The
Readout Unit can operate from the cradle of the Remote Module, or, if more convenient, can be
removed and operated up to 20 meters from the Remote Module.
3.2.1 Connecting Sensors with 10-pin Bulkhead Connectors Attached
Align the grooves on the sensor connector (male), with the appropriate connector on the
readout (female connector labeled senor or load cell). Push the connector into place, and
then twist the outer ring of the male connector until it locks into place.
3.2.2 Sensors with Bare Leads
Attach the GK-403-2 flying leads to the bare leads of a Geokon vibrating wire sensor by
connecting each of the clips on the leads to the matching colors of the sensor conductors,
with blue representing the shield (bare).
3.2.3 Operating the GK-405
Press the button labeled “POWER ON (BLUETOOTH)”. A blue light will begin
blinking, signifying that the Remote Module is waiting to connect to the handheld unit.
Launch the GK-405 VWRA program by tapping on “Start” from the handheld PC’s main
window, then “Programs” then the GK-405 VWRA icon. After a few seconds, the blue
light on the Remote Module should stop flashing and remain lit. The Live Readings
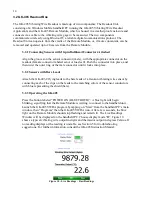
Window will be displayed on the handheld PC. Choose display mode “B”. Figure 10
shows a typical vibrating wire output in digits and thermistor output in degrees Celsius. If
no reading displays or the reading is unstable, see Section 5 for troubleshooting
suggestions. For further information, consult the GK-405 Instruction Manual.
Figure 10 - Live Readings – Raw Readings
Содержание 4450
Страница 2: ......
Страница 4: ......
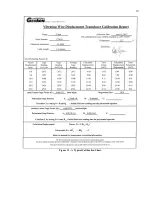
Страница 19: ...19 Figure 11 A Typical Calibration Sheet ...
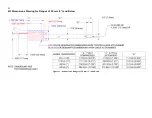
Страница 24: ...24 B 3 Dimensions Drawing for Ranges of 50 mm 2 and Below Figure 12 Dimensions Ranges of 50 mm 2 and Below ...
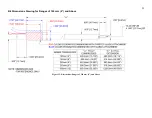
Страница 25: ...25 B 4 Dimensions Drawing for Ranges of 100 mm 4 and Above Figure 13 Dimensions Ranges of 100 mm 4 and Above ...


