background image

19

EN

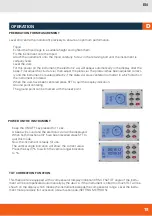
PREPARATION FOR MEASUREMENT

Level and centre the instrument precisely to ensure an optimum performance.

 · Tripod 

Extend the tripod legs to a suitable height and tighten them. 

 · Fix the instrument onto the tripod 

Attach the instrument onto the tripod carefully. Screw in the retaining bolt until the instrument is 

carfeully fixed. 

 · Level the vials 

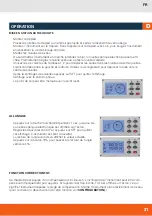
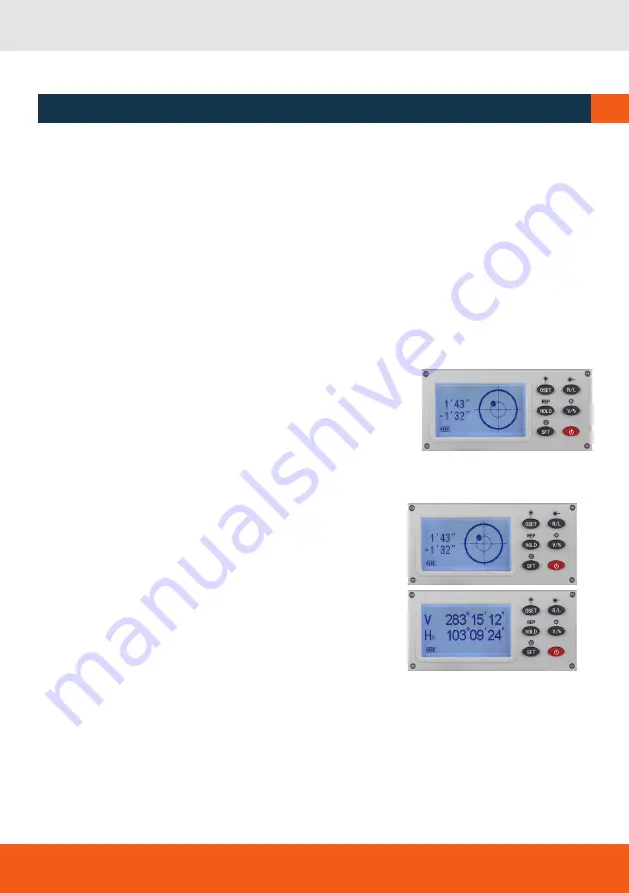
For this power on the instrument; the electronic vial will appear automatically in the display after the 

beep. First adjust the ciruclar vial, then adjust the plate vial. The plate vial has been adjusted correct-

ly and the instrument is leveled perfectly if the plate vial stays centered no matter in which direction 

the instrument is rotated.

 · When the vials have been centered press SFT to quit the display indication. 

Ground point centering

 · The ground point can be marked with the laser point.

OPERATION

D

POWER ON THE INSTRUMENT

 · Keep the ON/OFF key pressed for 1 sec. 

 · A beep will sound and the electronic vial will be displayed. 

When both directions X/Y have been levelled press SFT to 

quit this mode. 

Now the instrument is ready for use.

 · The vertical angle indication will show the current value.

 · Press the key V/% to switch the vertical angel indication  

to %.

TILT CORRECTION FUNCTION

This theodolite is equipped with a compensator (display indication CRM). The TILT angle of the instru-

ment will be compensated automatically by the device. If the instrument is tilted too much TILT will be 

shown on the display which means the instrument exceeds the compensator range. Level the instru-

ment more precisely (for activation / de-activation see (SETTING METHODS).

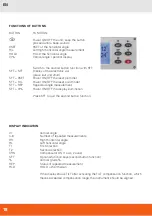
Содержание 313100

Страница 1: ...BEDIENUNGSANLEITUNG USER MANUAL MODE D EMPLOI www geo fennel de www geo fennel com www geo fennel fr DE EN FR FET 220K L ...

Страница 2: ...orgfalt produziert und qualitätsgeprüft Die beigefügte Anleitung wird Ihnen helfen das Gerät sachgemäß zu bedienen Bitte lesen Sie ins besondere auch die Sicherheitshinweise vor der Inbetriebnahme aufmerksam durch Nur ein sachge rechter Gebrauch gewährleistet einen langen und zuverlässigen Betrieb geo FENNEL Precision by tradition Elektronischer Theodolit FET 220K L Dreifuß Li Ion Akku Ladegerät B...

Страница 3: ...equemen Positionierung über dem Bodenpunkt uvm Einfaches genaues Horizontieren in beiden Achsen X und Y ohne mühseliges Drehen des Instru mentes durch elektronische Basislibelle im Display Fernrohrvergrößerung 30 x Objektivdurchmesser 45 mm Kürzeste Zielweite 1 5 m Winkelmessung absoluter Encoder Genauigkeit 2 0 6 mgon Kleinster Messwert 1 0 2 mgon Kompensator 2 Achkompensator Messeinheiten 400 go...

Страница 4: ...nahme Akku vollständig aufladen Akku nach dem Ladevorgang wieder in das Gerät einsetzen Gerät ausschalten und Batterie Akkufach abnehmen Der Akku wird außerhalb des Gerätes mit dem Ladege rät aufgeladen und anschließend wieder an das Gehäuse angeklickt Batteriebetrieb Batterien in das dafür vorgesehene Fach einlegen Pola rität beachten und in das Gerät einsetzen BATTERIEZUSTANDSANZEIGE Voll gelade...

Страница 5: ...hrenlibelle 8 Display 9 Fernrohrokular 10 Dreifuß 11 Fußschraube 12 Fokussierung 13 Batterie Akkufach 14 Horizontalklemme und Horizontalfeintrieb 15 Verriegelungshebel GRUNDEINSTELLUNGEN DES GERÄTES BEI AUSLIEFERUNG Kleinste Ablesung Winkeleinheit Automatische Abschaltung Messmethode des Vertikalwinkels Stehachskompensator 1 DEG AUS 0 im Zenit EIN ...

Страница 6: ...und ausschalten Repetitionsweise Winkelmessung Displaybeleuchtung ein und ausschalten SFT drücken um die zweite Tastenfunktion wieder zu verlassen ANZEIGEN IM DISPLAY VT n 6 HR HL T1 T2 CRN SFT REP HLD Vertikalwinkel Anzahl der Wiederholungen Repetitionen Horizontalwinkel Zählrichtung rechtsläufig Horizontalwinkel Zählrichtung linksläufig 1 Richtung 2 Richtung Stehachskompensator AN 1 Achse oder 2...

Страница 7: ...npunktes Der Bodenpunkt wird mit Hilfe des Laserlots markiert BEDIENUNG D EINSCHALTEN An Aus Knopf ca 1 Sek gedrückt halten Ein Piepton ertönt und die elektronische Libelle wird im Display angezeigt Nach dem Einspielen beider Richtungen X Y SFT drücken um diese Anzeige zu verlassen Nun ist das Gerät betriebsbereit Die V Kreis Anzeige wechselt auf den aktuellen Wert Durch Drücken des Knopfes V kann...

Страница 8: ...en 5 mit R L OFF DEG ON GON festlegen Mit SFT Einstellungen bestätigen und Funktion beenden NULLSETZUNG DES HORIZONTALKREISES 0SET Ziel anvisieren 0SET drücken der Wert des Hz Winkels beginnt zu blinken 0SET für 3 Sekunden gedrückt halten Nun ist der Horizontalwinkel auf 0 gesetzt 0SET lässt sich nur beim Hz Winkel betätigen Der Hz Winkel kann in jeder Position 0 gesetzt werden außer wenn er festg...

Страница 9: ...die Funktion zu verlassen UMSCHALTUNG DES HÖHENWINKELS AUF PROZENT V drücken um die Vertikalkreisanzeige von Höhenwinkel auf Prozent umzustellen Der maximale Wert beträgt 99 999 Bei Überschreibung erscheint WIEDERHOLUNG WINKELMESSUNG REPETITIONSWEISE WINKELMESSUNG SFT REP drücken um die Funktion zu starten T1 blinkt im Display Erstes Ziel anvisieren und 0SET drücken die Horizontalkreisablesung wir...

Страница 10: ...nkt PARAMETER SETZEN BELEUCHTUNG DES DISPLAYS Bei Dunkelheit oder schlechten Lichtverhältnissen kann das Display beleuchtet werden SFT V drücken Displaybeleuchtung ein und aussschalten EINSATZ DES LASERS Mit dem eingebauten Laserstrahl kann das Ziel anvisiert und markiert werden Durch Fokussierung kann der Laserpunkt angeglichen werden Das Anzeichnen des Ziels kann also von nur einer Person durchg...

Страница 11: ...11 DE ...

Страница 12: ...s Gerät andere Geräte stört z B Navigationsein richtungen durch andere Geräte gestört wird z B elektromagnetische Strahlung bei erhöhter Feldstär ke z B in der unmittelbaren Nähe von Industrieanlagen oder Rundfunksendern CE KONFORMITÄT Das Gerät hat das CE Zeichen gemäß den Normen EN 55022 2010 EN 55024 2010 EN 61000 3 2 2006 A1 2009 A2 2009 EN 61000 3 3 2008 GARANTIE Die Garantiezeit beträgt zwei...

Страница 13: ...r am Gerät angebracht HAFTUNGSAUSSCHLUSS 1 Der Benutzer dieses Produktes ist angehalten sich exakt an die Anweisungen der Bedienungsan leitung zu halten Alle Geräte sind vor der Auslieferung genauestens überprüft worden Der Anwen der sollte sich trotzdem vor jeder Anwendung von der Genauigkeit des Gerätes überzeugen 2 Der Hersteller und sein Vertreter haften nicht für fehlerhafte oder absichtlich ...

Страница 14: ...l help you to operate the instrument appropriately Please read the manual carefully particularly the safety instructions A proper use only guarantees a longtime and reliable operation geo FENNEL Precision by tradition SUPPLIED WITH A Electronic Theodolite FET 220K L Tribrach Li Ion rechargeable battery Charger Battery case for alkaline batteries Container User manual Optional 90 diagonal eyepiece ...

Страница 15: ...ositioning over a ground point Easy levelling in both X and Y axes without tedious turning of the instrument thanks to the electronic base level in the display Telescope magnification 30 x Clear objective aperture 45 mm Shortest focussing distance 1 5 m Angle measurement incremental Accuracy 2 0 6 mgon Shortest focussing distance 1 0 2 mgon Compensator 2 axis compensator Measuring units 400 gon 36...

Страница 16: ...of the instrument and insert it again when fully charged Operation with batteries Insert the batteries into the Alkaline battery case take care of correct polarity and fix the battery case in the battery compartment RECHARGE THE BATTERY Remove the Li Ion battery box from the instrument and insert the plug of the charger into the charging socket of the battery box RED LIGHT at the charger indicates...

Страница 17: ... 6 Objective lens 7 Plate level 8 Display 9 Eyepiece 10 Tribrach 11 Footscrew 12 Focusing drive 13 Battery compartment 14 Horizontal tangent screw and clamp 15 Tribrach clamp FACTORY SETTINGS Minimum reading Unit of angle measurement Automatic shut off Vertical angle measuring mode Automatic compensation 1 DEG OFF ZENITH ANGLE ON ...

Страница 18: ...ummet Power ON OFF the laser point finder Repeated angle measurement Power ON OFF the display illumination Press SFT to quit the second button function DISPLAY INDICATION VT n 6 HR HL T1 T2 CRN SFT REP HLD Vertical angle Number of repeated measurements Right horizontal angle Left horizontal angle First direction Second direction Compensator ON 1 axis 2 axes Optional function keys second button fun...

Страница 19: ...e vials have been centered press SFT to quit the display indication Ground point centering The ground point can be marked with the laser point OPERATION D POWER ONTHE INSTRUMENT Keep the ON OFF key pressed for 1 sec A beep will sound and the electronic vial will be displayed When both directions X Y have been levelled press SFT to quit this mode Now the instrument is ready for use The vertical ang...

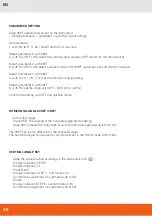
Страница 20: ...h R L set the angle unit OFF DEG ON GON Confirm the setting with SFT and quit this mode VERTICAL ANGLE SET Keep R L pressed while powering on the instrument with Display indication SETUP Display indication F1 Press O SET Display indication STEP 1 first rotation A Confirm the adjustment via collimator with O SET Rotate Display indication STEP 2 second rotation B Confirm the adjustment via collimato...

Страница 21: ...hing Press HOLD again to quit this mode release the value SLOPE PERCENT MODE Press V to switch the vertical angular reading shown in degrees into percent reading The maximum value will be 99 999 exceeding this the display will show ANGULAR REPEATED MEASUREMENT Press SFT REP to start this mode T1 will flash in the display Aim at the first target and press 0SET the horizontal reading will set to 0 T...

Страница 22: ...evelling rod Mulitply the value of the distance d between the two stadia hairs with 100 The result D the distance from the in strument centre to the levellig rod D d x 100 USE OFTHE LASER With the built in laser beam the target can be aimed at and marked By focussing the laser dot can be adjusted Such the marking of the target can be acomplished by one person only The laser beam is pulsed and can ...

Страница 23: ...23 EN ...

Страница 24: ...ompletely excluded that this instrument will disturb other instruments e g navigation sys tems will be disturbed by other instruments e g intensive electromagnetic radiation nearby industrial facilities or radio transmitters CE CONFORMITY The instrument has a CE mark according to EN 55022 2010 EN 55024 2010 EN 61000 3 2 2006 A1 2009 A2 2009 EN 61000 3 3 2008 WARRANTY This product is warranted by t...

Страница 25: ... expected to follow the instructions given in the user manual Although all instruments left our warehouse in perfect condition and adjustment the user is expected to carry out periodic checks of the product s accuracy and general performance 2 The manufacturer or its representatives assumes no responsibility of results of a faulty or intentio nal usage or misuse including any direct indirect conse...

Страница 26: ... servir de votre instrument de manière adéquate Nous vous recommandons de lire avec soin tout particulièrement les consignes de sécurité de ladite notice avant la mise en service de votre appareil Un emploi approprié est l unique moyen de garantir un fonc tionnement efficace et de longue durée geo FENNEL Precision by tradition LIVRÉ COMME SUIT A Théodolite électronique FET 220K L Embase Batterie L...

Страница 27: ...ÉRISTIQUES 2 grands écrans faciles à lire Plomb laser pour une mise en place facile au dessus du point sol Éclairage du champ de visée de l objectif à l écran Angle Hz Position zéro arrêt du cercle dans n importe quelle position cercle hz tournant à droite ou à gauche Angle V en grades degrés ou Pour mesurer des angles horizontaux verticaux et zénithaux Pour une utilisation dans le bâtiment et les...

Страница 28: ...eable Chargez la batterie hors de l instrument et remontez la dans l instrument Opération avec piles Mettez en place les piles dans leur boîte attention à la polarité et montez la boîte dans l instrument CHARGER LA BATTERIE RECHARGABLE Enlevez la batterie rechargeable de l instrument pour la charger hors de l instrument Utilisez le chargeur contenu dans la livraison ÉTAT DE LA BATTERIE La lumière ...

Страница 29: ...e de l objectif 7 Nivelle d alidade 8 Écran 9 Oculaire 10 Embase 11 Vis de réglage 12 Réglage du focus 13 Batterie 14 Vis de réglage micrométrique horizontale et de blocage de mouvement 15 Le levier de verrouillage de l embase CONFIGURATION STANDARD Lecture d angle minimum Unité d angle Arrêt automatique Affichage de l angle vertical Compensateur 1 DEG OFF 0 en zénith ON ...

Страница 30: ...vement Point d aplomb marche arrêt Viseur laser marche arrêt Répétition des mesures Retroeclairage de l ecran Appuyez sur SFT pour quitter le mode fonction AFFICHAGE SUR L ÉCRAN VT n 6 HR HL T1 T2 CRN SFT REP HLD Angle vertical Nombre de répétitions de mesures Angle horizontal lecture en sens horaire Angle horizontal en sens inverse de l horaire Direction 1 Direction 2 Fonction TILT du compensateu...

Страница 31: ...rès le centrages des nivelles appuyez sur SFT pour quitter l affichage Centrage avec le plomb optique Le point de sol peut être marqué avec la point laser ALLUMAGE Appuyez sur la touche marche arrêt pendant 1 sec jusqu au bip La nivelle spérique électronique est affichée sur l écran Réglez les deux direction X Y et appuyez sur SFT pour quitter cet affichage L instrument est prêt à travailler La le...

Страница 32: ...ure DEG GON avec la touche R L OFF DEG ON GON Confirmez les réglages et quittez ce mode avec la touche SFT 0SET ANGLE HORIZONTAL Visez un point Appuyez sur OSET la lecture de l angle horizontal commence à clignoter Tenez appuyé sur 0SET pour 3 secondes Maintenant la lecture de l angle horizontal est 0 00 00 0SET la touche est seulement effective pour les angles horizontaux L angle horizontal peut ...

Страница 33: ...ppuyez encore une fois sur la touche HOLD pour libérer la valeur MODE POURCENTAGE DE PENTE Appuyez sur la touche V pour la conversion de la lecture de dégrés en La valeur maximum est 99 999 En cas de dépassement l écran affiche Pressez de nouveau la touche V pour les mesures angulaires montrées en degrés MESURE ANGULAIRE RÉPÉTÉE Pressez SFT REP pour placer l instrument en mode répété T1 va clignot...

Страница 34: ...t Multiplier la valeur de la distance d entre les deux traits stadias par 100 Le résultat D distance du centre de l instrument jusqu à la mire D d x 100 UTILISATION DU LASER Avec le faisceau laser intégré la cible peut être ciblée et marquée Avec une mise au point le point laser peut être ajusté Ainsi le marquage de la cible peut être accompli par une seule personne Le faisceau laser est pulsé et ...

Страница 35: ...35 FR ...

Страница 36: ...ière générale il n est pas exclu que le niveau ne dérange d autres instruments p ex les dispositifs de navigation ou qu il puisse lui même être dérangé par d autres appareils p ex soit par un rayonnement électromagnétique dû à une élévation de l intensité du champ soit par la proximité d installations industrielles ou d émetteurs de radiodiffusion CE KONFORMITÄT Das Gerät hat das CE Zeichen gemäß ...

Страница 37: ...rruption du travail de l entreprise etc à savoir les dommages qui découlent du produit lui même ou de la non utilisation du produit 5 Le fabricant et son représentant déclinent toute responsabilité pour les dommages et le bénéfices non réalisés par suite d une manoeuvre non conforme aux instructions 6 Le fabricant et son représentant déclinent toute responsabilité pour les dommages et les bénéfice...

Страница 38: ...ment peut être utilisé sans avoir recours à d autres mesures de sécurité Au cas où l utilisateur a regardé un court instant le faisceau laser les yeux sont tout de même protégés par le réflexe de fermeture des paupières Les pictogrammes de danger de la classe 2 sont bien visibles sur le niveau Laser 2 IEC 60825 1 2014 P 1 mW 635 670 nm www geo fennel de ...

Страница 39: ...39 FR ...

Страница 40: ...5 Baunatal Tel 49 561 49 21 45 Fax 49 561 49 72 34 info geo fennel de www geo fennel de Technische Änderungen vorbehalten All instruments subject to technical changes Sous réserve de modifications techniques Precision by tradition 08 2021 ...

Отзывы: