11
Step 12
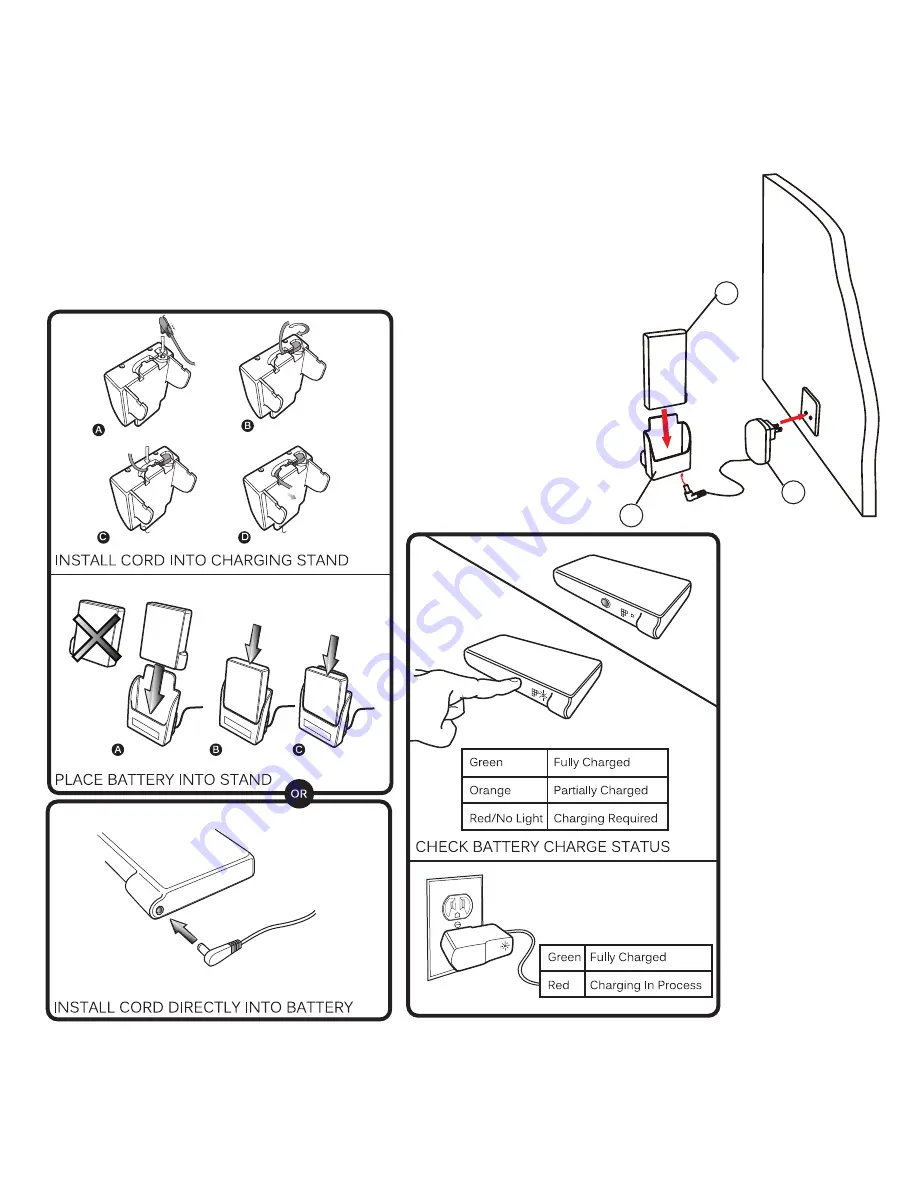
If the power of the battery is depleted, please connect
to the electrical outlet as shown.
P
Q
R
Battery Charging Procedure
Страница 1: ...Heat Cool Executive Chair Assembly Instructions Model HC 321...
Страница 2: ...rews Quantity 2 1 3 4 Big Screws Quantity 2 1 1 4 Small Screws Quantity 6 Plastic Caps Quantity 2 E1 E2 Left Arm Quantity 1 Right Arm Quantity 1 H I J 1 1 2 Small Screws Quantity 2 K N L1 Allen Key Qu...
Страница 3: ...wood floors Using these casters on tile or wood flooring may cause floor surface damage so please consider purchasing a chairmat to protect your floor surfaces We are here to help if you have any ques...
Страница 4: ...the Star Base B upside down and insert 5 Casters A into the holes on the Star Base B Step 2 Turn the Star Base B over and insert the Gas Lift with Telescoping Cover C through the center hole on top o...
Страница 5: ...at cushion Attach by using 1 3 4 Big Screws I for the front holes of the Seat Plate D and 1 Big Screws H for the rear holes of the Seat Plate D with the Allen Key O Note Align the Seat Plate so the FR...
Страница 6: ...rs D1 D2 of Seat Plate D to the pre attached cable lever receivers on the underside of Seat Cushion F Push down the key on the receivers to pull out the levers Note Fix the cable for the seat plate in...
Страница 7: ...Plate D on top of the Gas Lift with Telescoping Cover C and press down until fully engaged Step 6 Fasten the Arms E1 E2 onto sides of the Seat Cushion F by using 1 1 4 Small Screws J with the Allen Ke...
Страница 8: ...crew holes on both Arms E1 E2 Back Cushion G with the Allen Key O Note Do not tighten the screws completely Step 8 Push the Back Cushion G up to a vertical position and attach the Arms E1 E2 by using...
Страница 9: ...es between Seat Cushion F and Back Cushion G F G Step 10 Press the Plastic Caps N into armrest holes to cover screws and place the Arm Inserts L1 L2 M1 M2 into arm grooves once all screws have been ti...
Страница 10: ...on F correctly Insert battery with product description label facing down and charging port towards chair Note Chair must be occupied for the heat cool function to operate This feature extends battery...
Страница 11: ...11 Step 12 If the power of the battery is depleted please connect to the electrical outlet as shown P Q R Battery Charging Procedure...
Страница 12: ...ir to find the lever Lift the lever and raise your body up slightly to allow the chair to rise to the desired height Once desired height is reached release lever to lock chair at desired height To low...
Страница 13: ...ut While seated reach under the left side of the chair to find the lever Push down the lever and lean back to allow the chair to tilt backwards To lock the chair in the upright or vertical position si...
Страница 14: ...the front center of the chair grasp the round knob T and turn it counter clockwise to stiffen the tilt mechanism for a heavier user Turn the knob T clockwise to loosen the tilt mechanism for a lighte...
Страница 15: ...r Heating Operation Chair Cooling Operation Press for heating Select the desired heating level by pressing for HIGH or for LOW Switch will illuminate RED Press for cooling Select the desired cooling l...
Страница 16: ...of at least one 1 foot should be left on all sides Do not cover the Battery Charger or Charging Stand 5 Do not use the heat feature of this appliance with an infant a child an incapacitated person a...