background image


19

2.2.2 

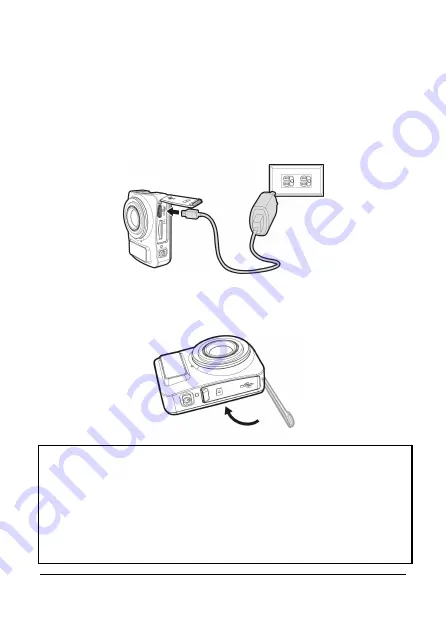
Charging from an outlet (optional) 

1. 

Open the waterproof cover of the USB / Memory card slot. 

2. 

Connect the micro USB cable into the port on the device. 

3. 

Connect the other end of the micro USB cable into the port on 
the USB plug, and connect the outlet.(Adaptor is not included, 
which is 5V/1A power equal to smartphone adaptor)   


4. 

On completion of charging, make sure the waterproof cover of 
the USB / Memory card slot is sealed tightly, to achieve normal 
activity waterproofing. 


Note:   
1.  Please  take  note  if  the  environment  temperature  reaches  45°C 

(113°F) or above, the wall outlet can still supply power to device, but 
it will not charge the Lithium-ion battery. This is the characteristic of 
Lithium-ion and is not a malfunction. 

2.  If  the  Wi-Fi  function  is  not  enabled,  the  device  can  sustain  an 

operation of about 1 hour. 

3.  If  you  turn  on  the  device  while  charging,  this  will  prolong  the 

charging time. 

Содержание Life Shot FHD300

Страница 1: ...information regarding the waterproofing of the camera 9 Important information regarding the property of the waterproof casing 11 1 Introduction 12 1 1 System requirements 12 1 1 1 Connection to a Com...

Страница 2: ...the tripod mount 28 2 6 Using the waterproof case 29 3 Initial set up 31 3 1 Camera application installation 31 3 2 Wi Fi connecting 32 4 Using the LIFE Shot Cam application 34 4 1 Recording videos 34...

Страница 3: ...3 6 Connecting to other devices 51 6 1 Connecting to the computer 51 7 Installing the software 52 8 Editing software 53 9 Specifications 54...

Страница 4: ...However there is no guarantee that interference will not occur in a particular installation If this equipment does cause harmful interference to radio or television reception which can be determined...

Страница 5: ...F exposure reduction can be achieved if the product can be kept as far as possible from the user body or set the device to a lower power output if such a function is available WEEE notice Disposal of...

Страница 6: ...d off mode electric power consumption of electrical and electronic household and office equipment and the Directive 2009 125 EC of the European parliament and of the council establishing a framework f...

Страница 7: ...ion Channels List Ch1 Ch11 The product employs wireless data communication which may interfere or be interfered by a near by device Never use this device in the vicinity of a microwave oven or at plac...

Страница 8: ...f your device is sufficiently shielded from the RF transmission of this device Medical Facilities Hospitals and medical institutes may use facilities that are sensitive to an external RF energy Observ...

Страница 9: ...terproof cover of the USB Memory card slot is sealed tightly make sure the cover is not open in a wet situation Do not open close the waterproof cover of the USB Memory card slot with a wet hands othe...

Страница 10: ...midity range 0 90 RH only Never use any chemicals on the product for cleaning anti rust anti fog etc or the waterproof capability may deteriorate Make sure the waterproof cover of the USB Memory card...

Страница 11: ...ter never use the product under water for more than 30 minutes NEVER open the waterproof casing when the device is submerged in water Never jump into the water with the waterproof casing impacting the...

Страница 12: ...specifications For Windows Windows XP SP2 Vista Win 7 Win 8 Processor with at least Pentium IV 3 2GHz AMD Athlon FX 2 6GHz or higher 2GB RAM at least NVIDIA GeForce 7600GT ATI X1600 series or later US...

Страница 13: ...ersion 4 or Greater Brand Name HTC SONY SAMSUNG LG Screen Resolution MDPI HDPI 1 2 Features Excellent 8MP CMOS sensor Full HD camcorder 1920x1080 30fps Wi Fi Built in 4k MJPEG Time Lapse video Complie...

Страница 14: ...The package contains the following items In case there is any missing or damaged items contact your dealer immediately Camera CD ROM Quick start guide Micro USB cable Clip mount Strap Bike mount Tripo...

Страница 15: ...de indicator light 3 Mode button 9 Power indicator light 4 Timelapse Capture Recording indicator light 10 Power button 5 Record Button 11 Lens 6 Wi Fi indicator light 12 Microphone 7 Wi Fi button 13 L...

Страница 16: ...down status press the Power button to stop recording In Camera mode press the Record button to capture a photo In Video mode press the Record button to start recording a video Press it again to stop r...

Страница 17: ...Make sure the waterproof cover of the USB Memory card slot is sealed tightly to achieve normal activity waterproofing 4 To remove the memory card push to eject the memory card out of the slot Note 1...

Страница 18: ...card slot 2 Connect the micro USB cable into the port on the device 3 Connect the other end of the micro USB cable to an available USB port on your computer 4 On completion of charging make sure the...

Страница 19: ...of charging make sure the waterproof cover of the USB Memory card slot is sealed tightly to achieve normal activity waterproofing Note 1 Please take note if the environment temperature reaches 45 C 11...

Страница 20: ...r Sound effect 1 Mode indicator light Changing modes Flash red One beep Self timer Flash red None Timelapse mode Flash red None 2 Timelapse Capture Recording indicator light Timelapse Flash red One be...

Страница 21: ...light Wi Fi on Red One beep Wi Fi off No indication One beep 4 Power indicator light Power on Red None Power off No indication None Power will soon be out Flash Red None Charging Red None Fully charge...

Страница 22: ...Description 1 Battery status Full battery power 2 3 battery power 1 3 battery power Out of battery power Charging 2 Wi Fi status Wi Fi on Wi Fi off 3 Status Timelapse mode Capture mode Recording mode...

Страница 23: ...23 Memory card full Connect with mobile Enter USB mode when connected with a computer Power will soon run out...

Страница 24: ...rap 1 Push the fixture latch gently into the support receptacle on the device seated into position 2 Tie the hanger string into the hole on the top of the fixing 3 Make sure the hanger string is firml...

Страница 25: ...nstalling onto the bike mount 1 Loosen the knob of the bike mount latch and push the latch into the support receptacle until it clicks into position 2 Tighten the knob make sure that the device is fir...

Страница 26: ...round the bike handle and through the support hole pull the rubber band backwards until a snug fit is achieved 4 Loosen the knob and adjust the device vertically and or horizontally 5 Tighten the knob...

Страница 27: ...27 6 To remove the bike mount first loosen the latch knob and withdraw the device from the support followed by pushing up the latch on the bike mount to loosen the rubber band...

Страница 28: ...alling onto the tripod mount 1 Push the tripod adapter latch gently into the support receptacle on the device until the latch clicks into position 2 Make sure that the tripod adapter is firmly fixed t...

Страница 29: ...in accordance with the position of the lens 2 Lift up the buckle ring on top of the casing and confirm that the device is firmly installed in the front casing then close up the back cover Note 1 Afte...

Страница 30: ...n top of the Waterproof Case down and forward so it is in the fixed position 5 Make sure that there is no gaps in the Waterproof Case and that the buckle ring has tightly fixed the Waterproof Case 6 T...

Страница 31: ...a allows you to connect to the mobile devices via software App When using for the first time install the LIFE Shot App for your mobile device 1 Download LIFE Shot App from Google Play or an App Store...

Страница 32: ...Using the mobile device Settings Wi Fi Select device ID no LifeShotFHD300XXXXXX Enter the password Connecting 7 Open the LIFE Shot App to begin using the camera through your mobile device The LCM dis...

Страница 33: ...th the equipment all the mode switch Record and Wi Fi operation buttons of the equipment will be inoperable all the operations shall be carried out via the LIFE Shot App 6 The language of the LIFE Sho...

Страница 34: ...switchover to Recording mode 2 Touch the button to set video duration 3 min 5 min 10 min 30 min 3 Touch the button to enable or disable Voice Record 4 Press button to start recording a video 5 Press b...

Страница 35: ...y status Indicates the remaining battery power 3 Video duration The device will follow the set recording video length to store them as individual files Touch to select the required video duration Avai...

Страница 36: ...s the current recording date and time 9 Menu Touch to enter the menu 10 Video resolution Indicates the current video resolution 11 Recording mode Indicates the current Recording mode Touch to switch t...

Страница 37: ...sec 10 sec Burst 3 Photos Burst 5 Photos 3 Touch the button to set Beauty class 0 1 2 4 Touch to capture the image the file will be saved on the camera device automatically Note 1 When using the Beaut...

Страница 38: ...Wi Fi status Indicates the Wi Fi status 2 Battery status Indicates the remaining battery power 3 Capture mode Touch to select Capture mode Available options Normal 5 sec 10 sec Burst 3 Photos Burst 5...

Страница 39: ...o enter Playback mode 7 Shooting Touch to start shooting photos 8 2014 01 01 12 00 00 Date and time Indicates the current recording date and time 9 Menu Touch to enter the menu 10 Photo resolution Ind...

Страница 40: ...in 10 min 30 min 3 Touch the button to set the file format of Timelapse video files Picture to save in picture files Format JPG Video to save in video files Format AVI MOV Picture Video to save in pic...

Страница 41: ...pse function stops when the memory is fully used or equipment is out of power It is suggested that you calculate the number of pictures in advance or activate power saving mode before starting Timelap...

Страница 42: ...us Indicates the Wi Fi status 2 Battery status Indicates the remaining battery power 3 Timelapse Touch to select a suitable Interval Available options 5 sec 10 sec 30 sec 1 min 5 min 10 min 30 min 4 S...

Страница 43: ...om status Touch to adjust the zoom Available options x1 0 x2 4 8 Playback Touch to enter Playback mode 9 Shooting Touch to start shooting photos 10 2014 01 01 12 00 00 Date and time Indicates the curr...

Страница 44: ...er Edit mode 3 Touch to select the required pictures or videos and touch to Delete or Download the selected files on your mobile device Picture Video Timelapse Select Note LIFE Shot Cam App is for use...

Страница 45: ...he photo to view it in full screen 1 3 2 No Icon Item Description 1 Delete Touch to delete the current picture 2 2014 01 01 12 00 00 Date and time Indicates the recorded date and time 3 Download Touch...

Страница 46: ...een 2 6 4 1 3 5 No Icon Item Description 1 00 00 01 Current duration Indicates the video current duration 2 Delete Touch to delete the current video 3 Stop Touch to pause the video playback 4 2014 01...

Страница 47: ...downloaded to the internal memory of your mobile device Use the application program in your mobile device to view the file 5 If you find the downloaded files could not be played or without sound which...

Страница 48: ...u 5 1 Using the settings You can customize the video recording and other general settings via the on screen display OSD menus 1 If recording is in progress please touch to stop recording 2 Touch to en...

Страница 49: ...ng video you may set Rotate View to alter the viewing angle of the recorded video Off Flip Vertical 180 Rotate Time Stamp Imprint the date and time on the recorded photo or video On Off Loop Recording...

Страница 50: ...memory card inserted in the equipment All the files in the card will be erased No Yes App Version Indicates the current application version Product Name Display the model number of the device LifeSho...

Страница 51: ...B Memory card slot 2 Connect the micro USB cable into the port on the device 3 Connect the other end of the micro USB cable to an available USB port on your computer 4 Press the Power button to switch...

Страница 52: ...CD player 2 If the CD does not execute automatically please use Windows File Manager to execute the Install_CD exe file in the CD The following screen will be shown up 3 Press the Menu item to start...

Страница 53: ...ave any previous experience Your pictures videos and music online Let your friends and family participate in your experiences Free Online Album with your own web address High quality design templates...

Страница 54: ...5M 2576x1932 2M 1920x1080 Format JPG AVI MOV Still Image Resolution 4K 3840 2160 5M 2576x1932 2M 1920x1080 Format JPG Movie Clip Resolution FHD 1080P 30fps HD30 720P 30fps Format AVI MOV Shutter Elec...

Страница 55: ...Built in 700mAh Li polymer rechargeable Operating Temperature 0 50 C 14 122 F Operating Humidity 0 95 RH Storage Temperature 20 70 C 4 140 F Dimensions 38 5 x 50 3 x 20 4 mm Weight Approx 36g without...

Страница 56: ...Copyright 2014 All rights reserved All other marks products or company names mentioned in this guide are trademarks of their respective companies...

Отзывы: