background image


14 

data and selecting the pages you wish to delete. In addition, you can remember 
and delete pages faster by put a mark 

-

 in the head of file name.   


3.6 

MENU functions 

STEP-1 

Turn on the power by pressing 


  and get in the functions of menu. 

Main menu shows up and wait for the information function. 

 
Accessing the menu functions, such as rotate, book, suspend or information.   


Rotate   

This menu allows you to adjust the paper orientation 
from portrait to landscape or upside down. 


Book 

Workbook

:  Start  a  new  workbook.  (A  new  meeting, 

or lecture) 

Format


disk

:  Use  this  option  to  format  the  flash 

memory and erase all of its content. 

Version: 

Display the current firmware version. 

Tablet Function Selection: 

User can switch on or off 

Tablet function by this option.


Suspend   

Set up the timing for automatically power off 


Information    Memory size / Power 


3.6.1    

  Change the paper orientation 


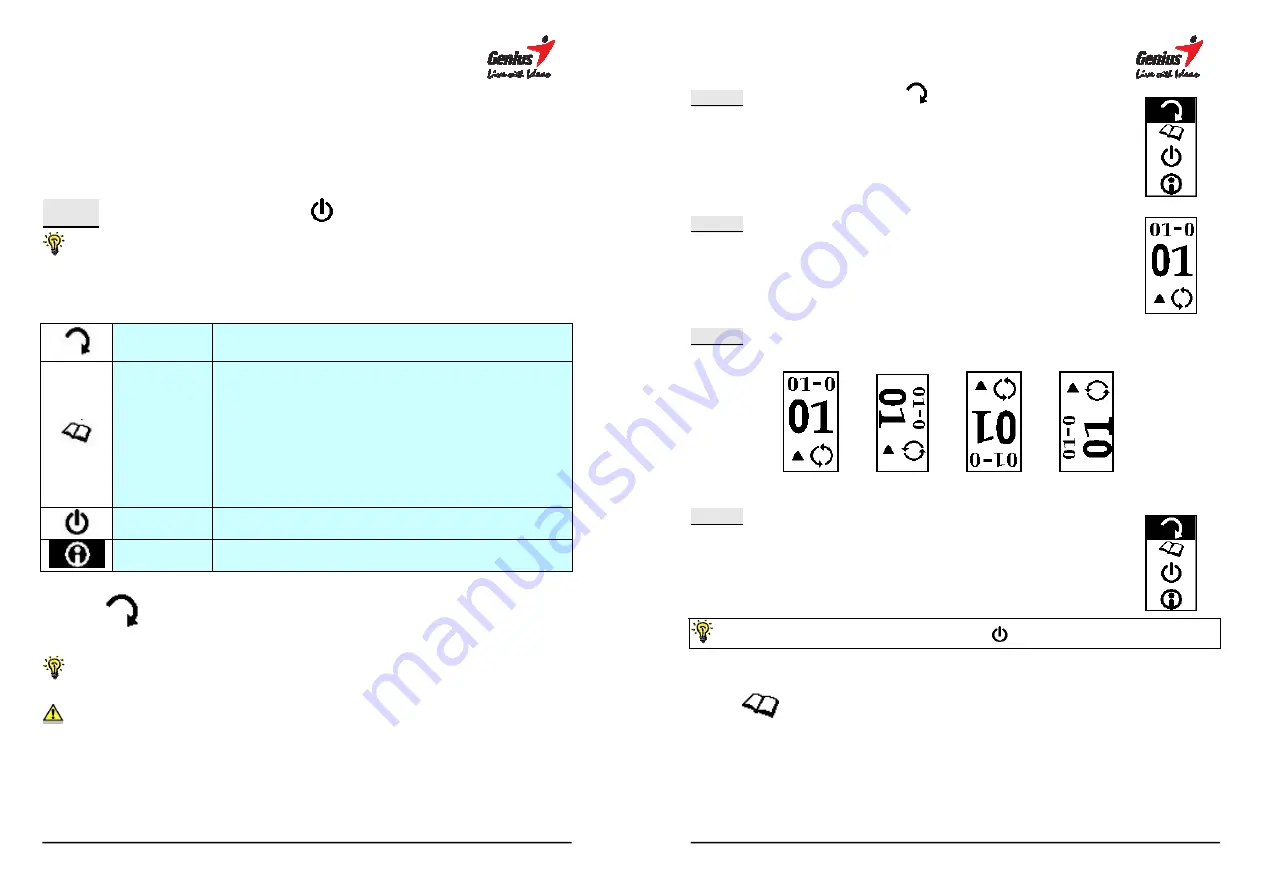
G-Note is designed for different level and way of using, there are four 
directions are able to select by user. 

        The function only supports a new page, not a written one. 


15 

STEP-1      Press 

r


and select

  for different direction. 


STEP-2     
 

Press 

/


to confirm and start the rotating function.


STEP-3      Press 

r

  to  select  the  direction.  LCD  changes  the  angles  as 

following: 


      1                      2                      3                        4 

STEP-4      Press 

/

    to return to the main menu. 


/


(Enter) 

Ñ


(Esc/Return to main menu) 


(Return to note taking model) 


3.6.2  

  Book Settings   

Содержание G-NOTE 7000

Страница 1: ...try to correct the interference by one or more of the following measures l Reorient or relocate the receiving antenna l Increase the separation between the equipment and receiver l Connect the equipm...

Страница 2: ...minutes 60 minutes 20 3 6 4 Space Power Display 21 3 7 Testing for Digital Ink Pen 22 4 Introduction to Software Functions 23 4 1 Install Digital Organizer 23 4 2 Transfer your data from G Note to you...

Страница 3: ...en good idea coming out 1 2 System Requirements Operating System Windows 2000 XP Vista CPU Pentium III 500 MHz or Higher Level of PC RAM Memory 128 MB or Higher Equipment One USB port one CD DVD ROM D...

Страница 4: ...eries of trough and change the batteries After that close the cover trough Turn of the power before changing the batteries or the memory data could come out with errors WARNING When the battery instal...

Страница 5: ...before inserting the pen battery In case to lose the digital pen please put them into the G Note s trough Recommendation of Mercury battery Brand GP IEC JIS EVEREADY VARTA DURACELL Model GPZA13 PR48 A...

Страница 6: ...lease do not save the files from computer into digital G Note s memory or the data in G Note will be damaged or lost 11 3 G Note Operation Guide 3 1 Front panel s functions Status one Status two MENU...

Страница 7: ...will help to synchronize the paper sheets with the workbooks and digital pages in the G Note s memory STEP 1 Press to create a new page 13 To avoid the creation of superimposed digital pages make sure...

Страница 8: ...flash memory and erase all of its content Version Display the current firmware version Tablet Function Selection User can switch on or off Tablet function by this option Suspend Set up the timing for...

Страница 9: ...Press to confirm and return to the main menu Enter Esc Return to main menu Return to note taking model 17 3 6 2 2 FORMAT Flash Memory The function will delete all the data in the memory If not sure t...

Страница 10: ...ote taking mode Enter Esc Return to main menu Return to note taking model 3 6 2 4 Tablet Function 19 STEP 1 Press s to select the workbook sub menu STEP 2 Press ENTER to confirm STEP 3 Press s to sele...

Страница 11: ...from 3 60 minutes after which the G Note will automatically switch off STEP 4 Press to confirm and return to the main menu Enter Esc Return to main menu Return to note taking model 21 3 6 4 Space Pow...

Страница 12: ...23 4 Introduction to Software Functions The Digital Organizer allows you to view edit annotate or e mail on Windows You can download the digital notepads from the G Note to your computer and organize...

Страница 13: ...ablet Model Do not use the 32MB flash memory of the G Note as a storage disk or memory errors may occur When using Digital Organizer please close the other software to avoid the software conflict When...

Страница 14: ...id direct contact between the pen tip and the writing area surface Cover the writing area with a sheet of paper or just use an empty page of your notepad when using the G Note in pen tablet mode This...

Страница 15: ...mp pdf notes etc Save Selected Area Two file models supplied with JPG or BMP 29 New folder In G Note Explorer click on a new folder and key in an appropriate folder name and press Enter Rename Click o...

Страница 16: ...he Attach button in the dialog box to finalize the operation Your e mail program will open and your pages will be attached as a series of JPG or BMP files 31 Save as PDF You can select one many or all...

Страница 17: ...attach to Microsoft Word Excel Outlook or other pages Undo Undo the last action Redo Redo the last action 33 Narrow Narrow down the page Enlarge Enlarge the zoom page Click on the down arrow in the Z...

Страница 18: ...nother one Delete source file After combined two files the source file will be deleted or you can remove the function 35 After files combination move and locate the position and attach it Rotating Pag...

Страница 19: ...ol There are 4 different shapes curve line ellipse rectangle to select Highlighter Select the Highlighter icon to highlight parts of the Notepad pane with transparent highlighter ink There are 4 diffe...

Страница 20: ...ter select the modify page and then start the paper mode After that locate the notepad s direction to confirm the open direction Reset Reset the notepad s direction Turn the notepad page same as the p...

Страница 21: ...erties dialog box to modify the annotations in the Notepad pane Please refer the CH 4 8 1 4 8 1 Modify the color and shape 41 STEP 1 Selecting the objects you want to modify with the Select tool The s...

Страница 22: ...STEP 1 Start with selecting the Background Picture under Insert on the view menu Support JPG and BMP STEP 2 Select picture source and then the picture appears on the notepad page Lighten Adjust the p...

Страница 23: ...n save the insert image as the default background image It is able to load the default image every time when you click the load defaults button 45 Step 3 Delete the Background image Delete the image f...

Страница 24: ...ions l Remove the batteries from the G Note if it is not expected to be used for long periods This will eliminate the possibility of battery liquid leaking from the batteries and corroding internal co...

Страница 25: ...e LCD display is either white or black see also section 3 7 in note taking mode to ensure a proper reading height distance l After you have switched on the device it may take a few seconds for the pag...

Страница 26: ...pen 4 Insert a new cartridge and press the tip firmly against a hard surface until it connects into the pen Notch Pen refills 51 A Pull out the refill Step 1 Press the pen tip into the pen trough Mak...

Страница 27: ...Life About 100 hours continuous use Work Current 3V 20mA 5mA Power Consumption 60mW 15mW Power saving Auto suspend after 15 min default idle time configurable Interface USB 1 1 Digital ink pen specif...

Отзывы: