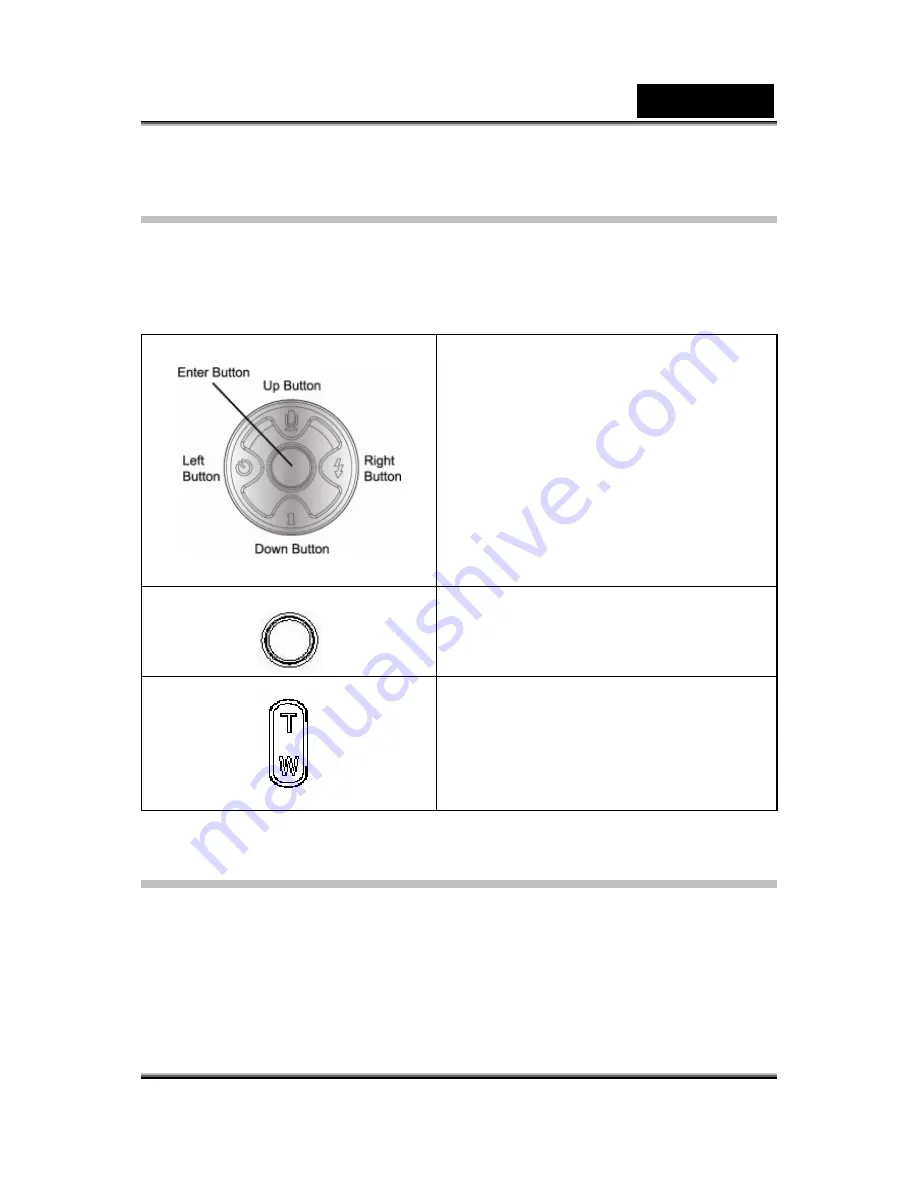
background image

 English  


-47- 

‹

Button Functions


The Direction Buttons have the following functions in Movie and Picture 

Playback Modes.   


Right Button: 

Go to the next movie/ 

picture. 


Left Button: 

Go to the previous 

movie/ picture. 

Up Button: 

Invalid


Down Button: 

Information ON/OFF 

Enter Button: 

Enter to movie, picture, 

voice, or music option menu.     


REC/PALY Button:

 Switch between 

Movie/Picture Record Mode and 
Playback Menu. 


Tele-Wide Button: 

Digital Zoom in 

and out.


‹

LCD Monitor Information


Indicators on the LCD screen while in Playback Mode


Содержание DV1110

Страница 1: ...nstructions may cause harmful interference to radio communications However there is no guarantee that interference will not occur in a particular installation If this equipment does cause harmful inte...

Страница 2: ...cs and geographical preferences Products very often vary between retailers especially with accessories such as batteries chargers AC adapters memory cards cables carrying cases pouches and language su...

Страница 3: ...air the camera This might cause fire or electric shock For repair or internal inspection contact your retailer Use the supplied AC adapter only with the indicated power supply voltage Use with any oth...

Страница 4: ...age to the person s eyesight Do not subject the LCD monitor to impact This might damage the glass on the screen or cause the internal fluid to leak If the internal fluid enters your eyes or comes into...

Страница 5: ...fire and electric shock Notes on Battery Usage When you use the battery carefully read and strictly observe the Safety Instructions and the notes described below Use only the specified battery NP60 3...

Страница 6: ...s not to be used for a long period of time remove it from the digital video camera to prevent leakage or corrosion If the battery is not to be used for a long period of time store it after no battery...

Страница 7: ...Picture Recording Voice Recording Taking Close up Pictures Using Digital Zoom Options for Record Mode Operations for Record Mode Default Setting and Validation Movie Mode submenu Setting Movie Resolu...

Страница 8: ...View MPEG 4 Movie on PC Share MPEG 4 Movie Section 7 Viewing Pictures and Movies on a TV 69 Section 8 Record movie clip from AV device 70 71 Section 9 Video File Converter 72 75 Section 10 Burning th...

Страница 9: ...color LCD monitor users can compose images and examine them easily Exposure and color balance can either be adjusted automatically or be changed manually An 8x digital zoom increases user control ove...

Страница 10: ...z Digital Video Camera z Power Adaptor z USB Cable z AV Cable z NP60 Rechargeable Lithium Ion Battery z User s Manual z CD ROM Driver Ulead Software and User Manual z Earphone z Remote Control z Strap...

Страница 11: ...4 Flash 5 Self Timer LED 6 IR Receiver 7 Power button KeyPad illustration 1 Direction Buttons 2 Enter Buttons 3 Movie Shutter Button 4 Tele Wide Button 5 Picture Shutter Button 6 REC PLAY Button 7 AV...

Страница 12: ...English 12 Side View 1 Macro Portrait Normal mode Switch 2 LCD Panel 3 Speaker 4 Battery SD Card Cover...

Страница 13: ...larity marks or 3 Close the battery SD Card Cover firmly NOTE NP60 is the widely used rechargeable Li ion battery developed by Nokia for mobile phones Charging the Battery Please fully charge Li ion B...

Страница 14: ...igure above and 1 Open the battery SD card cover 2 Insert the memory card until it locks into position To remove an installed SD card press the card inwards to release it When the card pops out gently...

Страница 15: ...ce press the Upper Button of Direction Buttons and press the Movie Shutter Button to start voice recording To view stored movies pictures or listen to stored MP3 and voice recordings press the REC PLA...

Страница 16: ...N OFF Down Button LCD Information ON OFF Enter Button Menu ON Power Button Press down for one second to turn on or turn off the camera REC PLAY Button Switch between Record Mode and Playback Mode Tele...

Страница 17: ...x 240 500 Kbps Sharpness Adjust with nine sharpness settings to soften or sharpen picture movie Auto Automatic adjustment Daylight Use under outsides light condition Fluorescent Use under fluorescent...

Страница 18: ...s Two in One Photo Frame Adds photo frame to the picture On The flash will fire in any light condition Auto The flash fires automatically according to the scenic light condition Flash Off The flash wi...

Страница 19: ...gsten light condition On Takes 5 continuous pictures at one time Multi Snap Off Disables Multi Snap On Brightens the object when its background is much brighter than the object Backlight Off Disables...

Страница 20: ...as the negative of the normal SET Setting Sound On Enable operation sound Off Disable operation sound Start up Screen Customize Startup Screen Time Setting Setup Date and Time Format Card YES Format...

Страница 21: ...are recorded Record Mode Movie Record Mode Picture Record Mode Voice Record Mode 1 Motion Stabilization 11 n o q r s u t v w n o n o q r s u t v w n o p n o q r s u t v w n o n o q r s u t v w n o p...

Страница 22: ...andard Low 2 Picture High Standard Low 3 Number of images or recording time of movie that can still be taken at current resolution 4 SD card inserted 5 Macro Position Focusing 6 White Balance 7 Batter...

Страница 23: ...ess Movie Shutter Button again To view stored movies press the REC PLAY Button once to switch to Playback Mode SD Card Resolution Quality 32 MB internal memory 128 MB 256MB 512MB 1GB 640 480 1 8Mbps 3...

Страница 24: ...92 11 M pixel High Quality 5 34 68 136 272 2592 1944 5 M pixel Standard Quality 9 90 180 360 720 1600 1200 2 M pixel Low Quality 25 230 460 920 1840 The data shows the standard testing results The act...

Страница 25: ...used for object located at about 20 cm while the Portrait Mode should be used for objects located from 70 cm to 140 cm To take close up pictures 1 Rotate the lens ring to switch to Macro or Portrait p...

Страница 26: ...ord Mode Movie Mode Picture Mode Voice Pen Exposure Effect Set z Resolution z Sharpness z White Balance z Stabilization z Exit z Resolution z Two in One z Photo Frame z Flash z Self Timer z Sharpness...

Страница 27: ...in Movie Picture Record Mode 2 Use the Right Left Buttons to move between main menu options which are Movie Mode Camera Mode Voice Mode Exposure Effect and Set Submenu will pop out while move to each...

Страница 28: ...for Movie Standard for Picture Sharpness One Time Medium White Balance Always Auto Motion Stabilization Always Off Two in One One Time Off Photo Frame Always Off Flash Always Off Self Timer One Time...

Страница 29: ...Mode press Enter button to switch to record menu screen 2 The default main option is Movie Mode Submenu of Movie Mode will pop out on the screen 3 Use Up Down buttons to select Resolution then press E...

Страница 30: ...tons to move between nine levels The change can be previewed immediately 4 Press Enter button to validate the setting and exit Display Screen Change Sharpness Setting White Balance The camera adjusts...

Страница 31: ...The change can be previewed immediately 4 Press Enter button to validate the setting and exit Display Screen W B Option Motion Stabilization To enable Motion Stabilization 1 In Movie Picture Record Mo...

Страница 32: ...change Picture Resolution 1 In Movie Picture Record Mode press Enter button to switch to record menu screen 2 Use Right Left Buttons to select Camera Mode Submenu of Camera Mode will pop out on the sc...

Страница 33: ...icture To enable Two in One 1 In Movie Picture Record Mode press Enter button to switch to record menu screen 2 Use Right Left Buttons to select Camera Mode Submenu of Camera Mode will pop out on the...

Страница 34: ...English 34 Display Screen Two in One Option Enter Button...

Страница 35: ...button to switch to Photo Frame submenu 2 Use Up Down buttons to locate preferred photo frame Then select Set option and press Enter button to validate the setting and exit Display Screen Photo Frame...

Страница 36: ...e subject is distant beyond the range of the flash To change Flash setting 3 When in Camera Mode use Up Down Buttons to select Flash Option then press Enter buttons to switch to Flash submenu 4 Use Up...

Страница 37: ...ey Left Button or Option Setting The self timer LED on the front of the camera beneath the flash light will also blink The speed of blinking will increase just before the picture is taken Self Timer M...

Страница 38: ...cklight Backlight Option Date Printing To enable Date Printing 1 When in Camera Mode use Up Down Buttons to select Date Printing then press Enter buttons to switch to Date Printing submenu 2 Use Up Do...

Страница 39: ...t Option 4 Choose Enter option to enable voice recording and press Enter button to validate the setting and exit Voice Exposure Setting The camera adjusts image exposure automatically In certain circu...

Страница 40: ...des are Normal Black White Classic and Negative To change Effect setting 1 In Movie Picture Record Mode press Enter button to switch to record menu screen 2 Use Right Left Buttons to move to Effect Op...

Страница 41: ...ure Record Mode press Enter button to switch to record menu screen 2 Use Up Down Buttons to select Setting then press Enter buttons to switch to Setting submenu 3 Use Up Down Buttons to move between s...

Страница 42: ...tting Sound z Start up Screen Customize the Start Up Screen with your favorite pictures Press Right Left buttons to select the picture you want and press Enter button to validate the setting and exit...

Страница 43: ...ve between Date Time and Exit by using Left Right Buttons 2 Adjust date and time by using Up Down Buttons then select SET to validate each change 3 Select EXIT to leave Time Setting without any change...

Страница 44: ...SD Card built in memory z TV System Ensure that the appropriate TV standard of your area is selected either NTSC or PAL Wrong TV system setting may cause image flicker NTSC standard USA Canada Japan...

Страница 45: ...Display Screen Language Option Language English Russian German Spanish Brazil Portuguese and Simplified Chinese z Default Setting To restore the default factory setting select this option Submenu Disp...

Страница 46: ...ening to voice and music on the built in memory or on an optional memory card Operation Display Screen Press REC PLAY Button to switch from Record Mode to Playback Mode Main Menu z There are four opti...

Страница 47: ...ure Left Button Go to the previous movie picture Up Button Invalid Down Button Information ON OFF Enter Button Enter to movie picture voice or music option menu REC PALY Button Switch between Movie Pi...

Страница 48: ...English 48 Mode Indicator Movie Playback Mode Picture Playback Mode Voice Playback Mode 1 Music Playback Mode n o q r p n o q r p...

Страница 49: ...Indicate the selected movie picture is locked Indicate the single movie voice MP3 is being repeated Indicate all of the movies voices MP3s are being repeated 3 Indicate the slide show is playing 4 Cu...

Страница 50: ...Movie Playback Mode 3 Use Right Left Buttons to go to the next or last movie 4 Press Movie Shutter Button to start the movie playing and then press it again to pause 5 While playing movie press down R...

Страница 51: ...utton to go to the movie option menu 8 Use Direction Buttons to select six options Delete Thumbnail Lock Repeat One Repeat All or Exit Delete Movies Operation Display Screen 1 Use Direction Buttons to...

Страница 52: ...ted a confirmation screen will appear Choosing Yes will execute the operation No will cancel the operation Press Enter button to confirm the operation 6 Press Enter button to exit NOTE If a memory car...

Страница 53: ...hile selecting Thumbnail option press Enter button to view nine thumbnail pictures 3 To view a picture use Direction Buttons to select the picture 4 Press Enter button to view the selected picture Loc...

Страница 54: ...ect the movie 4 Use Up Button to lock unlock all movies and Down Button to lock unlock single movie 5 Before a movie is locked unlocked a confirmation screen will appear choosing Yes will execute the...

Страница 55: ...English 55 Operation Display Screen 1 Use Direction Buttons to select the Repeat One option or Repeat All option 2 Press Enter button to start repeating...

Страница 56: ...o Picture Playback Mode 3 Use Right Left Buttons to go to the next or last picture 4 While the picture is selected use Tele Wide Buttons to magnify 5 Use Direction Buttons to navigate the magnified pi...

Страница 57: ...tton to go to the Delete menu 3 Use Right Left Buttons to select the picture 4 Use Up Button to delete all pictures and Down Button to delete single picture 5 Before a picture is deleted a confirmatio...

Страница 58: ...be unlocked before being deleted Lock Pictures Single or all pictures can be locked This function can prevent the pictures from being deleted accidentally Operation Display Screen 1 Use Direction But...

Страница 59: ...tton to exit Make Slide Show This function automatically repeats all pictures in order Operation Display Screen 1 Use Direction Buttons to select the Slide option 2 Press Enter button to start the sli...

Страница 60: ...he last or next voice Up Down Buttons Adjust the voice playback volume Enter Button Switch to voice option menu Operation Display Screen 1 Use Direction Buttons to select the Voice option 2 Press Ente...

Страница 61: ...ce recording 4 Press Movie Shutter Button to start playing back the selected voice Press it again to stop 5 Use Up Down Buttons to adjust the volume 6 Press Enter button to go to the voice playback op...

Страница 62: ...while selecting Repeat One option and Repeat All option 11 To delete a voice use Right Left Buttons to select the voice 12 Use Up Button to delete all voice recordings and Down Button to delete single...

Страница 63: ...Transfer MP3 Music to the camera 1 Install the camera driver on your computer 2 Connect your camera to the computer USB port 3 The RED LED will light when the camera is connected to the computer and i...

Страница 64: ...English 64 Listen to MP3 Music Operation Display Screen 1 In Playback Mode use Direction Buttons to select the Music option 2 Use Right Left Buttons to select MP3 you want to play...

Страница 65: ...to play MP3 4 Press Movie Shutter Button again to stop playing 5 Press Up Down Buttons to adjust volume 6 Press Enter button to go to repeat menu 7 Press Down Button once to repeat current MP3 8 Press...

Страница 66: ...ored in the camera can be played either by built in speaker Earphone or TV When the earphone cable is plugged in the camera the option menu of Earphone TV pops out on the LCD Screen Choose earphone or...

Страница 67: ...EG4 movies The MPEG4 movie format of AVI is used in this digital video camera When playing a MPEG4 movie for the first time MPEG4 Video Codec Xvid should be installed in PC View MPEG4 Movie on PC When...

Страница 68: ...You can share the recorded MPEG4 movies to your friends via internet or CD Make sure MPEG4 Video Codec Xvid is installed in your friends PC MPEG4 Video Codec Xvid is available in the provided CD or ca...

Страница 69: ...AV Out port 2 Connect the other end of the cable to a television 3 The option menu of Earphone TV pops out on the LCD Screen 4 Choose TV option and press Enter button to validate the setting 5 The st...

Страница 70: ...rogram or TV news from video device 1 Connect AV in cable between video device and camera s AV In Port 2 Turn on the camera by flipping out the panel or pressing the Power Button for one second 3 Ster...

Страница 71: ...t the desired Resolution in the recording mode Resolution Quality 640 480 1 8Mbps 30 fps High Quality 640 480 1 Mbps 30 fps Standard Quality 320 240 500 Kbps 30 fps Low Quality Display Screen Video Re...

Страница 72: ...format with your camera In this way you can convert any format of video files and playback your favorite movies on your camera To convert a video file 1 Install Ulead VideoStudio Refer to section 11 2...

Страница 73: ...English 73 5 Click Add to add the video file you want to convert 6 Select Save as type to choose output video format and click Convert to start file converting...

Страница 74: ...English 74...

Страница 75: ...note if Clip0001 avi exists in the camera then the converted file has to be renamed to clip0002 avi 9 Connect your camera to PC and transfer the converted video to My Computer Removable Disk DCIM 200M...

Страница 76: ...nto DVD Bundled software CD contains Ulead VideoStudio 8 0 SE DVD also feathers burning the movie clip into DVD You can preserve your precious movies on DVD to share with family and friends To create...

Страница 77: ...English 77 2 Create Disc window pops out and click Add Video to add video file you want to burn into DVD Then click Next button and follow on screen instruction...

Страница 78: ...English 78 3 Click Output icon and start to burn DVD...

Страница 79: ...VER icon Follow the on screen instructions to complete the installation Depending on your operating system you may have to restart your computer after installing the driver Connecting Your Digital Vid...

Страница 80: ...Mode When in Mass Storage Device Mode press REC PLAY Button to PC Camera Mode and the GREEN LED will light up Under this mode you can implement live video conference meetings or use video email over t...

Страница 81: ...ctor on the Digital Video Camera 3 The PC Digital Video Camera Mode menu appears on the screen 4 Position the Digital Video Camera steadily on top of your computer monitor or use a tripod 4 Running Yo...

Страница 82: ...found in online help of all the bundled software To install the bundled software 1 Insert the CD ROM into your computer s CD ROM drive The autorun screen appears 2 Select the piece s of software you...

Страница 83: ...ess 5 0 Before capturing a picture or video from the camera to the Photo Express 5 0 main screen you must switch to PC Camera Mode Press REC PLAY Button to Switch to PC Camera Mode Under this mode you...

Страница 84: ...English 84 Click the Import button Click the Capture button and then choose your images Click the Insert button and click Exit button to leave the screen...

Страница 85: ...English 85...

Страница 86: ...English 86 Getting Started With Video Studio 8 0 z Click Start Select Programs Video Studio 8 0 z The Video Studio main Screen will appear on your desktop...

Страница 87: ...Camera through Video Studio 8 0 To view images stored in the camera you must switch to Mass Storage Device Mode 1 Click the folder on the right hand side of the screen 2 Select the image stored in th...

Страница 88: ...o 8 0 Press REC PLAY Button to switch to PC Camera Mode Under this mode you can view camera video through Video Studio To capture a video picture from the camera Click the Capture item Click the Captu...

Страница 89: ...ecord Picture Record Voice Record MP3 Player PC Camera Mass Storage Device Lens f 8 5mm F3 0 Focus Range 140cm infinite Normal Mode 70cm 140cm Portrait Mode Center 20 cm Macro Mode Digital Zoom 8X Shu...

Страница 90: ...Manual Self Timer 10 second delay Flash Auto Off On File Format Picture JPEG Movie AVI Xvid Voice WAV Music MP3 Image play Single Image Thumbnails Slideshow PC Interface Mini USB 2 0 Port TV out NTSC...

Страница 91: ...ptoms and measures listed below before sending the digital video camera for repairs If the problem persists contact your local reseller or service center Power Supply Symptom Cause Measure The battery...

Страница 92: ...g the AC power adapter reconnect it It is being used in extreme low temperature Many images are being captured in dark places inside requiring flash The battery runs out quickly The battery is not ful...

Страница 93: ...e unwanted files End of memory card life Load a new memory card The flash is recharging Wait until the system LED off The memory card is unrecognized by the digital video camera Format the memory card...

Страница 94: ...om Cause Measure Even though the flash fired the image is dark The distance to the subject is greater than flash effective range Get closer to your subject and capture The image was captured in a dark...

Страница 95: ...ded a card that was formatted and stored on by this device The memory card is write protected Remove the write protection Cannot format a memory card End of memory card life Load a new memory card The...

Страница 96: ...er software Symptom Cause Measure The free space on the hard disk drive of your computer may be insufficient Check whether the hard disk drive has enough space for running Windows and if the drive for...

Отзывы: