background image


English


3

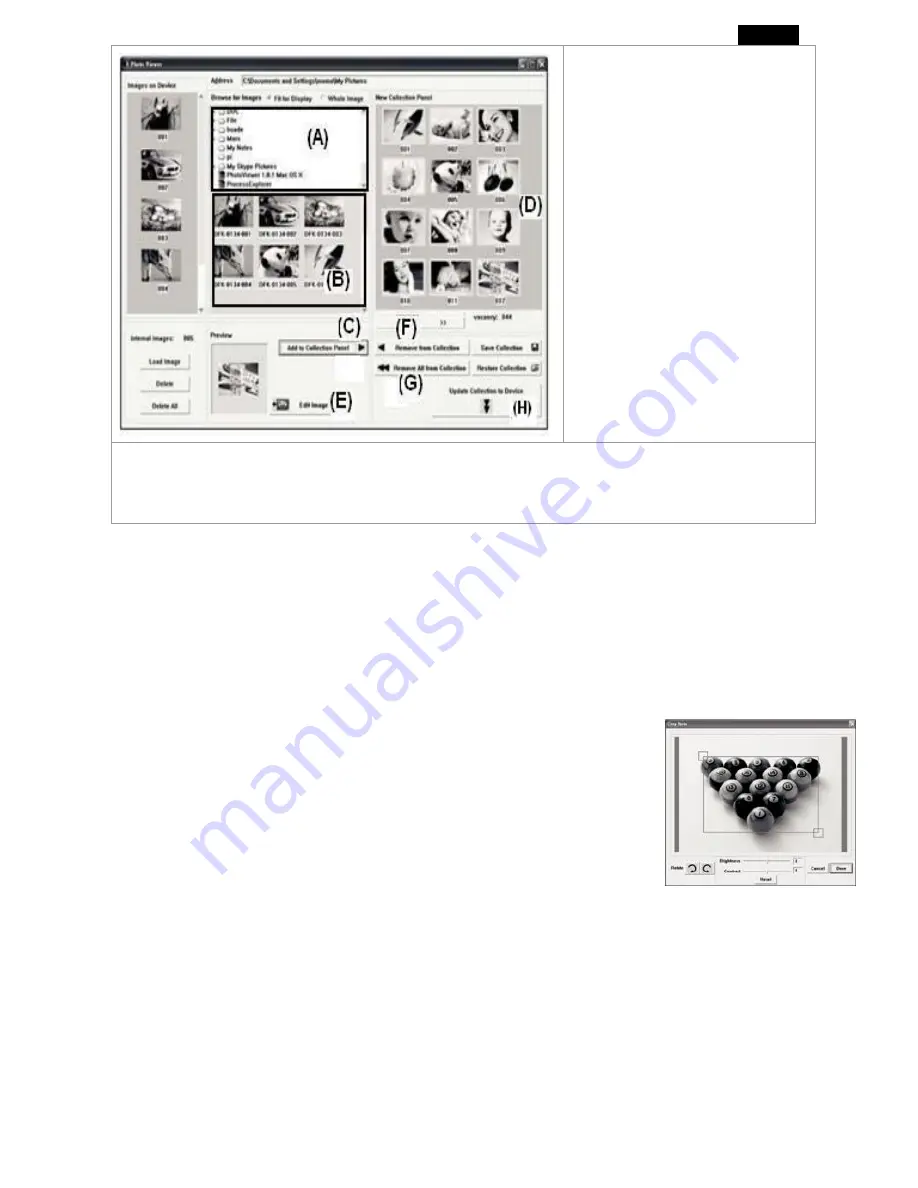
1. Check area (A) to select the 

photos stored in your 
computer. 

2. Select the photos from 

thumbnail area (B) and press 
(C) button to add the photos 
to “Collection Panel” (D). 

 
3. You can press (E) button to 

alter the


image


before


transferring


(see


Edit 

Images below). 


4.  You


may


remove


images


from


the

 “

Collection


Panel” (D) by


selecting (F or G button).

5. Finally, press (H) button to transfer the images in the collection panel to DPF-111K. 


z


Edit images 

1.


Select


an


image


to


Edit


Select a photo first in the image Preview Area (B) and press Edit Image button to edit the 
image. 

2. Edit Image


In the Edit Image Window you can do the following: 

A. 

Crop:

 click and drag the smaller boxes to increase or 

decrease the area to be cropped. 

B. 

Reposition: 

click and drag in the center of the large box to 

change the position of the crop. 

C. 

Brightness / Contrast: 

click and drag the slider bars. 

D. 

Rotate: 

Use the 

Rotate 

arrows for clockwise or 

counterclockwise. 


3. Click DONE


The edited image will be added to the collection panel. 
 

z


Basic operations 

 
Turn power on and play photos 

Press and hold 

ON/OFF

 button (about 2~3 seconds) until power on, then the player will 

start to playback photos automatically or manually. Press 

ON/OFF

 button again (about 2~3 

seconds) to turn off the device. 


Содержание DPF-111K

Страница 1: ...splay B Stores more than 40 images using the bundled photo software C Supports JPEG BMP Photo slide show playback z Components and button functions z Package contents DPF 111K USB cable User s manual CD ROM with photo compression software and detailed manuals z Charging the battery of DPF 111K Turn on the DPF 111K first and connect PC and DPF 111K with the provided USB cable The charging time is a...

Страница 2: ...top DO NOT LAUNCH THE SOFTWARE YET C After the software is installed connect the device to the computer with the included USB cable D After the hardware installation is complete launch the Photo Viewer application from the shortcut on your PC desktop Note You can not view the photos stores in the device directly from My Computer disk G The only way is to use the Photo Viewer software 2 Add picture...

Страница 3: ...ss Edit Image button to edit the image 2 Edit Image In the Edit Image Window you can do the following A Crop click and drag the smaller boxes to increase or decrease the area to be cropped B Reposition click and drag in the center of the large box to change the position of the crop C Brightness Contrast click and drag the slider bars D Rotate Use the Rotate arrows for clockwise or counterclockwise...

Страница 4: ...e to automatically see a slide show the photos Press ON OFF button once again to manually view the photos one by one Delete photos Delete single photo Hold UP button for 3 seconds and press ON OFF button to confirm Delete all photos Hold DOWN button for 3 seconds and press ON OFF button to confirm ...

Отзывы: