background image

 English  

-14-


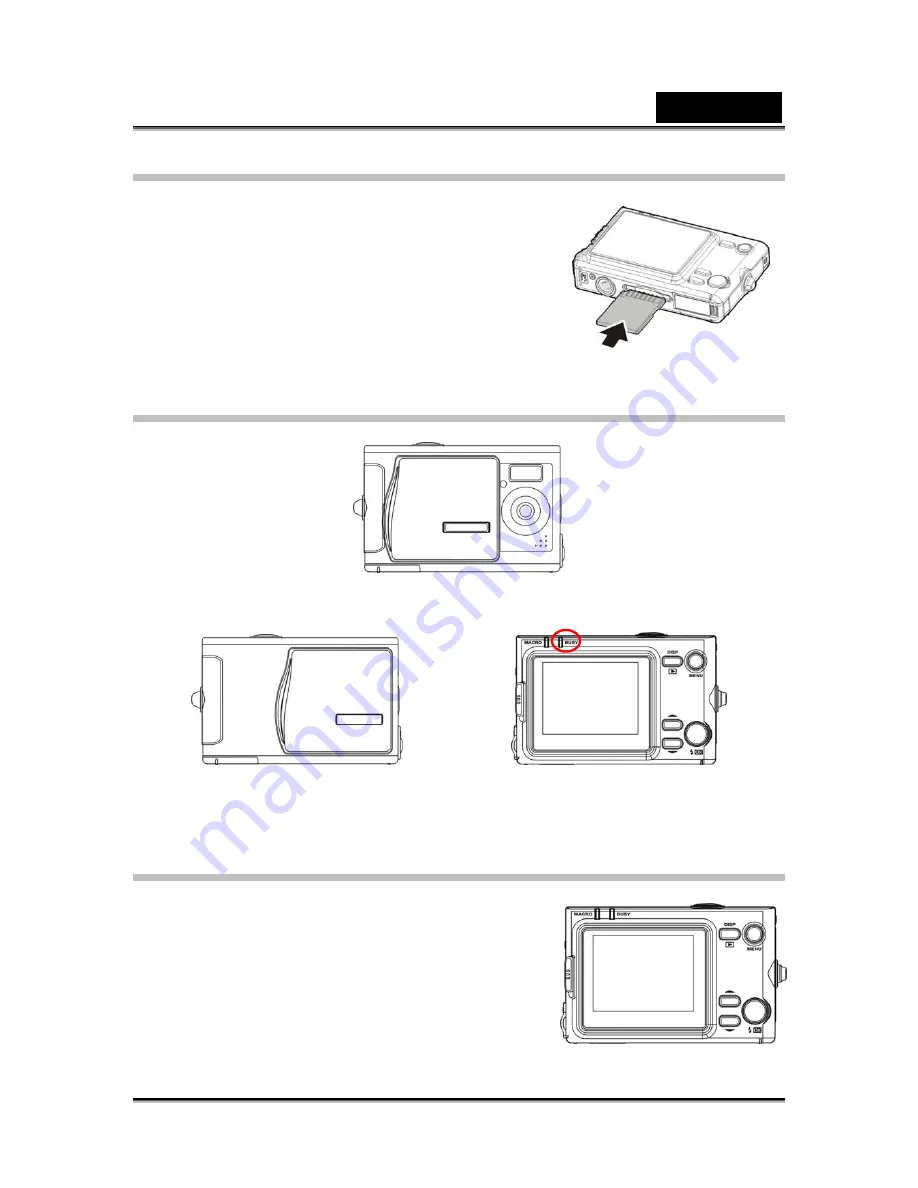
Inserting an SD card 

An SD card can be installed in the camera to provide 
additional storage space for still images, video clips, 
or other files. 
Install an SD card at the bottom of the camera as 
shown in the illustration. Make sure the gold contacts 
are facing up towards the LCD, as shown. 
To remove the SD card, gently push it into the card 
slot and release. The card pops out. Slide out the 
card. 
 

Turning on for the first time   

Slide the power cover sideways as shown in the picture to switch the camera on. 


Slide the power cover sideways as shown to switch the camera off. 


When the camera is switched on, the Busy LED will flash red, and an image will 
appear on the LCD display. 
 

Changing modes 

The camera can operate in four modes: 
Photo, Video, Playback, and Setup.   
Long press and hold the MENU button to view the 
mode menu. Use the Previous or Next buttons to 
select a mode and press OK/Set button to confirm 
your selection. 


Содержание D5123

Страница 1: ...been tested and found to comply with the limits for Class B digital devices pursuant to Part 15 of the FCC rules These limits are designed to provide reasonable protection against harmful interference...

Страница 2: ...sories to suit their market requirements customer demographics and geographical preferences Products very often vary between retailers especially with accessories such as batteries memory cards cables...

Страница 3: ...over causing injury Keep the batteries out of the reach of children Swallowing batteries might cause poisoning If the battery is accidentally swallowed immediately consult a physician Do not use the c...

Страница 4: ...n Battery Usage When you use the battery carefully read and strictly observe the Safety Instructions and the notes described below Use only the specified battery Avoid using the battery in extremely c...

Страница 5: ...n If the batteries are not to be used for a long period of time store it after no battery power left If the battery is stored for a long time in a fully charged state its performance may be impaired R...

Страница 6: ..._____ 14 TURNING ON FOR THE FIRST TIME ____________________________ 14 CHANGING MODES_______________________________________ 14 BEFORE YOU START ______________________________________ 15 Setting the d...

Страница 7: ..._____________________________ 28 Webcam mode_______________________________________ 28 USING THE SETUP MENUS ______________________________ 29 PICTURE MENU _________________________________________ 29...

Страница 8: ...________________ 36 Default setting _______________________________________ 36 System info _________________________________________ 37 INSTALLING SOFTWARE AND DRIVERS ___________________ 38 DRIVERS _...

Страница 9: ...higher z At least 256 MB of RAM z Standard USB 1 1 port or better z 4 x speed CD ROM drive or better z At least 200 MB of available disk space NOTE A USB 1 1 port will enable you to transfer files to...

Страница 10: ...missing or displays damaged contact your dealer immediately User manual Digital camera Pouch CD ROM driver and application software USB AV Out cable Wrist strap AAA batteries x2 About the camera Refer...

Страница 11: ...w Top view Back view Shutter button Lens Flash Strap Eyelet Microphone Sliding power ON OFF cover Self timer LED Macro LED LCD screen Busy LED Playback display button Menu button Previous button OK Se...

Страница 12: ...English 12 Bottom view Right view Tripod mounting hole SD card slot Battery compartment Macro Landscape switch USB port...

Страница 13: ...chapters for details about advanced functions Inserting the batteries The camera is powered by two AAA alkaline batteries NOTE Install the batteries exactly as described here Ensure that the polarity...

Страница 14: ...ease The card pops out Slide out the card Turning on for the first time Slide the power cover sideways as shown in the picture to switch the camera on Slide the power cover sideways as shown to switch...

Страница 15: ...p menu as shown Press OK Set button to confirm your selection 4 Use the Previous or Next buttons to highlight the Date Time Setting option Press OK Set button to confirm 5 Use the Previous or Next but...

Страница 16: ...xit the menu without making any changes Taking your first still picture Before taking your first still picture make sure you read Before you start To take a picture 1 Turn the camera on and make sure...

Страница 17: ...o connect the camera to a computer to transfer files or to use the camera as a PC camera for web conferences Connect the camera to a computer using the USB port and the USB cable provided as shown See...

Страница 18: ...cture menu Playback menu or Video menu z Press and hold to display the Mode menu Previous Next button Zoom in out z Use Previous to zoom in Photo or Video modes z Use Next to zoom out in Photo or Vide...

Страница 19: ...ed N A N A Macro LED Green N A N A N A N A Using the LCD Use the LCD to compose your pictures and videos review pictures and videos stored in memory and navigate the menu system Icons shown the curren...

Страница 20: ...mode icon is displayed Photo mode icons Use the following picture to familiarize yourself with the Photo mode icons and symbols See the following table for a description of each icon and symbol Icon...

Страница 21: ...nal memory 7 Counter to display the number of available shots using current settings 8 Shows current resolution 9 Indicates burst or single mode photo 10 Timer indicator 11 Flash mode indicator 12 Ind...

Страница 22: ...mode the minimum distance is 16cm Use macro mode for subjects 15 16cm from the camera To switch the macro function on use the macro switch on the side of the camera An icon displays to indicate macro...

Страница 23: ...mory card Internal SD Memory Card Resolution 32MB 64MB 128MB 256MB 512MB 1GB 4048 x 3040 12MP 22 44 88 176 352 704 2592 x 1944 5MP 65 130 260 520 1040 2080 2048 x 1536 3MP 90 180 360 720 1440 2880 128...

Страница 24: ...de when the Video mode icon is displayed Video mode icons Use the following picture to familiarize yourself with the Video mode icons and symbols See the table below for a description of each icon and...

Страница 25: ...the zoom function Refer to Using the zoom function in Photo mode Possible recording time sec video clip SD card capacity Image size 32 MB 64 MB 128 MB 256 MB 512 MB 1GB 640 x 480 5 min 02 sec 15 min 1...

Страница 26: ...iption 1 Indicates that the displayed image can be zoomed and moved Press the shutter button to enable zooming and moving 2 Indicates the current picture is tagged for printing See section Print for m...

Страница 27: ...the screen Use Previous Next button to move through the image and video files stored in memory Press OK Set button to view thumbnails of the videos and images To play videos z Press the shutter butto...

Страница 28: ...s displayed on the screen 2 Press the menu button to display the playback menu 3 Use Previous Next to highlight the slide show option in the menu 4 Press the OK Set button to start the slide show The...

Страница 29: ...tion 4 Use OK Set button to select a setting 1 3 5 or 12 M Mega pixels 5 Press the menu button again to exit the menu NOTE This option is only available in Photo mode Exposure adjustment EV Use the ex...

Страница 30: ...ion is only available in Photo mode Burst snapshot The burst snapshot option allows you to take a series of three photographs very quickly with one press of the shutter It is useful to take series sho...

Страница 31: ...evious Next to highlight the Time Stamp option 4 Use OK Set button to select a setting OFF Date Only or Date Time 5 Press the menu button again to exit the menu NOTE This option is only available in P...

Страница 32: ...ess OK Set button again to start from the lowest value 5 Press the menu button again to exit the menu White balance Use the white balance option to correct color for different lighting conditions When...

Страница 33: ...sure you have a backup before you delete Protected files cannot be deleted See Protect for more details about file protection Delete All Use the delete all function to delete all files on the current...

Страница 34: ...ard with print information You can tag all pictures to be printed or just the current picture DPOF requires a memory card When all images to be printed are tagged remove the memory card and take it to...

Страница 35: ...emory Make sure you have a back up copy of any files you want to keep TV output Use the TV option to set the TV output system for the area To change the TV output settings 1 Turn the camera on and ens...

Страница 36: ...r supply s frequency For more information contact the energy supplier in the area To set the light frequency 1 Turn the camera on and ensure that it is in Settings mode 2 Use Previous Next to highligh...

Страница 37: ...displays the firmware version To display the system information 1 Turn the camera on and ensure that it is in Settings mode 2 Use Previous Next to highlight the System info option 3 Press OK Set butto...

Страница 38: ...is connected the camera memory and any installed SD card displays as Mass Storage in Windows Explorer Files can be dragged and dropped in the same way as an ordinary disk Web camera You will need to i...

Страница 39: ...ctions More information about Presto Video Works 6 can be found in the help files when the application is started Presto Mr Photo 3 Presto Mr Photo 3 is an advanced photo editing software application...

Страница 40: ...solution 1280 x 960 2048 x 1536 2560 x 1920 4032 x 3024 firmware interpolation Movie clips AVI Motion JPEG sound available Movie 320 x 240 max 15fps or 640 x 480 max 8fps PC cam 320 x 240 max 30fps or...

Страница 41: ...rrectly The power does not come on The batteries are exhausted Replace with a new set of batteries The camera was left unattended and unused so the auto powers off cuts it off Turn the power back on T...

Страница 42: ...mera Format the memory card in this camera before its first use or when it was used other than this camera The auto power off function is activated Turn the power on again Even if I press the shutter...

Страница 43: ...y card is write protected Remove the write protection Cannot format a memory card End of memory card life Load a new memory card Other Problems Symptom Cause Measure Cannot load the memory card The ca...

Страница 44: ...English 44 Symptom Cause Measure The USB driver is not installed for Windows 98 98SE Install USB driver...

Отзывы: