background image

4

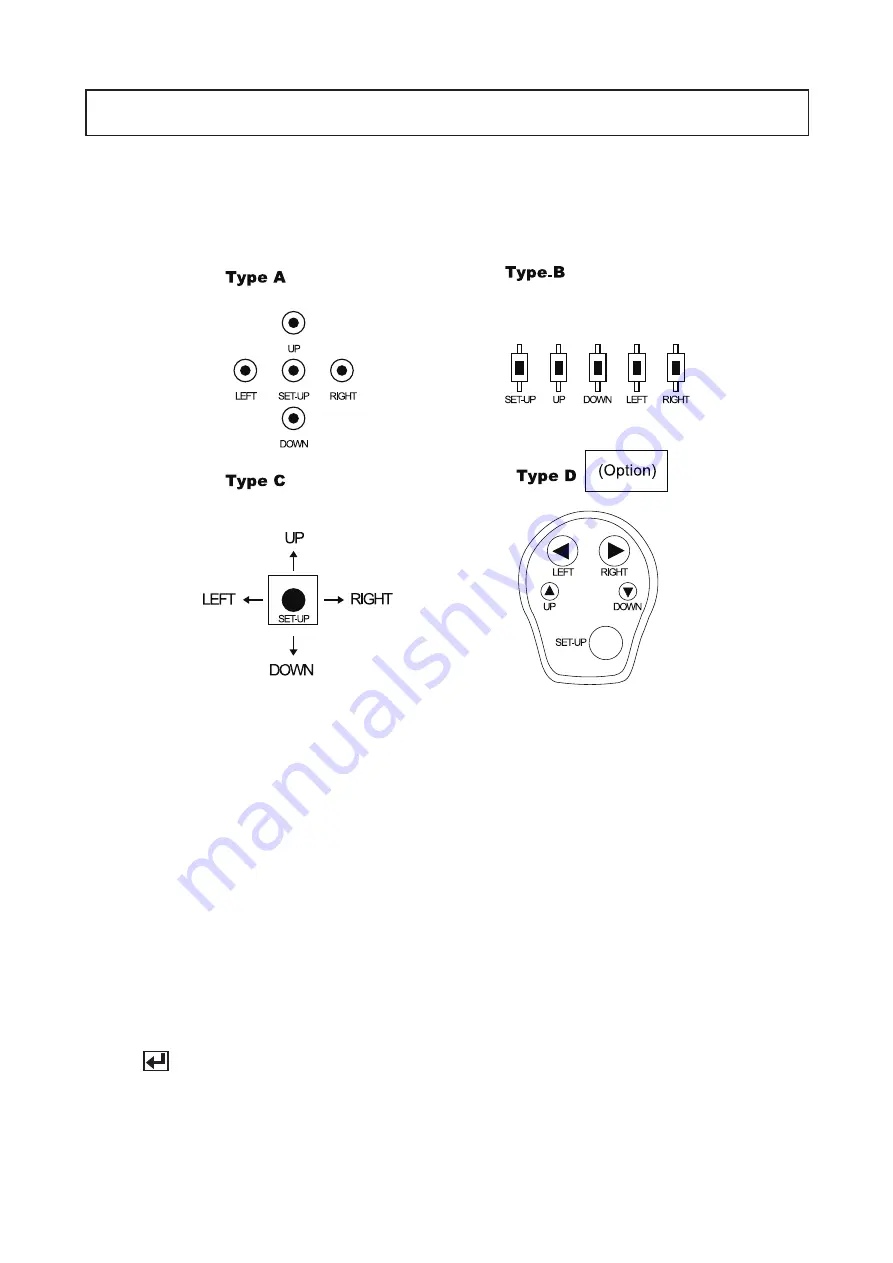
OSD Control Button

1.  Type A, Type B, Type C of OSD button could be used when it needs to 

OSD control.

2. Type D is extra Option (wired Remote controller)

 Up button: Moves the cursor upwards. Use this button to select an item   

    or adjust the parameters.

 Down button: Moves the cursor downwards. Use this button to select an 

    item or adjust the parameters.

 Left button: Moves the cursor to the left. Use this button to select or  

    adjust the parameters of the selected item. The parameter changes 

    each time this button is pressed.

 Right button: Moves the cursor to the right. Use this button to select or 

    adjust the parameters of the selected item. The parameter changes each

    time this button is pressed.

 Set button: Executes selections and displays a submenu for an item with  

   the       mark.

Содержание ZD2812IR

Страница 1: ...ULTRA HIGH RESOLUTION NIGHTVISION CAMERA with 3D DNR ZD2812IR USER MANUAL ...

Страница 2: ...rt the user to the presence of important operating and maintenance servicing instructions in the literature accompanying the appliance INFORMATION This equipment has been tested and found to comply with limits for a Class A digital device pursuant to part 15 of the FCC Rules CE Rules These limits are designed to provide reasonable protection against harmful interference when the equipment is opera...

Страница 3: ...ecially careful to provide ventilation when operating under high temperatures This is one of the most important parts of the camera Be careful not to leave fingerprints on the lens cover Do not install or use the camera in an environment where the humidity is high It can cause malfunctions to occur If exposed to radioactivity the CCD will fail Severe lighting change or flicker can cause the camera...

Страница 4: ...ice TV System Total Pixels Effective Pixels Scanning Frequency Scanning System Synchronisation Resolution Minimum Illumination S N Ratio Video Output Electronic Shutter Speed OSD SSDR BLC Day Night Gain Control White Balance SENS UP Motion Detection Privacy Masking SSNR III Digital Noise Reduction Digital Zoom DIS Digital Image Stabilizadion Sharpness Filp Mirror Power Supply Power Consumption Len...

Страница 5: ...V DualVoltage Connect Video Power Line 12V DC 24V AC Regulated Power Position the camera for the correct angle of view Loosen the locking screws and focus the camera Re tighten the locking screws Settings can be made using the OSD button located in the body housing OSD Control Board 1 LENS 2 EXPOSURE 3 WHITE BAL 4 SSNR 5 BACKLIGHT 6 DNR3 7 DAY NIGHT 8 SPECIAL 9 EXIT MAIN SETUP DC ATW OFF OFF ON AU...

Страница 6: ...Control Button Camera Menu Set Up 1 Menu Set Up 2 Lens Setting 3 Exposure Setting 4 White Balance Setting 5 SSNR Setting 6 Backlight Setting 7 DNR3 Setting 8 Day Night Setting 9 Special Setting 10 Exit Setting Trouble Shooting 1 2 3 4 5 5 5 6 7 8 9 10 11 12 17 18 ...

Страница 7: ...Always disconnect the power by removing the plug from the power socket lf the camera emits a burning smell immediately disconnect it from the power source and report the problem to your distributor Cautions When Install Only apply power after installation of the product Do not install the camera in a position facing directly at a strong light source Do not install or use the camera in areas of hig...

Страница 8: ...time conditions The COLOUR mode operates in daytime conditions to provide optimum colours and BW mode operates in night time conditions to enhance the definition of the image SSNR For images with high contrast between bright and dark Areas from difficult lighting conditions such as backlighting this camera selectively illuminates darker Areas while retaining the same light level for brighter Areas...

Страница 9: ...rds Use this button to select an item or adjust the parameters Left button Moves the cursor to the left Use this button to select or adjust the parameters of the selected item The parameter changes each time this button is pressed Right button Moves the cursor to the right Use this button to select or adjust the parameters of the selected item The parameter changes each time this button is pressed...

Страница 10: ...maximum value of ESC shutter mode 2 Select a desired function using the Function Setup switch Place the cursor over a desired item 3 Set up a selected item by using the Function Setup switch 4 To finish the setting select EXIT and press the Function Setup switch MAIN SETUP MAIN SETUP 1 LENS 2 EXPOSURE 3 WHITE BAL 4 SSNR 5 BACKLIGHT 6 DNR3 7 DAY NIGHT 8 SPECIAL 9 EXIT 1 LENS 2 EXPOSURE 3 WHITE BAL ...

Страница 11: ...lect a desired mode using the Function Setup switch SHUTTER You can select either auto or manual shutter Shutter speed is fixed at 1 60sec 1 50sec ESC Select this to control the shutter speed automatically If ESC is selected the shutter speed is automatically controlled depending on the ambient illumination of the subject MANUAL You can control shutter speed manually NTSC MODEL 1 60 1 120 000 PAL ...

Страница 12: ...d return to the SETUP menu NOTE If you press the Function Setup switch to AUTO mode you can adjust brightness by increasing or decreasing the shutter speed x2 x512 Note that the higher the zoom level the brighter the screen but the more likely there will be a ghosting effect It is normal for Noise Spots and Whitish symptoms to appear in SENS UP mode when the D ZOOM level is increased White Balance...

Страница 13: ...just it NOTE White Balance may not work properly under the following conditions In this case select the AWC mode When the colour temperature of the environment surrounding the subject is out of the control range e g clear sky or sunset When the ambient illumination of the subject is dim If the camera is directed towards a fluorescent light or is installed in a place where illumination changes dram...

Страница 14: ...sation If the scene contains extremely bright light areas such as from car headlights the light can mask out much of the on screen detail LEVEL Adjust level of the HLC function LIMIT Enable to change the operating condition MASK COLOR TONE Change the colour transparency of the masking area Black Red Blue Cyan Magenta TOP BOTTOM LEFT RIGHT Adjust the area to be enhanced OFF Not being used 2 Select ...

Страница 15: ...ize in NIGHT ONLY mode The HLC is not activated in day light or when bright light is not present at night in NIGHT ONLY mode BLC Function doesn t work in the B W mode of the DAY NIGHT menu DNR3 Setting This function reduces the background noise in a low luminance environment 1 When the SETUP menu screen is displayed select DNR3 by using the Function Setup switch so that the arrow indicates DNR3 2 ...

Страница 16: ...splay pictures in colour or black and white 1 When the SETUP menu screen is displayed select DAY NIGHT by using the Function Setup switch so that the arrow indicates DAY NIGHT MAIN SETUP 1 LENS 2 EXPOSURE 3 WHITE BAL 4 SSNR 5 BACKLIGHT 6 DNR3 7 DAY NIGHT 8 SPECIAL 9 EXIT DC ATW OFF OFF ON AUTO SAVE 2 Select a desired mode using the Function Setup Switch according to the picture display you want CO...

Страница 17: ...7s 10s 15s 20s 30s 40 60s The day night switching point of the camera can be adjusted FAST SLOW COLOR B W 2 5 lux 1 lux B W COLOR 5 lux 10 lux AUTO SETUP 1 BURST MODE 2 COLOR B W DURATION DWELL TIME 3 B W COLOR DURATION DWELL TIME 4 RETURN ON FAST 3SEC FAST 10SEC NOTE When AGC in the EXPOSURE menu is set to OFF AUTO mode cannot be selected Special Setting 1 When the SETUP menu screen is displayed ...

Страница 18: ...this value the picture outline becomes stronger and clearer Adjust this value appropriately depending on the sharpness of the picture MONITOR Please change the settings value of video appropriate to your monitor LCD Please select this menu item when using a LCD monitor CRT Please select this menu item when using a CRT monitor USER Please use this menu item when using a monitor other than standard ...

Страница 19: ...he SPECIAL menu screen is displayed use the Function Setup switch so that the arrow indicates CAM TITLE 2 Set it to ON by using the Function Setup switch 3 Press the Function Setup switch 4 Use the Function Setup switch to move to a desired letter and select the letter by pressing the Function Setup switch Repeat this to enter multiple letters You can enter up to 15 letters 5 Enter a title move th...

Страница 20: ...ognize even small movement AREA MODE Determines whether to use the MD area selected in SENSITIVITY SEL POS Determines which of the 4 vertices of each MD area is to be used XPOS Determines the coordinate of the horizontal axis for SEL POS YPOS Determines the coordinate of the vertical axis for SEL POS FILL SET Fills in a selected MD area The colour of the area can be selected from brown orange blue...

Страница 21: ...en controlling the camera through an external control device 1 When the SPECIAL menu screen is displayed press the Function Setup switch so that the arrow indicates COMM ADJ 2 Set up the mode using the Function Setup witch CAM ID Determines the camera s identification number between 0 and 255 BAUD RATE You can select 2400 4800 9600 19200 38400 57600 bps UART MODE You can select NONE EVEN or ODD fo...

Страница 22: ... the MAIN SETUP menu Exit Setting Select a desired EXIT mode using the Function Setup Switch SAVE Save the current settings and exit the MAIN SETUP menu NOT SAVE Do not save the current settings and exit the MAIN SETUP menu RESET Resets the camera settings to the factory defaults Language Communication and Monitor Settings are not initialized ...

Страница 23: ... set to ON in the menu Has MD AREA been properly defined Check that the AGC setting in the EXPOSURE menu is t set to OFF Check the EXPOSURE menu and make sure SHUTTER is set to Make sure that the camera isn t facing direct sunlight or fluorescent lighting If necessary change the camera position Check the settings in WHITE BALANCE menu Check the camera is correctly connected to an appropriate regul...

Страница 24: ...19 MEMO ...

Страница 25: ...20 MEMO ...

Страница 26: ...21 MEMO ...

Страница 27: ...22 MEMO ...

Страница 28: ...Edition GN JANUARY 2012 ...

Отзывы: