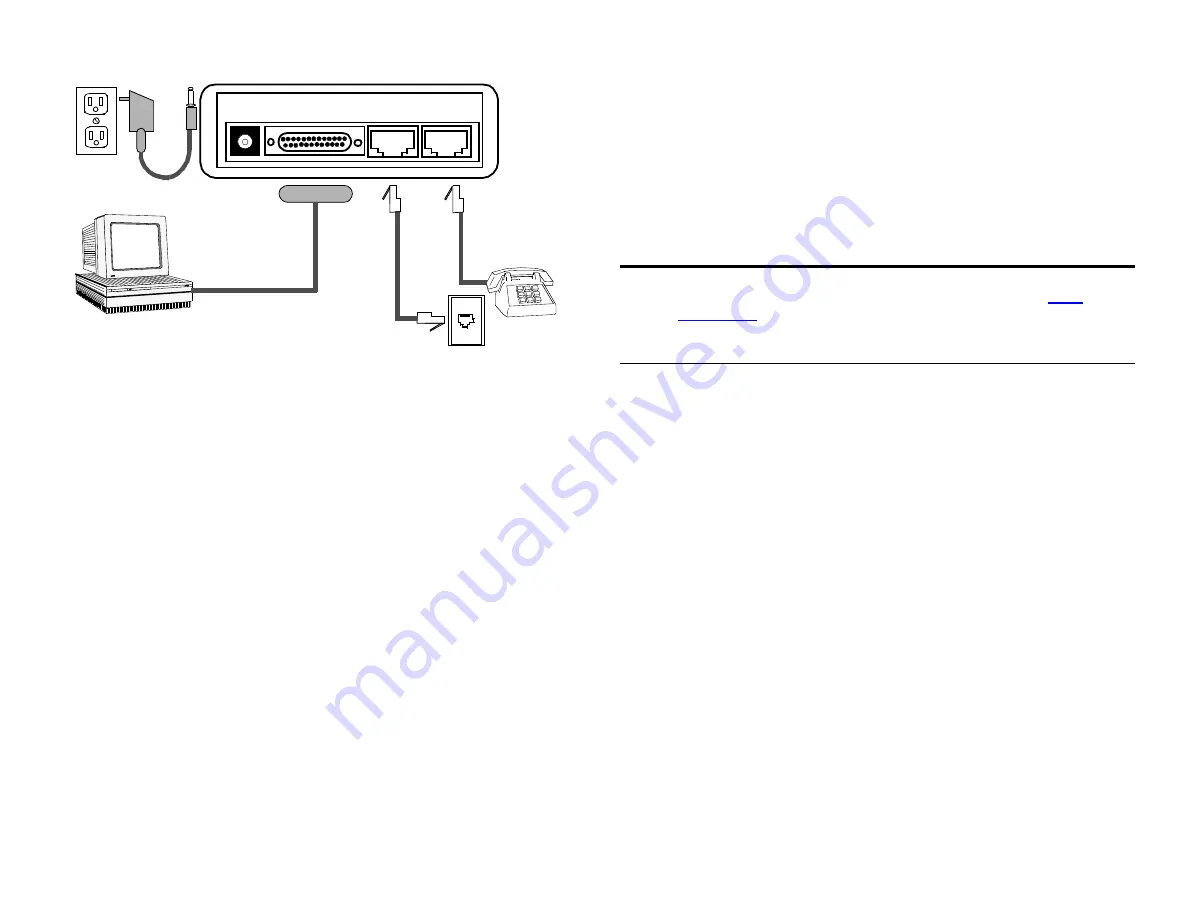
1 Make Connections
(Refer to illustration)
PC Users:
1. Look for serial ports, usually marked
SERIAL 1 (A)
and
SERIAL 2 (B)
,
or
COM1
and
COM2
, on the back of your computer. Connect the modem using
the 25-pin (male)-to-25-pin/9-pin (female) cable provided.
2. Remember which port you select; the system may ask you for the port number
during software installation.
Macintosh Users:
Use a standard Mac hardware-controlled modem cable (not included). Note: If you use a
Mac Hayes-compatible cable, you must choose Xon/Xoff flow control for the software
selection and add the
\Q1
command to the software modem initialization string.
Connect Quester II to Outside Phone Line
1. Unplug your phone from the wall jack and connect it to the opening marked
PHONE
on the back of Quester II.
2. Connect the standard phone cable to the opening marked
Line
on the
back of Quester III; connect the other end to the wall jack.
Connect Quester III to Power Supply
1. Connect the power supply cord to the
POWER
jack on the back of Quester III
and then plug the power cord into a standard electrical outlet.
2. Place Quester III in a convenient location near the PC with the LED indicators
visible.
3. Turn the Quester III power switch
ON
and power up the PC. Your hardware
installation is now complete.
2 Modem Installation for Windows 95 , 98, or NT 4.0 OS
Make sure modem is connected to your PC and powered on, then power up your PC. Once
your PC has booted up, make the following series of selections:
Start -> Settings -> Control Panel -> Modems -> Add
In the resulting Install New Modem window, check the box labeled “Don’t detect my
modem: I will select it from a list”, then click “Next”. Click “Have Disk” on the next
screen. Insert the disk into the A drive and click “OK” on the Install From Disk screen.
Click on Next when the Install New Modem screen displays the INF file name General
DataComm QUESTER III V.90. Select the port to use with the modem and click “Next”.
(A “Location Information” screen may come up; if it does answer its questions and click
“Next”.) When the screen displays “Your modem has been set up successfully”, click on
“Finish”. The Modem Properties screen now shows the new INF as one of the modems set
up on the computer; highlight it, click “Properties”, and set the appropriate DTE speed.
Click “Close” on the Modem Properties screen.
3 Modem Installation for DOS
Some Communications Software can auto detect the modem during installation. If soft-
ware does not detect the Quester III modem automatically, use manual selection and select
one of the following types: GDCV.34, Quester, DeskTop V.F28.8, GDC V.42, Standard
28.8 modem, AT Compatible, or Hayes Compatible. Alternatively, you can modify the ini-
tialization string.
The most common Modem Initialization string is:
AT &F &C1 &D2 \Q3 \V0 S0=0
which configures the modem for Real Carrier Detect, drop DTR to hang up, rts/cts flow-
control, connect message =vf speed and protocol, auto answer off.
4 Initialization Commands
Back of Quester IIII
Terminal
Power
Phone
Line
Computer
Be sure your computer is turned off before you plug anything into it.
NOTE:
The latest General DataComm modem INF file (Q3V90D.inf) and readme file
(read_inf.txt) for Windows can be obtained from GDC’s web site
http://
www.gdc.com
(Service & Support, Modem/DSU Support, V.90 Modems), or by
calling General DataComm and requesting P/N 080U040-302A driver disk.
Also the latest Flash code and download tool is available from the web site.
AT&F&W
Returns modem to the factory default settings and saves.
ATDT*70
AT&C0
AT&D2
AT%C0
AT\N0 or \N1
Turns off call waiting. In some areas, you’ll need to use
ATDT1170 instead. Check with your local phone company.
Carrier indication is forced ON.
DTR must be ON to answer and loss of DTR forces a disconnect.
Turns off data compression.
Turns off error correction and data compression.
AT\Q1
AT\Q3
AT S0 = 0
AT S0 = 1
Selects Xon\Xoff flow control.
Selects RTS/CTS (hardware) flow control (recommended setting).
Auto Answer turned off.
Auto Answer turned on (default).
For a complete listing of AT commands, consult Quester III Technical Reference Guide.


