SXBlue GPS Reference Manual
13
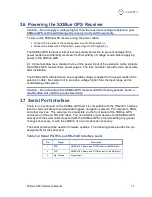
3.6 Powering the SXBlue GPS Receiver
Caution – Do not apply a voltage higher than the maximum voltage labeled on your
SXBlue GPS as this will damage the receiver and void the warranty
To turn on the SXBlue GPS receiver using the power cable:
•
Connect the red wire of the cable’s power input to DC positive (+).
•
Connect the black wire of the cable’s power input to DC negative (-).
The SXBlue GPS features minimal reverse polarity protection to prevent damage if the
power leads are accidentally reversed. Confirm polarity of voltage source before applying
power to the SXBlue GPS.
A 1.0 Amp fast-blow fuse, situated in-line of the power input of the extension cable, protects
the SXBlue GPS receiver from power surges. The fuse container should remain accessible
after installation.
The SXBlue GPS will start when an acceptable voltage is applied to the power leads of the
extension cable. Be careful not to provide a voltage higher than the input range as this
could damage the system.
Caution – Do not operate the SXBlue GPS receiver with the fuse bypassed. Such a
modification will void the product warranty.
3.7 Serial Port Interface
There is one serial port on the SXBlue GPS and it is compatible with the RS-232C interface
level to communicate with external data loggers, navigation systems, PC computers, PDAs
and other devices. This serial port is accessible via the front panel of the SXBlue GPS
enclosure and has an ‘RS-232’ label. You can interface most devices to the SXBlue GPS
directly with the serial cable (supplied with the SXBlue GPS), accommodating any gender
changes necessary, or with the addition of a null modem as necessary.
The serial port should be used for firmware updates. The following table provides the pin
assignments for the serial port.
Table 3-2 Serial Port Pin-out, RS-232C Interface Level
Pin
Signal
Description
1
RXD
NMEA 0183, binary, and RTCM input for the MAIN port
2
TXD
NMEA 0183, binary, and RTCM output for the MAIN port
3
Sig. Ground
Signal return

