background image

25

TRACK TIME

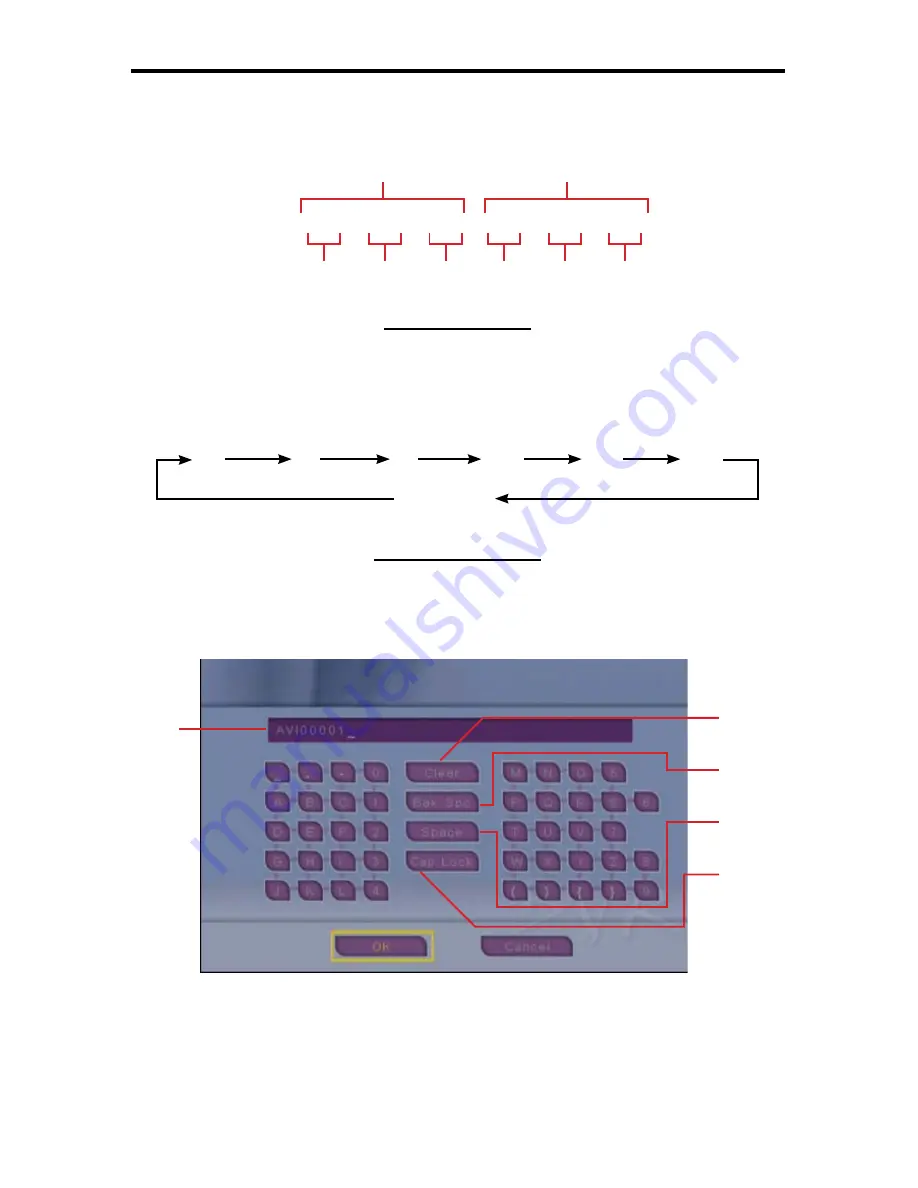
This displays the current track’s playback position in time and the track’s 
total playback time. The time format is as follows:

0 0 : 0 0 : 0 0 / 0 0 : 0 0 : 0 0

ZOOM FUNCTION

The 

Zoom 

button can be used to focus in or out of a movie during playback. To 

zoom into the movie, press the 

Zoom 

button on the IR remote control during 

playback or when the movie is paused. The zoom multiplier follows the order 
below:

RENAMING MOVIES

Movies can be renamed using the on-screen keyboard. From the 

Movie Menu

select the 

fi

 le that you wish to rename and press the 

Rename 

button on the IR 

remote control. The on-screen keyboard (4A-8) will appear.

 4A-8

NAME FIELD

The current name should be indicated here. When characters are selected 
they will be displayed in this 

fi

 eld.

OPERATING THE GEFEN TV SD PVR

Hours Minutes Seconds Hours Minutes

Seconds

Current Time

Total Time

2x

3x

4x

1/2x

1/3x

1/4x

Zoom Off

1

2

3

4

5

Содержание GTV-SD-PVR

Страница 1: ...SD Personal Video Recorder User Manual www gefentv com GTV SD PVR...

Страница 2: ...00 Nordhoff St Chatsworth CA 91311 www gefentv com support gefentv com Notice Gefen Inc reserves the right to make changes in the hardware packaging and any accompanying documentation without prior wr...

Страница 3: ...e Gefen TV SD PVR GUI Navigation 10 Operating The Gefen TV SD PVR Initial Setup 14 Operating The Gefen TV SD PVR Watching A Live Source 16 Operating The Gefen TV SD PVR Recording A Source 18 Operating...

Страница 4: ...ity and portability of digital recordings in a way not previously possible You won t miss the action any more with the Gefen SD PVR With a touch of the IR Remote you ll be able to instantly begin reco...

Страница 5: ...ed file systems include FAT FAT16 and FAT32 NTFS hard drives are not supported Supported file formats are AVI MPG DIVX MP3 WMA JPG GIF BMP The Gefen TV SD PVR will not record Macrovision protected con...

Страница 6: ...to locate audio video files automatically Playback of externally imported videos music pictures 3 different quality settings for storage compression Friendly graphical interface for controlling settin...

Страница 7: ...4 Front Panel Back Panel 7 16 17 19 8 2 1 11 12 3 4 5 6 9 10 13 18 15 14 PANEL LAYOUT...

Страница 8: ...This remote must have a clear line of sight path to the IR receiver Obstructions in front of the IR receiver will prevent operation from the remote control USB A INPUT PORT 8 This port will accept a...

Страница 9: ...tereo analog audio input for composite video COMPOSITE VIDEO OUTPUT 16 480i and 576i composite video output S VIDEO OUTPUT 17 480i and 576i s video output COMPONENT VIDEO OUTPUT 18 480i and 576i compo...

Страница 10: ...te s video or component to 3 the display using user supplied video cables Connect the Gefen TV SD PVR audio output to the display s audio input 4 using a user supplied analog stereo L R RCA cable Conn...

Страница 11: ...posite input S VIDEO Switches to the s video input QUALITY Switches the recording quality see page 18 ROT Rotates an image 90 counter clockwise when viewing pictures DELETE Deletes the currently selec...

Страница 12: ...playback of content PLAY Begins playing the currently selected item Resumes playback when recording slide show or music is paused FAST FWD Fast forward during playback of content STEP REW Rewind playb...

Страница 13: ...The Home Screen 1 4 will display once a valid USB device is connected and detected This is the main screen from which all of the recorded and stored movies pictures and music can be accessed Access to...

Страница 14: ...eature INITIAL FORMAT To initially prepare the unit for use it is recommended that the currently connected USB media be formatted by the Gefen TV SD PVR Please follow the steps below to format the USB...

Страница 15: ...the 3 Format option 1 9 in the Format window 1 10 and press OK 1 10 The 4 HD Utility window 1 11 will appear and ask for confirmation to begin formatting Select the YES option and press OK to start f...

Страница 16: ...tting process will be complete when the status bar reads 100 1 13 1 12 1 13 Once the formatting process is finished 1 14 press any button on the 6 remote to return to the Format window 1 15 Press the...

Страница 17: ...urce is not detected on any of the inputs the unit will return to USB Mode To manually select a specific input press the corresponding input button on the included IR remote REMOTE BUTTON INPUT COMP C...

Страница 18: ...This will always be listed as USB CURRENT INPUT 2 This icon will identify which current input is selected Displayed Source YUV Component AV Composite S Video S Video RECORDING QUALITY 3 This icon will...

Страница 19: ...ON 3 SELECTING A LIVE VIDEO SOURCE TO RECORD Refer to Section 2 starting on page 14 for instructions on how to view a live source In example 3 1 the component source is selected with the Information D...

Страница 20: ...CORDING MEDIUM 2 This indicates what type of recording device is connected This will always be listed as USB RECORDING FILE TYPE 3 This indicates what type of file format is being used for the recordi...

Страница 21: ...B Mode Please see section 4 starting on page19 for information on how to access and manage the recordings RECORDING QUALITY OPTIONS There are 3 Recording Quality modes to choose from Please refer to t...

Страница 22: ...e IR remote control This mode is also the default mode that is displayed whenever the unit is powered on You access the Movie Music and Photo sections directly by pressing their corresponding keys on...

Страница 23: ...t DIRECTORY 4 All directories on the connected USB media device that contain valid movie files will be listed here Pressing the OK button on the IR remote control when this item is selected will displ...

Страница 24: ...gate up and down this menu to select your desired directory The files are listed in the following format 0 0 0 XXXXXXXX XXX 0 0 0 0 12 00 If there are more than 11 total movie files in the selected di...

Страница 25: ...ft hand corner of the screen to indicate which command was used STOP Stops the current movie playback and returns to the Movie Menu REWIND Rewind during playback of movie content The movie rewinds in...

Страница 26: ...in the selected directory sequentially and only once The Repeat Mode is only accessible when in the Movie Menu Press the Repeat button on the IR remote control to bring up the Repeat Mode menu 4A 6 4A...

Страница 27: ...device is connected This will always be listed as USB TRACK 2 This indicates that currently a track is playing TRACK NUMBER 3 This shows the track number of the currently playing movie file The format...

Страница 28: ...he movie is paused The zoom multiplier follows the order below RENAMING MOVIES Movies can be renamed using the on screen keyboard From the Movie Menu select the file that you wish to rename and press...

Страница 29: ...3 This key will delete the previous character SPACE KEY 4 This key will add a space in the Name Field CAPS LOCK KEY 5 This key will toggle between lowercase and uppercase letters By default all keys w...

Страница 30: ...ayback position in time and the track s total playback time The time format is as follows 0 0 0 0 0 0 0 0 0 0 0 0 ARTIS 3 T Artist information is displayed here if available ALBUM 4 Album information...

Страница 31: ...p Rew buttons on the IR remote control to navigate forwards and backwards through full pages of directories 4B 4 The naming structure for directories are limited to eight alpha numeric characters Spac...

Страница 32: ...ension Recording date and time will still be listed PLAYING A MUSIC TRACK From the Music Menu 4A 5 select your desired movie and press the OK or Play button on the IR remote control to begin music pla...

Страница 33: ...he Repeat Mode is only accessible when in the Music Menu Press the Repeat button on the IR remote control to bring up the Repeat Mode menu 4A 6 4A 6 SEQ PLAY Sequential playback of all music tracks in...

Страница 34: ...ld BACK SPACE KEY 3 This key will delete the previous character SPACE KEY 4 This key will add a space in the Name Field CAPS LOCK KEY 5 This key will toggle between lowercase and uppercase letters By...

Страница 35: ...IR remote control The only exception is when the user is in the System Menu PHOTO MENU From the Home Screen 4C 1 in USB Mode navigate to the Photo Menu 4C 2 listing and press the OK button 4C 1 PHOTO...

Страница 36: ...s 4C 4 Using the IR remote control you can navigate up and down this menu to select your desired directory If there are more than 9 total directories with valid photo files you can either manually scr...

Страница 37: ...xtension Files with long names that exceed the viewable area will be shown without a extension Recording date and time will still be listed PLAYING A PHOTO From the Photo Menu 4C 5 select your desired...

Страница 38: ...the next photo in the current directory Pressing this button while the slide show is paused will advance to the next photo and automatically pause it LEFT DIRECTIONAL BUTTON Progress to the previous...

Страница 39: ...ng has been changed will execute whichever Repeat Mode was selected The Repeat Mode will remain until changed PHOTO INFORMATION DISPLAY PANEL Pressing the Display button on the IR remote while playing...

Страница 40: ...paused The zoom multiplier follows the order below RENAMING PHOTOS Movies can be renamed using the on screen keyboard From the Photo Menu select the file that you wish to rename and press the Rename b...

Страница 41: ...in the uppercase form Using the Directional buttons on the IR remote control select the key you wish to use and press the OK button to use it Once the desired name has been entered navigate to the OK...

Страница 42: ...d via the System Menu SYSTEM MENU From the Home Screen 5 1 in USB Mode navigate to the System Menu 5 2 listing and press the OK button 5 1 The System Menu 5 3 is where all setup and format options are...

Страница 43: ...p Menu is separated into two main categories The System and A V Set sections The sections have the following configuration options SYSTEM A V SETUP TV System Screen Saver System Language Time Format S...

Страница 44: ...tions Highlight a menu option and press the OK button to confirm a menu item change Currently set menu options are marked with a yellow asterisk TV SYSTEM This will change the TV output standard OPTIO...

Страница 45: ...s and labels OPTIONS ENGLISH Default CHINESE DUTCH SPANISH FRENCH AND PORTUGESE TIME FORMAT This will change the way that the date and time appear in all menu systems OPTIONS M_D_Y_12 Default M_D_Y_24...

Страница 46: ...system menus OPTIONS Use the and Directional buttons to move between fields and the and buttons to change the values SET TIME This will set the time that is shown on all system menus OPTIONS Use the a...

Страница 47: ...will reset all system options to their default factory settings OPTIONS Use the OK button on the IR remote control to initiate a factory reset VIDEO OUTPUT This will set the output to either YCbCr or...

Страница 48: ...TYPE This will set the output video format OPTIONS PS 4 3 LB 4 3 16 9 NOTE PS Pan And Scan LB Letterbox BRIGHTNESS This will adjust the brightness of the video output OPTIONS Press the OK button to b...

Страница 49: ...46 OPERATING THE GEFEN TV SD PVR Use the and buttons on the IR remote control to change the brightness level Default brightness level is set to 6...

Страница 50: ...p p TTL Single Link Range 480i and 576i Input Connectors Composite TV S Video Component Output Connectors Composite TV S Video Component Audio Connections Analog L R input and output Remote Control In...

Страница 51: ...Buyer This warranty is in lieu of all other warranties expressed or implied including without limitation any implied warranty or merchantability or fitness for any particular purpose all of which are...

Отзывы: