Gefen EXT-VGAAUD-444 Скачать руководство пользователя страница 11

8

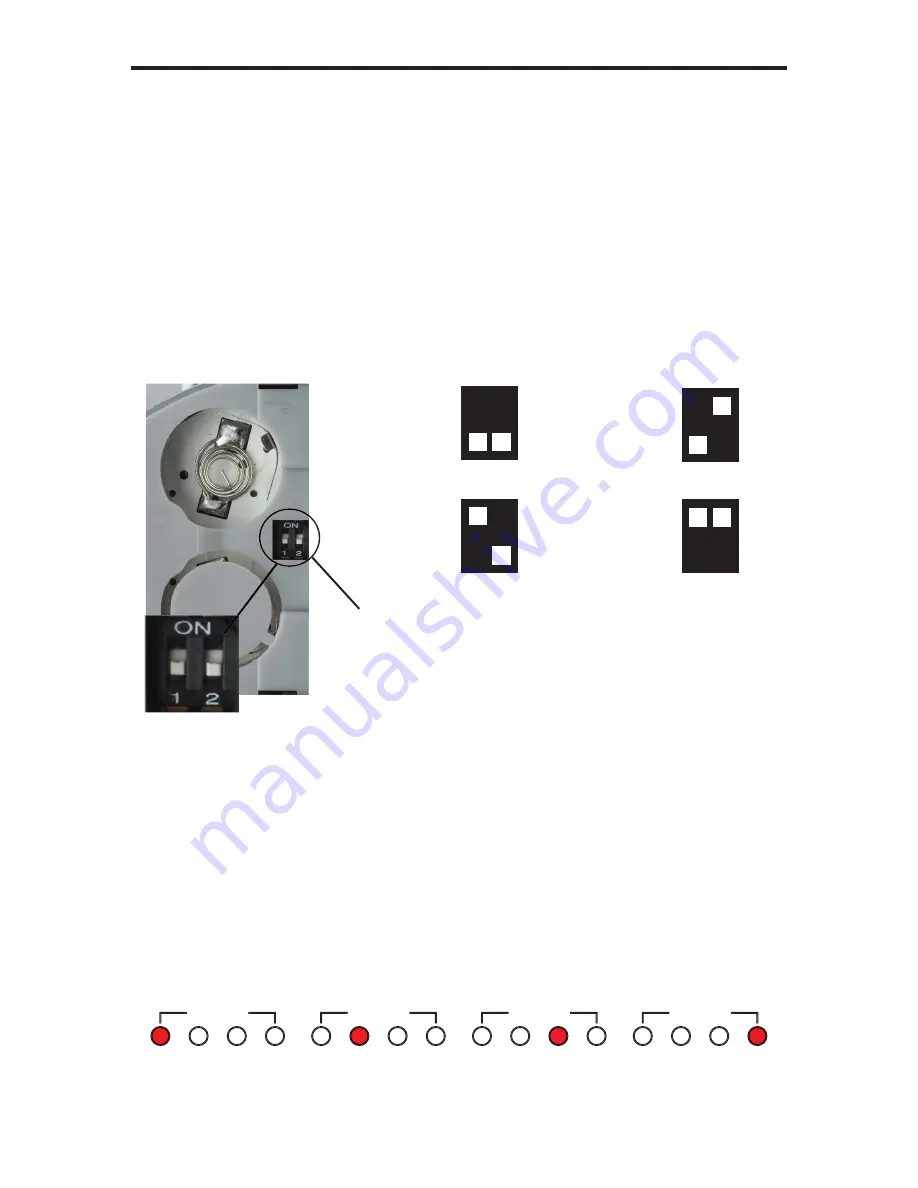
Channel 1:

Default

1     2

Channel 3:

1     2

Channel 2:

1     2

Channel 4:

1     2

Output-1

1

Channel 1

2

3

4

Output-1

1

Channel 2

2

3

4

Output-1

1

Channel 3

2

3

4

Output-1

1

Channel 4

2

3

4

Follow these steps to place the 4x4 VGA Matrix into IR channel setup mode.

1.  Turn on the 4x4 VGA Matrix.

2.  Press and hold the front panel POWER button for 5 seconds to enter the 

setup mode (All output LED’s except for Output 1 will be off). The Output 1 
LED source indicator (page 4) will display the currently selected IR channel. 
The active LED, either 1, 2, 3, or 4, will indicate the IR channel being used. 

3.  Note the IR channel used on the RMT-16IR remote and press the Output 1 

selector button to cycle to the IR channel that is being used.

4.  Press the POWER button to save settings and exit IR channel setup mode.

Left: 

Close-up picture of the opened rear battery 

compartment of the RMT-16IR remote showing 
the exposed DIP Switch bank between the battery 
chambers.

How to Resolve IR Code Confl icts

In the event that IR commands from other remote controls confl ict with the 
supplied RMT-16IR remote control, changing the remote channel will alleviate 
this issue. The RMT-16IR remote control has a bank of DIP (Dual Inline Package) 
switches (see page 7) for confi guring the remote channel that both units use to 
communicate. The 4x4 VGA Matrix can be put into a mode that will uses its front 
LED array to indicate which remote channel is being used and also give the user 
the ability to modify the currently used IR remote channel. These IR channel 
settings must exactly match each other for proper operation. 

The DIP Switch bank on the RMT-16IR is located underneath the battery cover 
as shown on page 7.

4X4 VGA MATRIX REMOTE INSTALLATION

Содержание EXT-VGAAUD-444

Страница 1: ...www gefen com 4x4 VGA Matrix EXT VGAAUD 444 User s Manual...

Страница 2: ...o Gefen LLC c o Customer Service 20600 Nordhoff St Chatsworth CA 91311 www gefen com support gefen com Notice Gefen LLC reserves the right to make changes in the hardware packaging and any accompanyin...

Страница 3: ...Panel Layout 5 Panel Descriptions 6 Connecting And Operating The 4x4 VGA Matrix 7 IR Remote Description 8 4x4 VGA Matrix Remote Installation 9 Using the IR Remote Control Unit 10 RS 232 Interface 11...

Страница 4: ...ty VGA and Analog Audio from any of four VGA audio sources to any of 4 VGA displays and audio devices The Gefen 4x4 VGA Matrix works with a wide variety of VGA sources such as computers security camer...

Страница 5: ...EDID to the source Standard VESA resolutions should be output by most computers without the need of an EDID If using a non VESA standard resolution or if EDID is needed an EDID storage and relay devic...

Страница 6: ...s high definition VGA up to 1920 x 1200 resolution at 60 Hz LED lights on the front panel show selected VGA routes RS 232 Control Includes discrete IR remote control Package Includes 1 Gefen 4x4 VGA M...

Страница 7: ...4 Front Panel Back Panel 24 25 22 26 23 21 20 6 7 8 9 10 11 PANEL LAYOUT 2 4 3 5 1 27 28 29 19 18 17 16 15 14 13 12...

Страница 8: ...l be routed to that output 12 15 Audio Output For Outputs 1 4 This 3 5mm mini jack analog stereo output will accept a single amplified audio device There are four outputs one for each VGA output 16 19...

Страница 9: ...mm mini jack stereo audio cables 5 Connect the included 24V DC power supply to the 4x4 VGA Matrix and an open wall power socket Routing Sources Using the Front Panel Buttons Each output on the 4x4 VGA...

Страница 10: ...Y one button at a time The indicator light on the remote will flash once each time you press a button WARNING Do not press multiple buttons simultaneously and do NOT press buttons rapidly The remote w...

Страница 11: ...s and exit IR channel setup mode Left Close up picture of the opened rear battery compartment of the RMT 16IR remote showing the exposed DIP Switch bank between the battery chambers How to Resolve IR...

Страница 12: ...d to In 7 to the monitor connected to Out 3 1 Press button 3 monitor 3 on the IR remote control unit 2 Press button 7 source 7 on the IR remote control unit The source connected to In 7 will be routed...

Страница 13: ...010 4 4 0011 0100 c 12 0110 0011 5 5 0011 0101 d 13 0110 0100 6 6 0011 0110 e 14 0110 0101 7 7 0011 0111 f 15 0110 0110 8 8 0011 1000 g 16 0110 0111 Additional Features ASCII Command X or x Power Off...

Страница 14: ...into a 1U rack mount space 1 Locate the side screws on the unit 2 Remove the front 2 screws that are located closest to the front of the unit 3 Using the removed screws screw the rack mounting bracke...

Страница 15: ...Range 15 70 KHz Vertical Frequency Range 30 170 Hz Video Connectors 8 x HD15 female 4 input 4 output Audio Connectors 8 x 3 5mm mini stereo jack female 4 input 4 output RS 232 Control Port 9 pin femal...

Страница 16: ...Proof of sale may be required in order to claim warranty 2 Customers outside the US are responsible for shipping charges to and from Gefen 3 Copper cables are limited to a 30 day warranty and cables...

Страница 17: ......

Страница 18: ......

Страница 19: ...Rev A5 Pb 20600 Nordhoff St Chatsworth CA 91311 1 800 545 6900 818 772 9100 fax 818 772 9120 www gefen com support gefen com This product uses UL listed power supplies...

Отзывы: